
If you’re wondering which trekking boots to take on the trail, you’ve come to the right place. In this article you’ll find out what to look for when buying them, which types of footwear work best in which weather, which models are versatile, and which do better in winter or in summer. Let’s get to it.
Which boots for which trail? The short answer
If you don’t have time to read the whole thing, here it is in a nutshell. In summer, on well-trodden trails in lower mountains, light trail shoes or ordinary running shoes will do, and on a trail you know well, even sandals. For rocky ground, a heavy rucksack or a weak ankle, mid-weight high boots are a better bet, the most versatile of the lot. In winter in the higher parts of the Tatras, above the mountain huts, you need proper high winter boots that take crampons, plus the crampons themselves, an ice axe and the skills to use them1.
| Where and when | Which boots | What to remember |
|---|---|---|
| Lower mountains in summer, well-trodden trail | light trail shoes or running shoes, on a familiar trail even trekking sandals | in sandals, small stones get annoying and your foot is poorly protected |
| Rocky trail, heavy rucksack, weak ankle | mid-weight high boots | break new boots in before the trip |
| Early spring and late autumn, when the trail may be icy | mid-weight high boots, with microspikes in your rucksack | light shoes without microspikes are no good on an icy trail |
| Easy trails in winter in lower mountains | mid-weight high boots with a thick sock, or high winter boots, plus microspikes | with a thick sock on, the boot must not pinch |
| Higher parts of the Tatras in winter | high winter boots that take crampons | try the crampons on your boots before the trip |
Mountain boots: low or high?
There are fierce debates about this, for example on the Polish Tatromaniak forum. At times the discussion gets quite heated, and the moderators have also removed a few of the more “colourful” posts.
According to the prevailing view, high boots protect your ankle better against sprains in the mountains. Is that true? Well, it looks as though the belief that high boots protect against ankle sprains is not strongly supported by research.
One Reddit user looked into the subject in some depth. He analysed more than a dozen medical studies on it and came to the following conclusion:
[…] high boots are no more effective at protecting the ankle from sprains than ordinary footwear, or the evidence for it is inconclusive […]
I haven’t been able to find any specific scientific studies showing that we sprain our ankles less often in high boots. Laboratory studies show only that a high-cut upper limits how far and how fast the foot can roll over2.
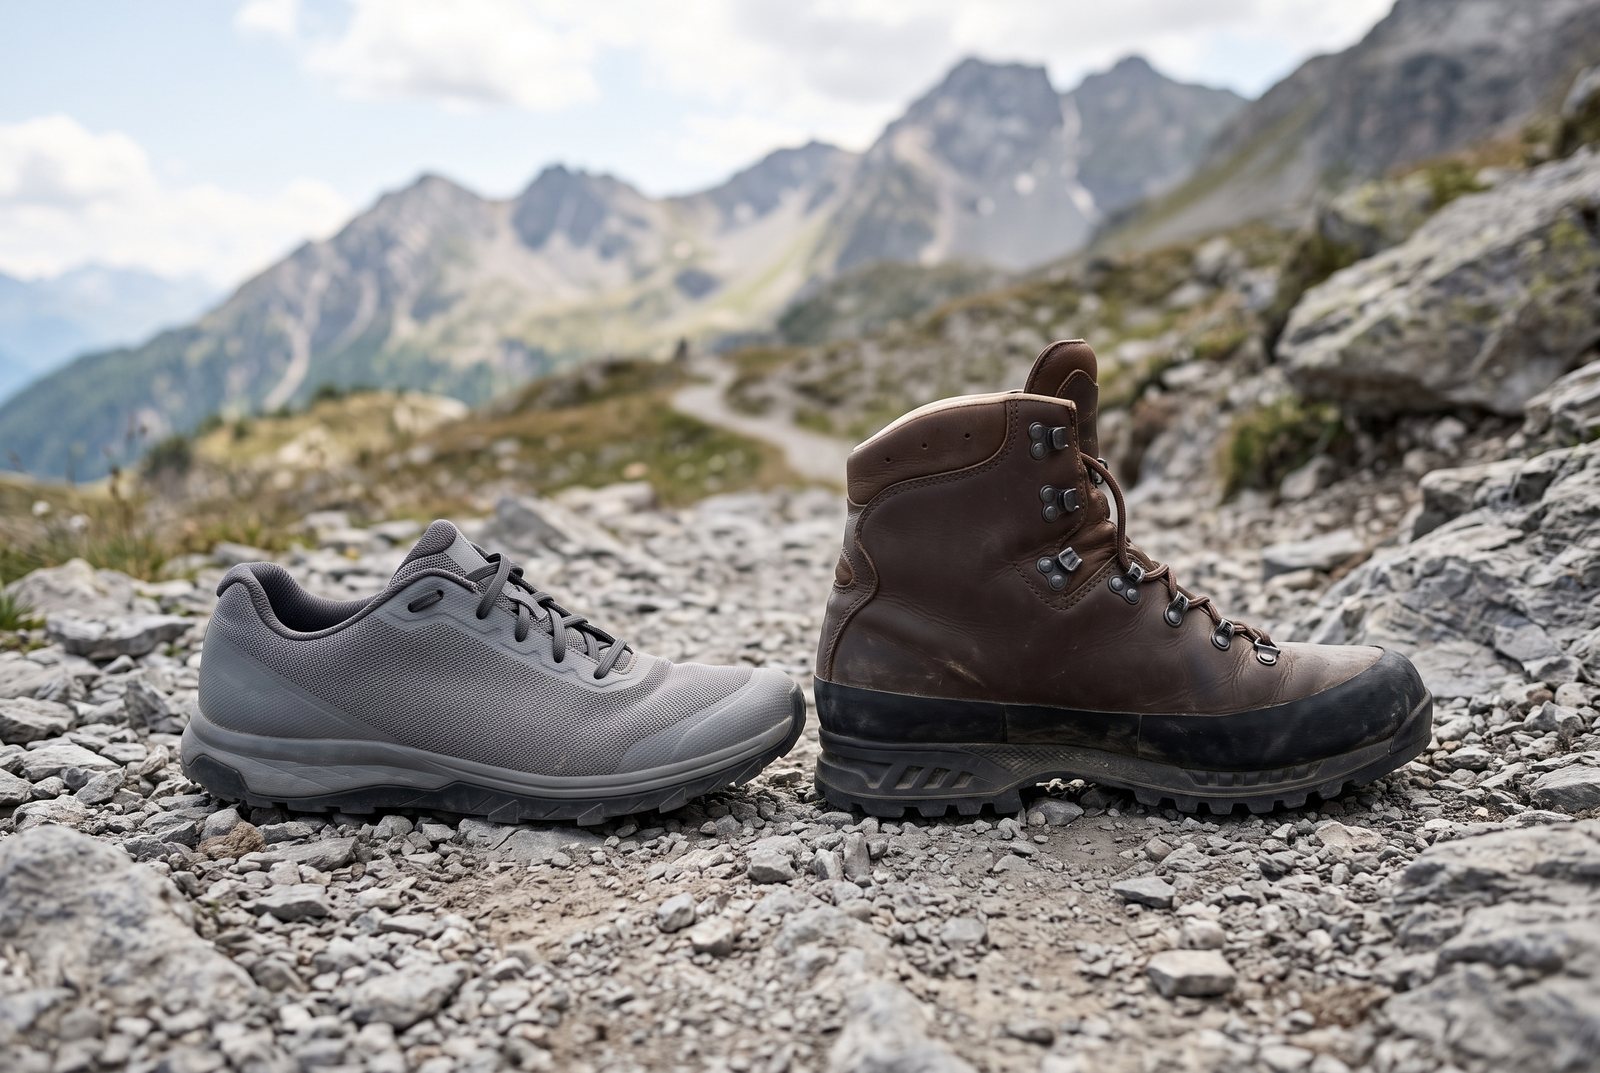
On top of that, the foot and ankle joint are built to move in several planes (bending up and down, and turning inwards and outwards), which helps absorb all kinds of stumbles and sudden twists. It’s the human body’s natural defence against injury, and each of us has had it wired into our brain since taking our very first steps.
So if we stiffen the ankle and take out this first line of defence, the next shock absorber in line is the knee, which is admittedly much “stronger” than the ankle, but also has a smaller range of movement and cushioning. In other words, even if we assume that high footwear protects our ankle, we have to reckon with a higher risk of knee injury at the same time (this is my own reasoning, not a research finding: in a large study of lace-up ankle braces in basketball players there were fewer ankle injuries3, and a review of studies on such braces shows no higher risk of knee injuries4).
Is that trade-off worth it in any way? In my opinion, it isn’t.
Even so, high boots still have their uses and in some conditions they’re irreplaceable (for example with a heavy rucksack, on rocky ground or when you have a weak ankle), as you’ll find out further on.
Boots with or without a membrane?
The answer to this question is complicated, and the simplest reply would be “it depends”. There are many kinds of membrane, and the most popular is Gore-Tex.
Boots with a membrane aren’t necessarily suitable for longer trips in the summer months, because Gore-Tex works best at lower temperatures.
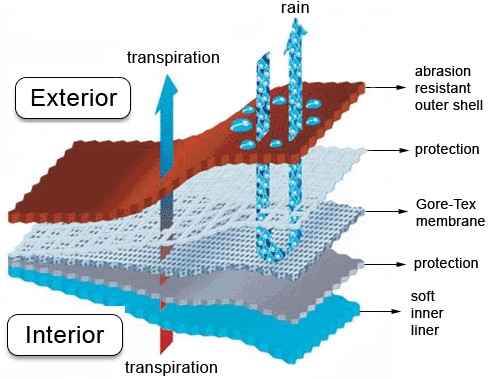
Every membrane works thanks to the difference in temperature and humidity between its two sides5, and heat together with moisture from the foot is carried outwards through the semi-permeable membrane. The warmer and more humid it is on the other side of the membrane, the less efficient the process and the more our feet will sweat.
Boots with a membrane are also waterproof, which is desirable in most cases, but not always.
Once we do manage to get them wet, for example by wading into a stream that’s too deep so that water gets in over the top, such boots take much longer to dry than boots without a membrane. That’s because they’re just as reluctant to let moisture out as they are to let it in.
On the other hand, remember that a membrane on its own isn’t an insulating material, which is why more “hardcore” boot models, especially those designed for winter trips, have a membrane with added insulation that provides proper thermal protection. I wouldn’t wear boots like that in temperatures above freezing, though, because your feet will simply roast in them like a chicken in an oven.
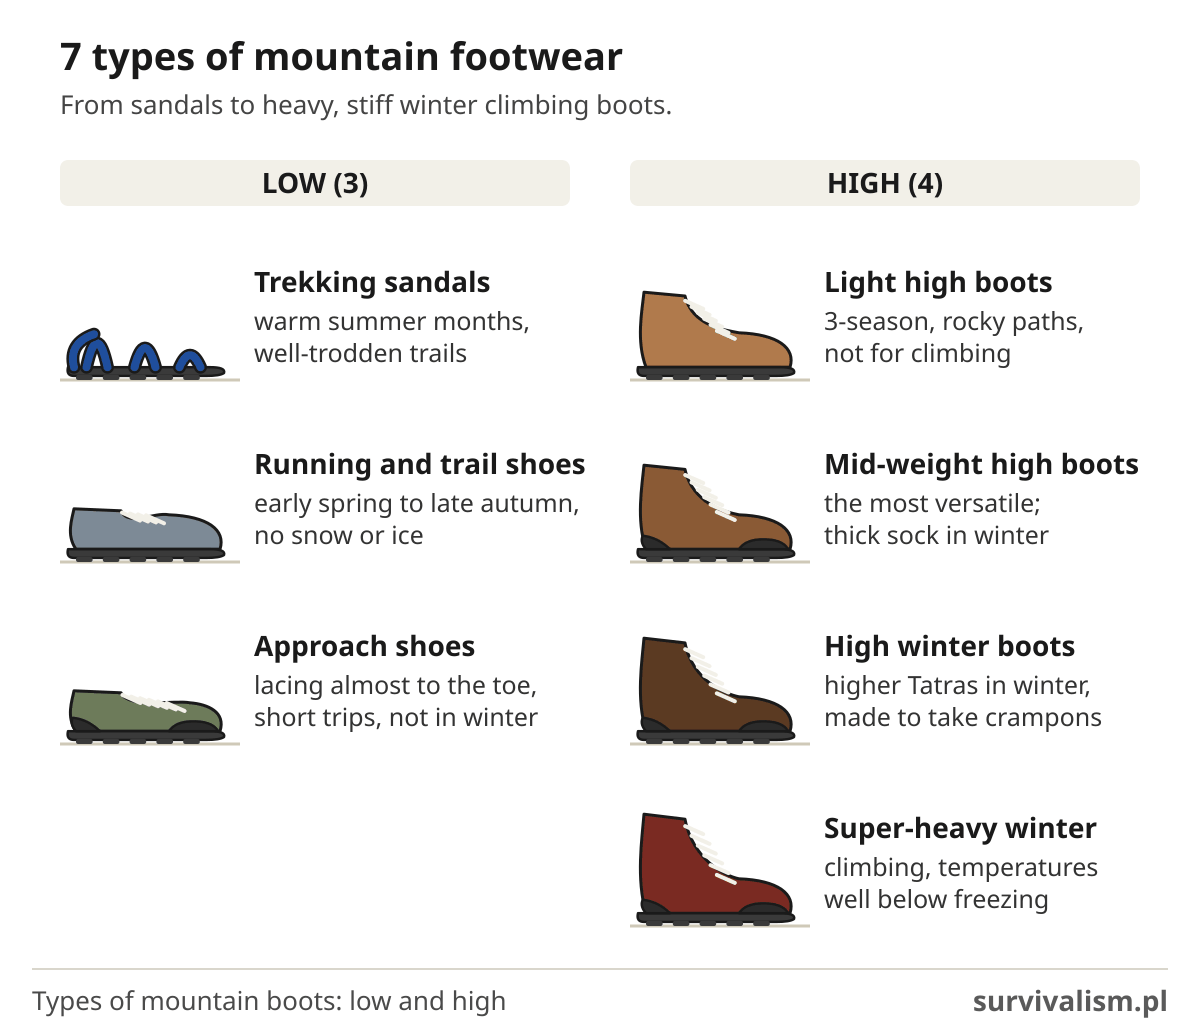
So let’s get down to business. To start with, we’ll classify mountain footwear by construction, use and versatility, and divide it into 7 basic categories.
Trekking sandals for the mountains and beyond
Sandals? Yes, there is such a category of trekking footwear. Contrary to appearances, they have plenty of advantages, above all their low weight and breathability. It was in sandals that I climbed my first peak in New Zealand, and it was no mere hillock either, at around 2,400 metres. It has no name on the map, but it stands near one of New Zealand’s highest peaks, Tapuae-o-Uenuku (2,885 m, the highest outside the Southern Alps).
Of course, this kind of mountain footwear only works well in specific conditions: in the warm summer months, on well-trodden trails without any particular obstacles. One of the biggest problems you’re likely to run into on a mountain hike in sandals is small stones getting between your foot and the sole. Sometimes a shake of the foot is enough to get rid of them, but sometimes you have to stop and fiddle about a bit more.
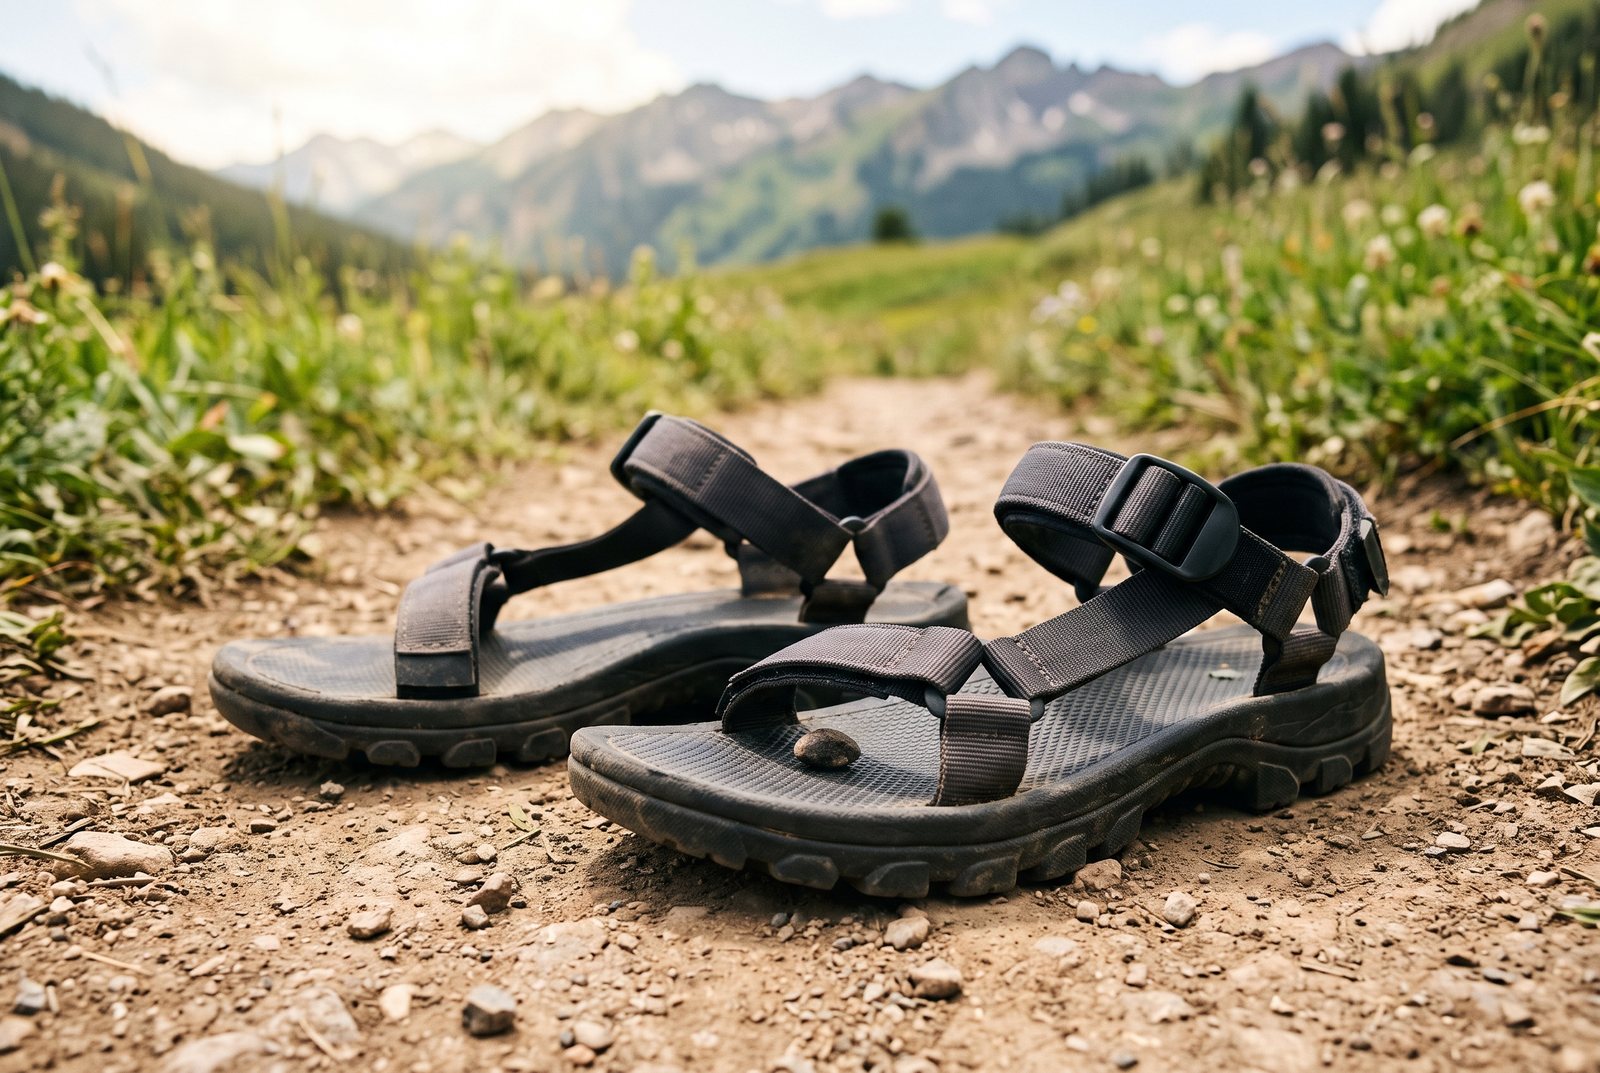
Obviously, sandals are no good for climbing or rocky terrain, because they do very little to protect your foot from knocks and scrapes. But for an August trip, say somewhere in the Sudetes in south-western Poland, on a trail you know, sandals as trekking footwear are definitely worth considering.
What should you look for when choosing trekking sandals?
Above all, their shape. Good trekking sandals should be contoured and fit your foot well. They should also have a thick sole to cushion you properly from uneven ground.
It’s also worth checking what kind of adjustment system the sandals have - we can rule out Velcro models straight away, unless we pick them up for “peanuts” for a one-off trip, but even then it’s worth asking yourself whether they’ll fall apart after a dozen or so kilometres, because I doubt anyone wants to end up somewhere on the trail with no shoes.
It’s also worth making sure the footbed has a proper non-slip texture, so that it doesn’t turn into an “ice rink” on the trail when your feet get sweaty or you dip them in a stream.
Ordinary running shoes and light trail shoes
In my opinion, these are among the most versatile types of mountain footwear. They’ll do the job in a great many situations from early spring to late autumn, except on high-mountain trips (as long as there’s no snow or ice on the trail, because light shoes without microspikes are no good on an icy trail). Personally, in the 2022 season, from March right through to autumn, I walked in my well-worn Nikes.
Shoes like these will work in almost all Polish mountains, except the higher parts of the Tatras. Because of how the sole is built, they won’t always suit trails with very rocky ground either. The undoubted advantage of trail shoes is - as with sandals - their lightness and breathability. True, they also get wet very easily, but they make up for it by drying in no time. And unlike sandals, they cover the whole foot, giving much better protection against knocks and scrapes.
If you’re still not convinced about wearing running shoes in the mountains, I suggest you try them out on a few hikes. I’m almost certain you’ll come round to them very quickly 🙂
What should you look for when buying running shoes for the mountains? Obviously, the fit matters. Personally, besides walking in the mountains I sometimes run short and middle distances too, so for me switching to running shoes in the mountains came smoothly and naturally. If you don’t have shoes like these in your “arsenal”, then among ordinary running shoes I suggest the good, tried-and-tested Nike Tanjun (one shoe weighs under 200 g!), and as for proper trail shoes, a good choice is the DYNAFIT FELINE SL Amazon store, affiliate link, opens in a new tab or the excellent SALOMON Speedcross 5 W Amazon store, affiliate link, opens in a new tab in more subdued colours (there are newer versions of this model now).
Light approach shoes
Approach shoes are usually low shoes, originally made for - as the name suggests - the approach to a climbing spot. They were meant to be light by design, because once they had done their job they went into the rucksack and were swapped for proper climbing shoes. But everything changes, and today approach shoes have become a separate category of trekking footwear. Their distinctive feature is lacing that runs almost all the way to the tip of the toe, which is how you can tell them apart from other types of trekking footwear. They’re also generally a little stiffer and narrower than classic trekking boots. They’re great on moderately difficult terrain, including rocky ground.
On the other hand, they aren’t really suited to longer trips, mainly because of that very stiffness and the relatively narrow sole.
To sum up, approach shoes are a good choice for short trips on more varied terrain, though not in winter, of course.
Light high boots for the mountains
Now we move on to the subcategory of high boots. Here we have a whole range of boots for every occasion, and it starts with boots that are high but light. They’re generally made of soft leather, often with fabric panels, or even made mostly of airy, breathable fabric. They often have no rubber rand, which protects the foot better but also adds to the weight of the boot.
A light, high trekking boot like this is a halfway house between typical above-the-ankle boots and low, light shoes. Its thick sole makes it fine for rocky paths, but not for climbing. And these are 3-season boots: in winter we need to reach for better-insulated models.
In my opinion, boots like these aren’t really good for anything. They exist, but it’s hard to say exactly when you’d wear them. In summer we have the shoes I wrote about earlier, which do far better on the trail and won’t cook your feet either. For winter trips, on the other hand, there’s a whole range of “bigger calibre” boots, which I’ll cover later. The only halfway sensible reason anyone might want to go into the mountains in boots like these is their looks. Admittedly, some of them look quite good, for example the Columbia Fairbanks Omni-Heat Amazon store, affiliate link, opens in a new tab, which weighs under 500 g (this one happens to be an insulated model, more for town and easy winter walks than for the trail in the warmer months).
Mountain boots - mid-weight high boots, the most versatile of all
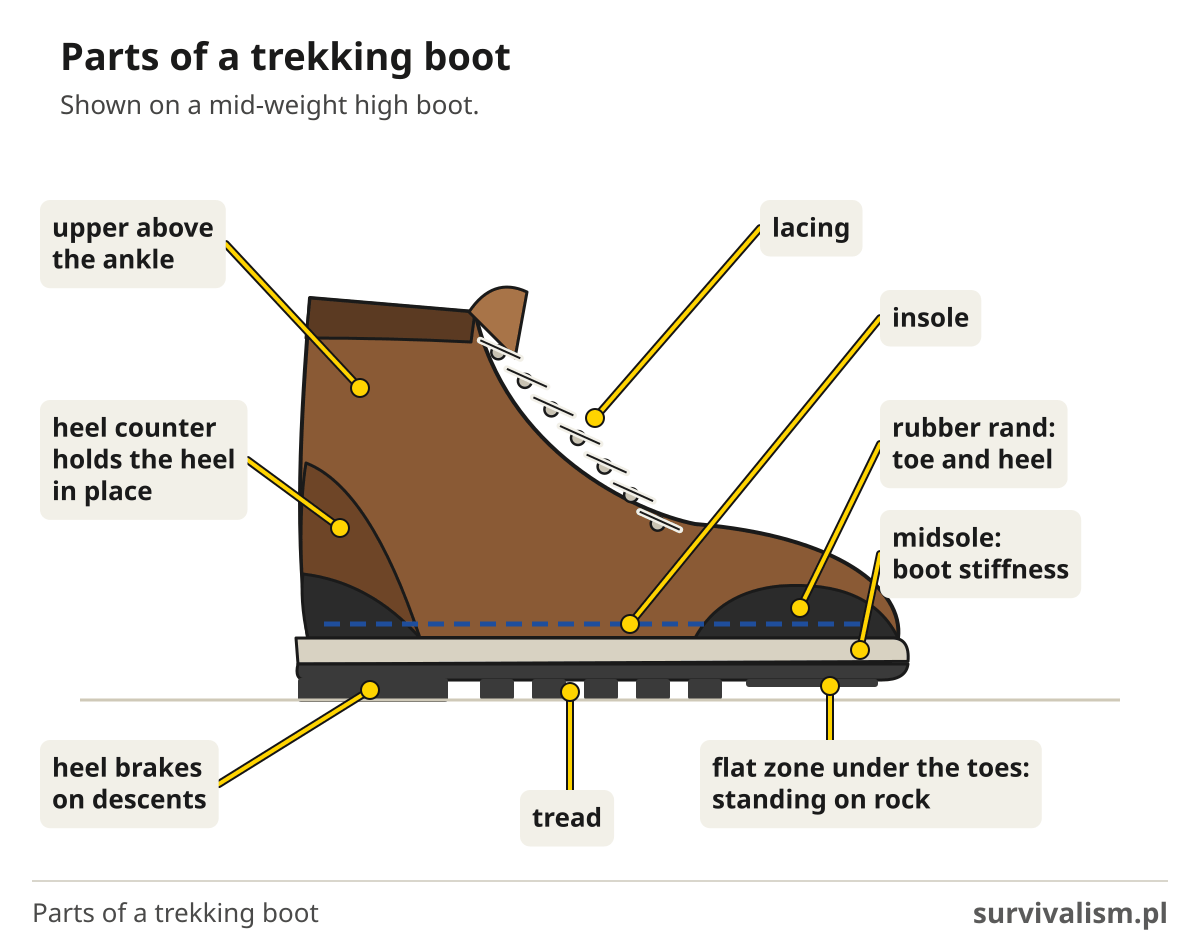
If you’re looking for the most versatile boots of the lot, these are the ones: high boots with “middle-of-the-road” specs. They’re reinforced, at least at the toe and heel, with a rubber rand that not only protects your foot but also keeps water out better. You can walk freely over rocks and stones in them without worrying about hurting your foot or wrecking the boot itself - within reason, of course. These boots are generally more solidly built than the group described before, and they’re also stiffer, with a harder sole. Some models also have an insulating layer, but many don’t, so in winter you’ll want a thick sock with them.
Here you need to decide whether you want boots with a membrane or without. The question is whether the boots should be as versatile as possible, that is, worn all year round. A membrane, as I wrote earlier, works brilliantly at lower temperatures, but in summer your feet will cook. So we have 2 options here:
- One all-round pair of boots without a membrane that we wear all year, but in winter we’ll need to keep our feet warmer some other way, for example by buying suitable socks. I’ll write about socks further on. The downside of this option is that in the warmer months we’ll have to wear heavier boots, and our feet won’t be as well ventilated as in, say, trail running shoes.
- A two-pair system. Boots with a membrane that we wear only in the colder months, while in summer we switch to lighter, more breathable footwear.
Which system you choose will depend on your personal preferences and the depth of your pockets. If you’re putting together a bug-out bag, all-round boots like these are the ones to keep next to it, because you don’t know what terrain or what time of year you’ll end up walking in them.
High winter boots
This is a category for more specialised use. If you’re looking for boots like these, you need to know what you’re doing and exactly what you expect from them. They’re generally made from a single piece of strong, waterproof leather. They’re well insulated and also have a membrane, which in this kind of boot isn’t an option but a must-have. Footwear like this is ideal for trips to, for example, the higher parts of the Tatras. Your feet won’t get too cold in them, even in temperatures well below freezing.
High winter boots of this kind, thanks to their solid construction, stiffness and hardness, are generally made to take crampons (which crampons fit depends on how stiff the boot is: strap-on crampons will go on even stiffer trekking boots, semi-automatic ones need a heel welt, and automatic ones a toe welt as well, so try the crampons on your boots before you go).
Manufacturers describe this with a simple scale: boot stiffness from B0 to B3, and crampons from C1 to C36. In a nutshell, it looks like this:
| Boot class | What kind of boot | Which crampons |
|---|---|---|
| B0 | soft boot for walking below the snow line | none, at most slip-on microspikes |
| B1 | stiffer four-season boot | strap-on only (C1) |
| B2 | stiff, warmer boot with a thicker upper | strap-on (C1) or semi-automatic (C2) |
| B3 | the stiffest boot, for climbing and high-mountain expeditions | semi-automatic (C2) or automatic (C3) |
I write about how to dress, what to eat and how not to get frostbitten toes on a winter trail in Mountains in winter, or how not to freeze on the trail.
Super-heavy winter climbing boots
If you’re heading for the North Pole or want to climb Mount Everest, these are the boots for you. They’re big, heavy brutes, armed with an insulated membrane, stiff and hard. They’re made for climbing and perform best in temperatures well below freezing. What more is there to say - if you’re looking for exactly these boots, you most likely know exactly what you’re doing, and this guide probably isn’t for you 🙂
Sole and grip
Once you know what type of boot you’re after, turn it over and look underneath. It’s the sole that decides whether you’ll be sure-footed on wet rock, in mud and on a steep descent. Look out for a few things:
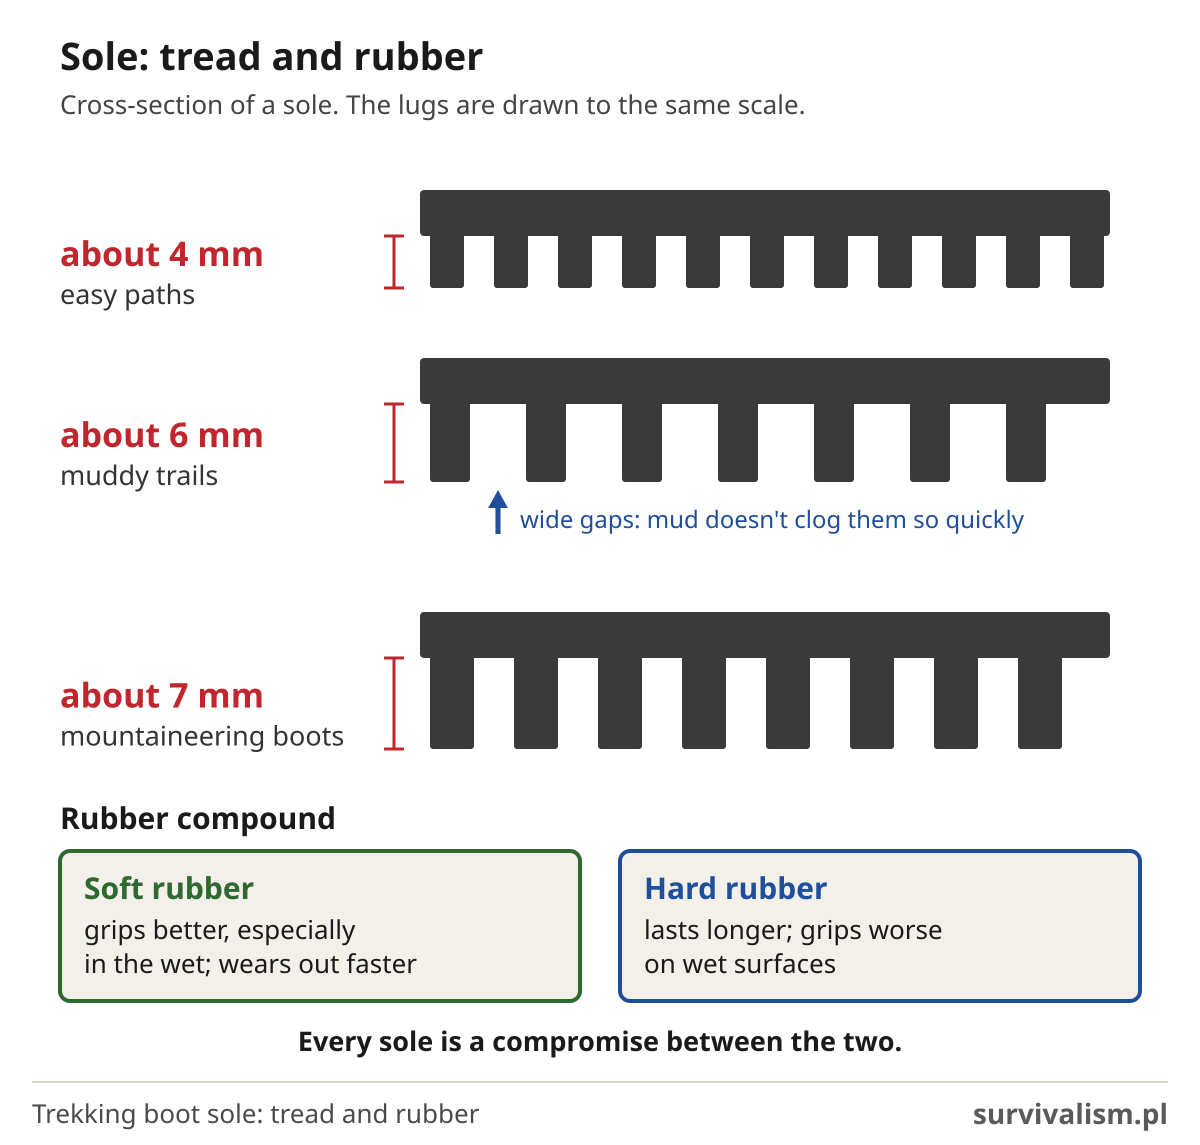
- Rubber compound. Soft rubber grips better, especially in the wet, but wears out faster. Hard rubber lasts longer, but grips worse on wet surfaces7. Every sole is a compromise between the two.
- Tread. For easy paths a shallower tread of around 4 mm is enough, on muddy trails a deeper one of around 6 mm comes in handy, and mountaineering boots go deeper still, around 7 mm. Wide gaps between the lugs mean the sole doesn’t clog up with mud so quickly.
- Heel and toe. A clearly defined heel and large lugs at the back brake you on descents, and a flat zone under the toes helps when you need to stand on rock.
- Stiffness. How stiff a boot is depends largely on the midsole. In mountaineering boots it’s harder, so that your foot stands securely on small footholds and rock ledges.
- Sole brand. You’ll see Vibram’s yellow octagon on a great many trekking boots, but it isn’t the only maker of good, grippy soles.
And let’s be honest about one thing: wet rocks are slippery in any boot, so there you simply have to watch every step.
How to fit trekking boots? Which trekking boots should you choose?
When choosing your mountain clodhoppers, pay attention to a few key things. It goes without saying that the boots should be well made from top-quality materials. When it comes to boots, in my opinion it isn’t worth skimping - the money you spend once will pay you back in comfort and in features that make your trips a pleasure rather than an ordeal.
When choosing a model, pay particular attention to how stable the boot is. It depends on 2 basic features:
- A well-shaped heel - it should be slightly rounded, and some types of footwear also have a special heel lock that further improves fit and stability. It’s this fit that stops your foot “swimming” around in the boot, so you can step confidently even on technically difficult terrain, and you’ll avoid needless chafing too.
- Sole width. Professionals often use approach shoes with a slightly narrower sole, but for most of us the best choice will be boots with a relatively wide sole.
Let’s assume you’ve already found the model you want to buy. So how do you get the fit right?
Well, when choosing your size, there are a few things to keep in mind.
- Remember that you’ll have a sock on your foot, or even two. How thick it is matters. In winter boots the sock will most likely be thick, maybe even very thick. Take this into account when buying boots.
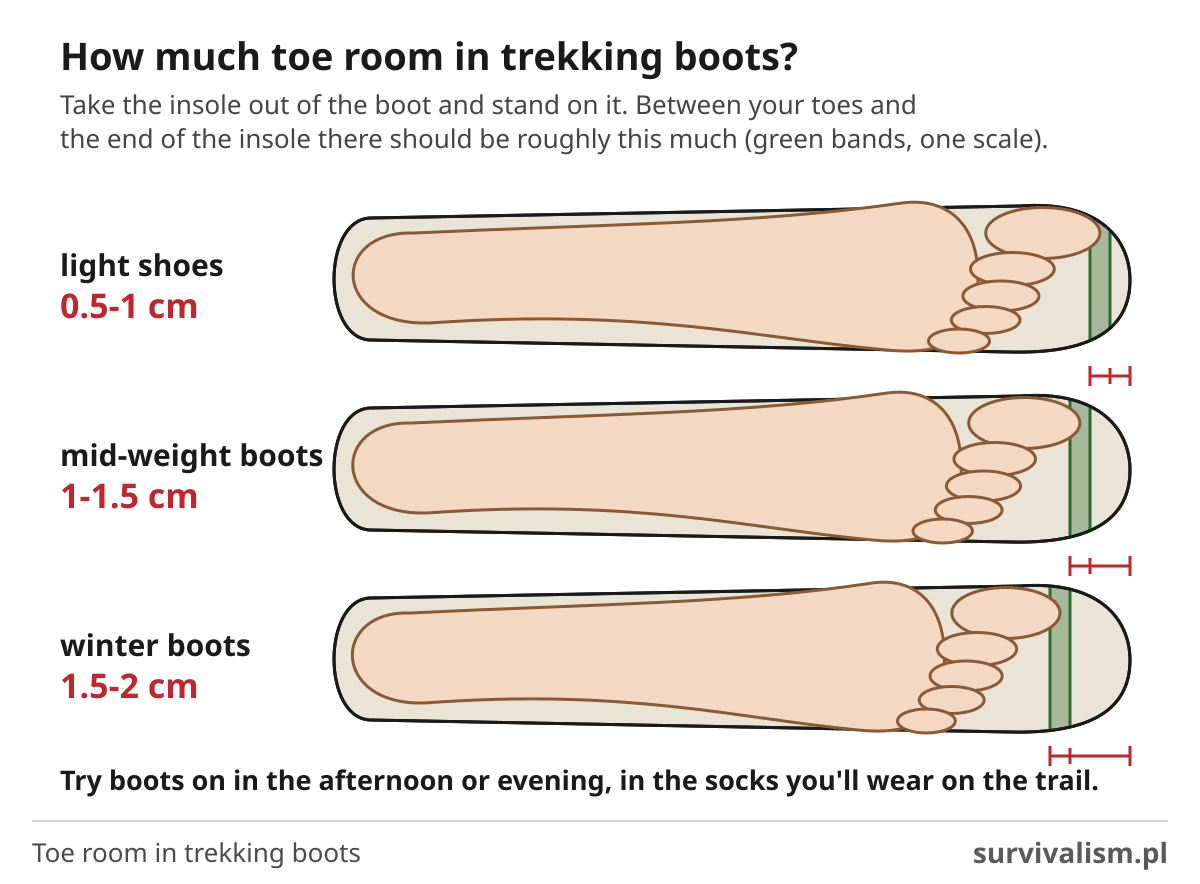
- Your feet always get a little bigger as you walk: they swell. How much depends on your physiology and individual traits. That’s why it’s best to try boots on not in the morning, but in the afternoon or evening, when your feet are already “swollen” after a whole day of walking around.
Because of all this, trekking boots should always be a little bigger than your normal size. By how much? It’s hard to say with 100% precision, but as a rule of thumb, light shoes should be 0.5 to 1 cm bigger, mid-weight boots 1 - 1.5 cm, and winter boots 1.5 to 2 cm. The easiest way to check is to take the insole out of the boot and stand on it: there should be roughly that much room between your toes and the end of the insole.
How should you try on trekking boots?
The room at the front isn’t there to make the boot loose. It’s there so that your toes don’t hit the end of the boot on descents, because that ends in a black toenail, and sometimes a painful inflammation8. So when trying boots on, do a few simple tests:
- The descent test. Walk downhill in the boots, down stairs or down a ramp if the shop has one. Your toes mustn’t touch the front of the boot.
- The heel test. Put the boot on without lacing it: if your heel can move from side to side, the heel counter is too wide for you. Then lace the boots up, stand with just the front of your foot on a stair, rise up on your toes and lower yourself down. Your heel shouldn’t move while you do this, because a heel slipping about in the boot is the most common cause of blisters.
- Width. Boots in the same size can be narrower or wider, and some manufacturers make separate, wider versions of their models. If the boot pinches at the sides, look for a wider version of that model or of another one.
- Lacing. Before you tie the boots, flex your toes up and press your heel down so that it sits snugly in the heel counter. If your heel still slips, tie a simple knot where the lower part of the lacing meets the upper part: the lower part will stay tighter and your heel will be held better9.
Buying boots online
Some people may wonder whether they can get the right size when ordering boots online. Personally, I’m a big fan of online shopping. Firstly, if they don’t fit, we always have the right to return the purchase within 14 days without giving a reason. That’s Polish law on online shopping. (Only try the boots on at home, on a clean floor - if you’ve worn them outdoors, the shop may deduct something from the refund. You usually pay the return postage yourself, unless the shop says otherwise.)
Some online shops even extend this to 30 days or more. So if the boots turn out to be too tight, for example, we send them back and order the same model a size up. Simple.
What’s more, prices in online shops are generally lower than in high-street shops, sometimes by quite a lot, and we can often come across all kinds of discounts, special offers and discount codes. We also have a much wider choice than in any bricks-and-mortar shop, even the biggest and best-stocked one.
In my opinion, it’s mostly upsides.
Socks - a subject not to be taken lightly
How comfortable our hike is depends as much on the socks we put on as on the boots. Socks wick moisture straight off the foot and are the first thing the skin of our feet touches. They also add extra cushioning, which matters enormously for our joints. And of course they insulate, which in simple terms means they protect us from the cold, although good wool socks will also keep your feet cool on warmer days.
The state of our feet depends to a large extent on the quality and type of socks we wear, and on any walking trip, foot condition is one of the most important things to look after.
We won’t get very far if a badly chosen sock gives us blisters on our heels by the fifth kilometre. So this isn’t the place to skimp: it’s better to choose socks that will serve us well for many seasons.
Socks made of merino wool are among these top-quality products.
Wool itself usually makes up anything from around 30%10 to over 60%11 of them, and the rest is synthetic fibre. The synthetic blend is essential here, because pure wool doesn’t stand up well to abrasion and isn’t very stretchy. Adding synthetic fibres solves that problem.
Merino wool is a wonderful gift of nature. It wicks moisture brilliantly. It keeps you warm in winter, and in summer it brings relief to your feet by carrying away excess heat. Socks made from it, thanks to their thickness, cushion every step superbly, making the trip more comfortable. And merino wool absorbs and holds on to unpleasant odours less than synthetic fibres do12, which in turn means a “less intense” whiff from your socks and feet, even on long trips.
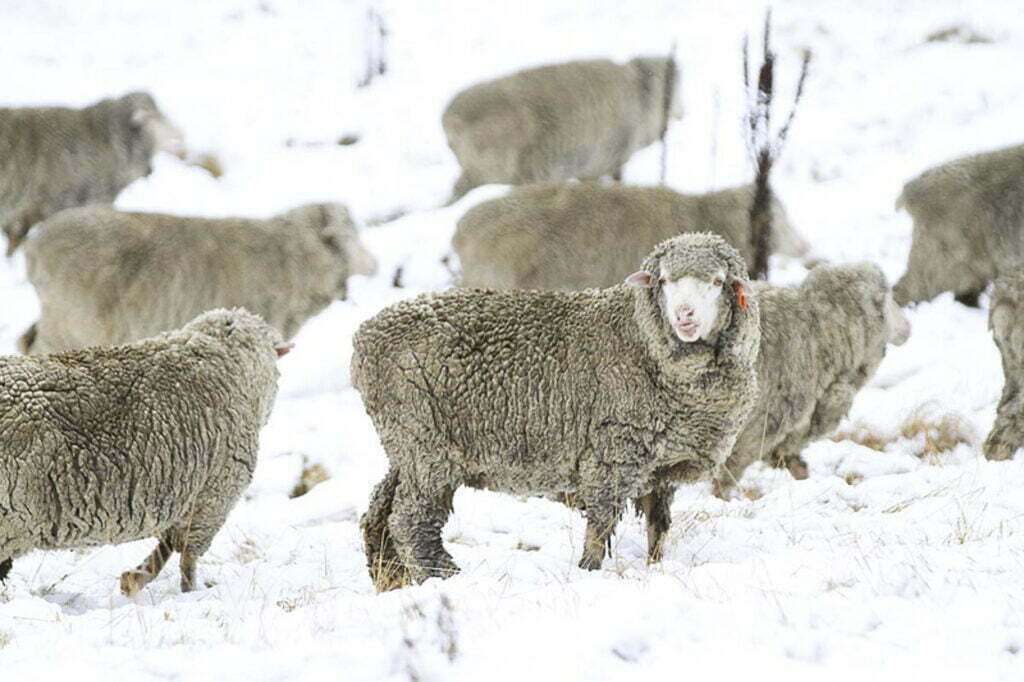
If, however, wool socks don’t suit you for some reason, the alternative is socks made of synthetic fibres. They’re generally cheaper than good-quality wool socks, but they don’t perform as superbly as their natural counterparts.
As for cotton socks, I’d advise against wearing them on hikes longer than a few hours. Cotton soaks up moisture fairly quickly and then takes a long time to dry. On a short trip we should be able to put up with that without much trouble, but on trips lasting several days it can end in sweat rash, blisters and chafing.
One pair of socks or two?
Some experienced walkers use a two-pairs-of-socks trick, which is supposed to help wick moisture away from the feet faster. You put on a thinner pair of socks first, and only then a second, thicker pair over them.
The theory behind this system is that the thin sock wicks moisture away faster, the thicker one then takes it over, and the moisture is finally carried outside as water vapour. I tested this system once myself, but without much success. The thicker sock kept sliding off my foot, because it slipped on the thin one and had nothing to grip. And I didn’t notice any real improvement in wicking either.
Still, I don’t rule out that it might work well for someone else - test both and pick the one that suits you best.
How do you look after trekking boots?
When it comes to caring for your footwear, the most important thing to make sure of is that it stays dry and waterproof. Most trekking boots have leather parts, and it’s the leather that takes the most work.
After every trip, clean your boots thoroughly of mud, leaves, grass and any other dirt. If you want to do it properly, it’s best to take the laces out and give the boots a good scrub with a set of brushes, both dry and wet.
After that, leave the boots to dry at room temperature. Remember never to dry boots, especially leather ones, on a radiator, by a heater or with a hairdryer. It’s the easiest way to ruin them for good. To speed up drying from the inside, you can stuff the boots with fist-sized balls of newspaper or paper towels. You can also put in, say, a pair of cotton socks rolled into a ball.
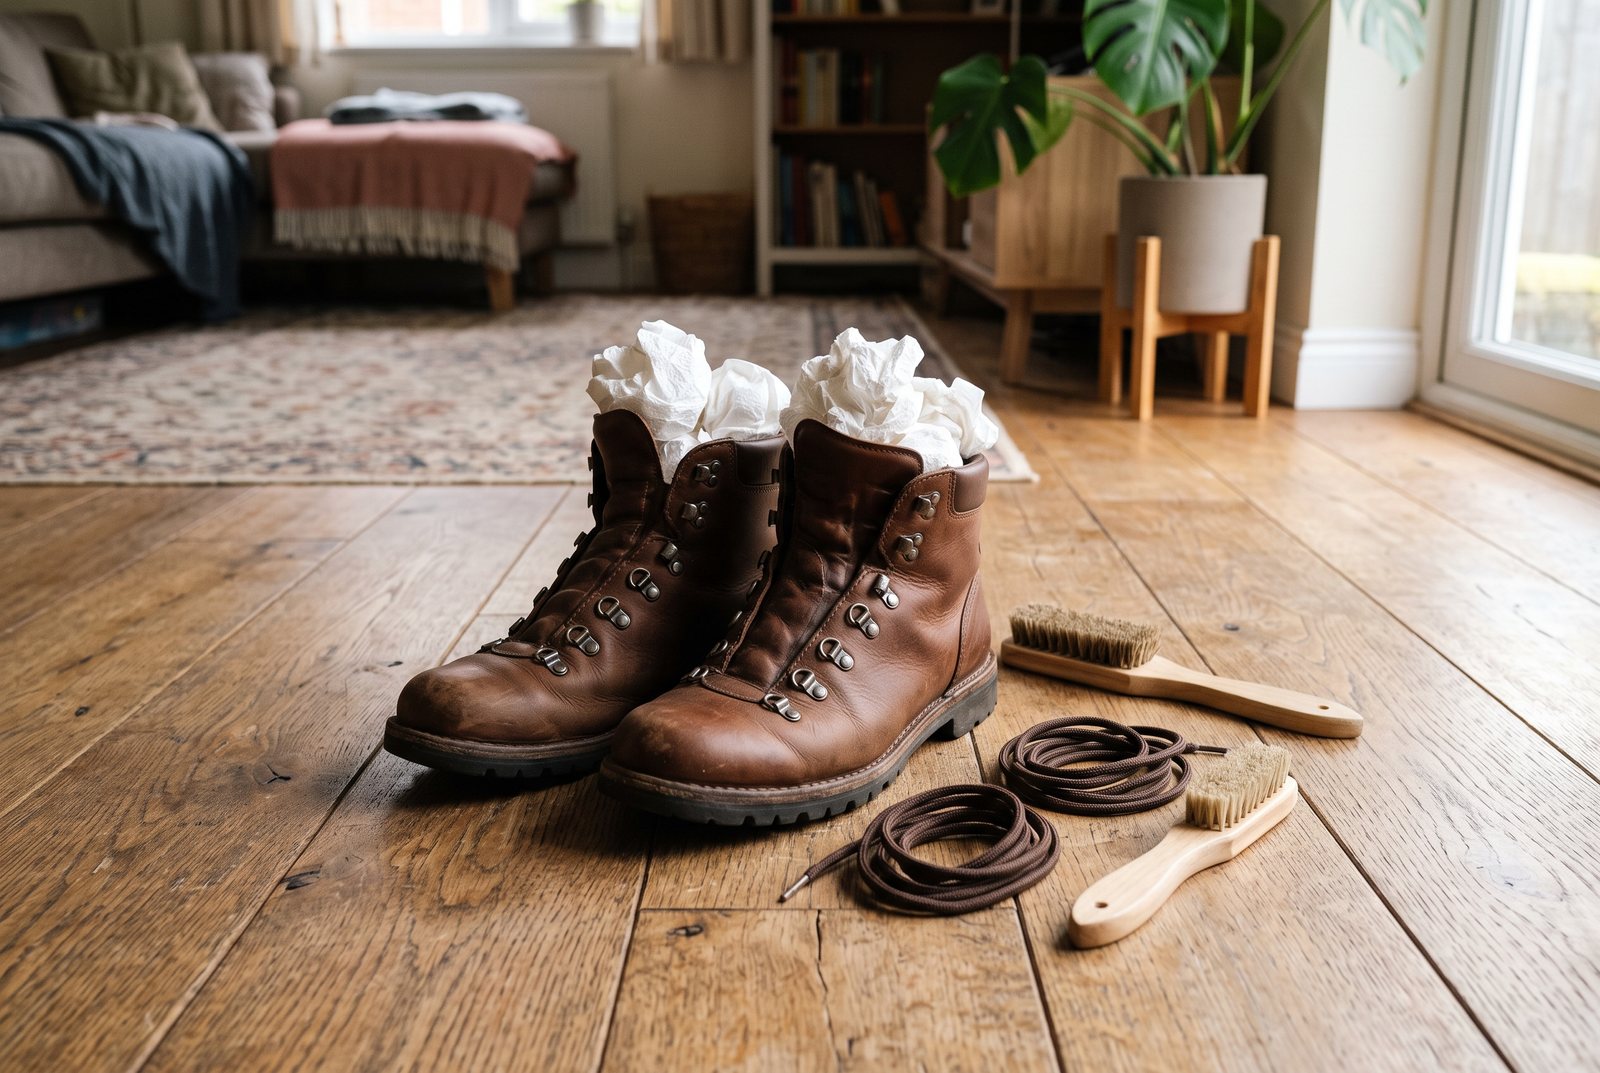
Once the boots are dry, it’s time for proper care. Every self-respecting boot manufacturer offers a set of care products made for your particular model. There are many kinds of leather, and each material should be treated with a product made for it. There are also universal kits that can be used on most materials.
Among universal products, beeswax or petroleum jelly can be recommended, but there are exceptions (wax isn’t suitable for nubuck or suede, for example), so it’s better to use products matched to your specific boots. The main thing we want to achieve is to treat the leather in a way that makes our boots waterproof.
What’s more, well-waxed leather is more supple, which makes it more comfortable and more resistant to damage from flexing. Wet boots, especially in winter, can be ruined very quickly, particularly if they freeze during a break or overnight. Putting on boots that have frozen solid is not only obviously unpleasant but will almost certainly damage them. On top of that, wet boots cancel out the membrane. So let’s look after our footwear, and it will serve us for many years.
Breaking in new boots and replacing the sole
Don’t take new boots straight out of the box on a trip lasting several days. Break them in gradually: first around the house and on short walks, then on shorter hikes, wearing the same socks you’ll wear on the trail. The stiffer the boot, the longer this takes, and heavy crampon-compatible boots need it most13.
New boots can also simply turn out not to fit, and it’s better to find that out on a walk than in the mountains. In New Zealand my new boots turned out to be so uncomfortable that after a few kilometres I couldn’t take a step in them without pain, and I climbed the peak I mentioned above in sandals. I told the whole story in my article on how to walk in the mountains without getting tired.
And when should you replace your boots? With every kilometre the sole wears down and grips less, but that’s no reason yet to throw out comfortable, broken-in boots. Some manufacturers resole their own boots14, so before you buy new ones, check whether your model can be resoled.
Are gaiters worth wearing?
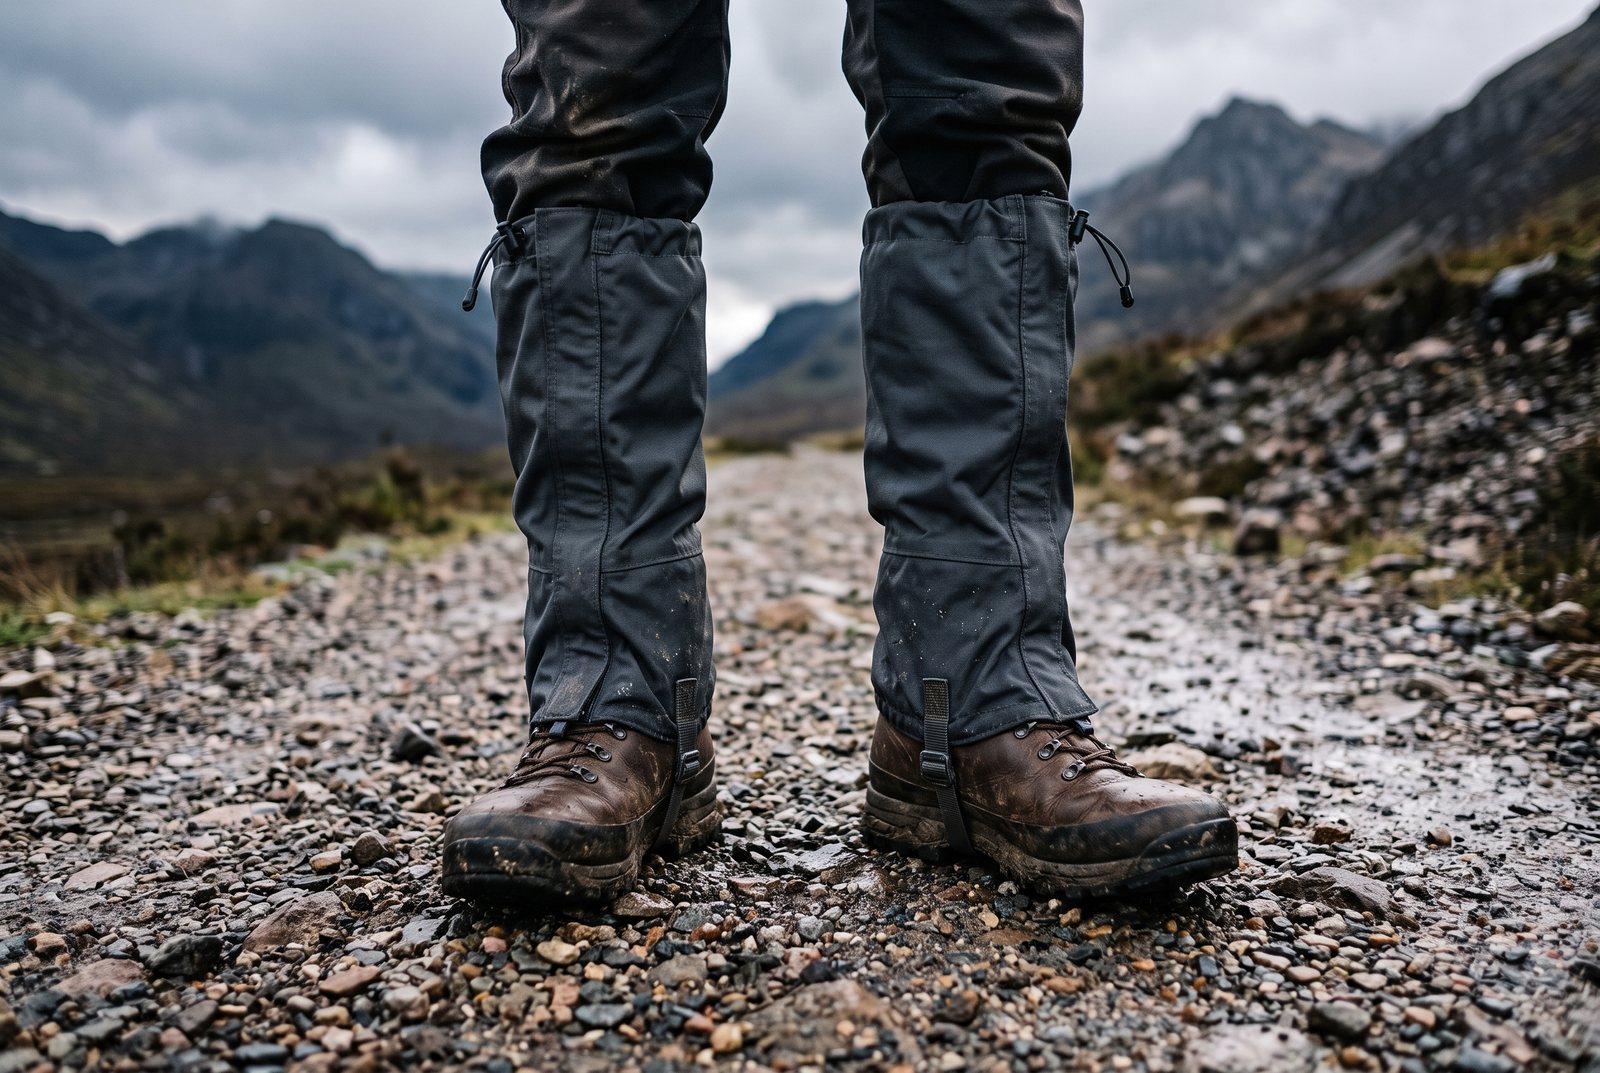
Sometimes they are. Especially in the rain, when water gets into your boots “from above”. Some people use a trick then and wear their gaiters under their trousers rather than over them. That way the water runs straight down and doesn’t go into the boots.
Another use for gaiters is walking on sand or gravel, when every so often a little stone drops into your boot. Good-quality running gaiters weigh very little and can be carried in your rucksack “just in case”.
How do you look after your boots and feet on the move?
I mentioned earlier that the condition of your feet is hugely important for any traveller, and the longer the trip, the more you need to focus on it. So how do you look after your feet on the trail?
- Before the trip, trim your toenails (straight across, not too short and not into the corners, because nails cut too short easily become ingrown)15.
- During the trip, keep checking your feet as you go. Pay attention even to small rubs, which can quietly turn into open wounds along the way.
- Keep your feet dry. It’s not just about walking comfort, because I don’t think anyone likes walking in wet boots, but rather that wet feet are very vulnerable to all kinds of injuries. The skin on wet feet goes soft and is easily damaged. In a warm, damp environment, all sorts of pathogens, such as fungi or bacteria, also have ideal conditions to grow.
- Change your socks at least once a day, and every time they get wet.
- Don’t ignore discomforts that seem minor at first glance. A slightly wrinkled sock sitting badly on your foot can, after the 20th kilometre, turn out to be the cause of a deep and painful raw patch. The same goes for any little stones, twigs or other foreign bodies that get into your boot.
- On longer trips, take off your boots (and sometimes your socks) at every stop. Give your feet a rest. As you walk, your feet increase in volume (they swell). This is natural, but it’s worth counteracting. In summer you can soak your feet in a cold mountain stream flowing nearby. It will definitely bring you relief. While resting, also raise your legs above your head, propping them on a tree trunk, for example. This too is a tried-and-tested way to help not just your feet but your whole legs recover.
- In freezing weather, wiggle your toes in your boots regularly to get the circulation going. This lowers the risk of frostbite. A winter boot mustn’t pinch, though, because a tight boot restricts circulation16. Even with a thick sock on, your toes need room to move inside the boot, and swap wet socks for dry ones.

A very important lesson from Lieutenant Dan 🙂
Summary
As you can see, choosing trekking boots is a big subject, but in this article I deliberately covered only its most important aspects. I wrote just a few sentences about soles, and I could also have gone into more detail about the whole range of materials footwear is made from, and about dozens of other things.
But this text is meant to be a guide that introduces a beginner to choosing the right footwear for the trail, and I think I’ve achieved that. Or have I left out something important? Let me know in the comments.
To sum it all up in 4 short points:
- Get to know the terrain. Will there be lots of mud on the trail, or mostly sand? Will it be flat or more varied?
- Choose your boots carefully for shape and size.
- Pick the right socks: they matter just as much as the boots.
- Check the condition of your feet regularly.
Sources
- Tatra National Park, „Tatry zimą” (The Tatras in Winter): tpn.gov.pl/tatry-zima (in Polish)
- Zhang J. et al., “High-Top Shoes Reduce Ankle Inversion Injury Risk: Pressure and Kinematic Analysis during Sudden Inversion”, Annals of Biomedical Engineering, 2026: pubmed.ncbi.nlm.nih.gov/41350517
- McGuine T.A. et al., “The effect of lace-up ankle braces on injury rates in high school basketball players”, The American Journal of Sports Medicine, 2011: pubmed.ncbi.nlm.nih.gov/21795671
- Slivšek G. et al., “Ankle Bracing as a Public Health Game Changer: A Narrative Review on the Prevention of Ankle Injuries in Basketball Players”, Medicina, 2026: pubmed.ncbi.nlm.nih.gov/41752686
- GORE-TEX, “Breathability: that’s when air gets through, right?”: gore-tex.com/en_uk/blog/breathability-thats-when-air-gets-through-right
- SCARPA, “Crampons Guide”: scarpa.co.uk/blogs/blog/crampons-guide
- HANWAG, “Sole Facts: Everything About Hiking Shoe Grip”: stories.hanwag.com/en/sole-facts-everything-about-hiking-shoe-grip
- HANWAG, “Hiking Boot Sizing: 5 Top Tips for a Perfect Fit”: stories.hanwag.com/en/hiking-boot-sizing-4-top-tips-for-a-perfect-fit
- HANWAG, “How to Tie Hiking Boots”: stories.hanwag.com/en/how-to-tie-hiking-boots
- Bridgedale, “Men’s Midweight Merino Comfort Boot” (fibre content): bridgedale.com/products/mens-midweight-merino-comfort-boot
- Darn Tough, “Men’s Hiker Micro Crew Midweight Hiking Socks” (fibre content): darntough.com/products/mens-merino-wool-hiker-micro-crew-cushioned-midweight-hiking-socks
- McQueen R.H. et al., “Odor Intensity in Apparel Fabrics and the Link with Bacterial Populations”, Textile Research Journal, 2007: doi.org/10.1177/0040517507074816
- HANWAG, “How to Break In Hiking Boots”: stories.hanwag.com/en/how-to-break-in-hiking-boots-read-the-expert-guide
- HANWAG, “Your hiking boots guide”: stories.hanwag.com/en/hiking-boots-guide
- NHS, “Ingrown toenail”: nhs.uk/conditions/ingrown-toenail
- Cleveland Clinic, “Frostbite”: my.clevelandclinic.org/health/diseases/15439-frostbite
Leave a comment