
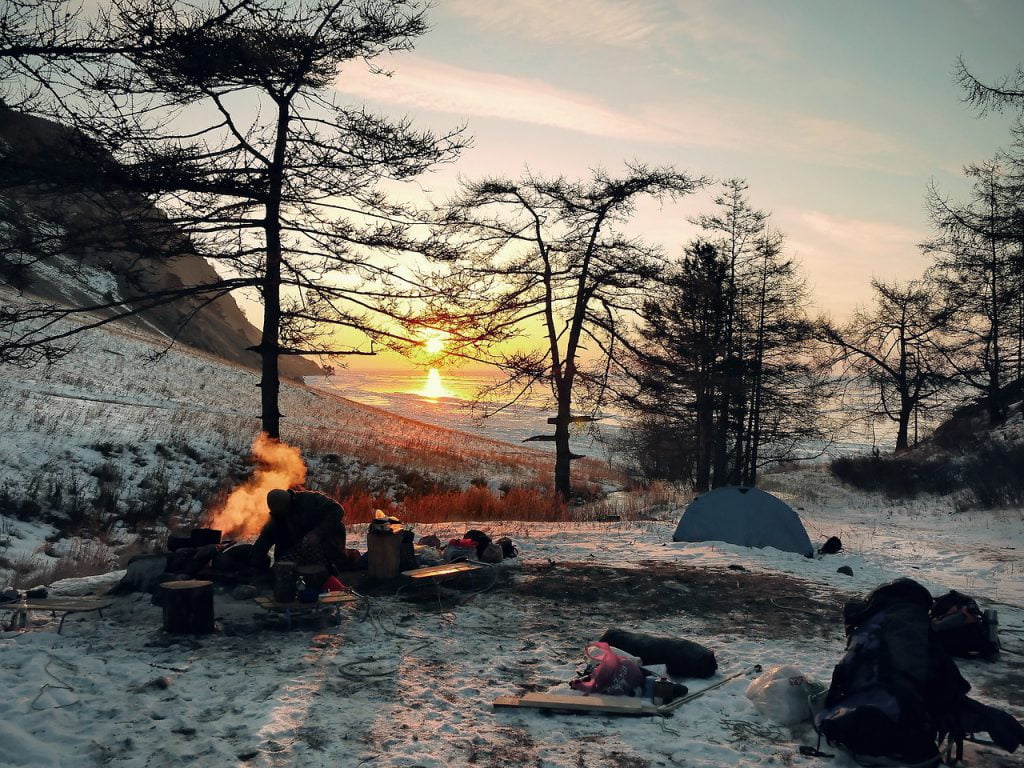
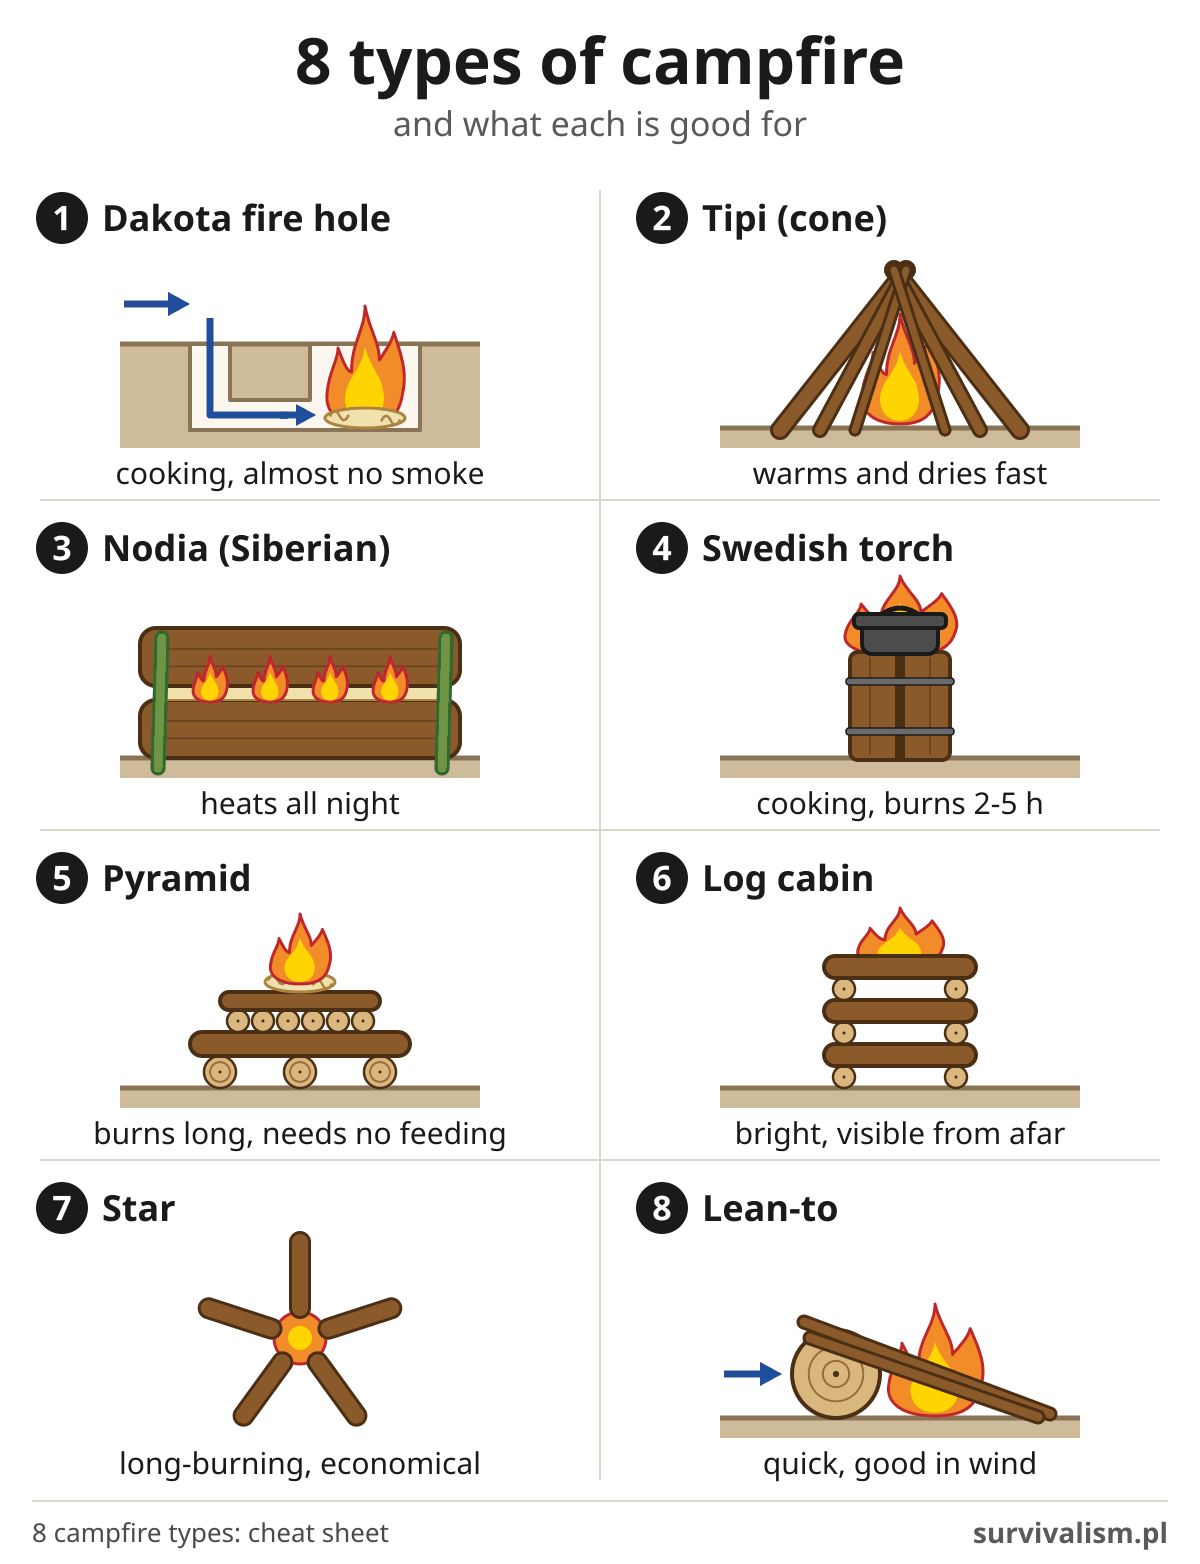
You could say that people have been using fire since the very beginning of their history. Fire gives warmth, lets you cook a meal and keeps mosquitoes and wild animals away. In an emergency, knowing how to light a campfire, and which type of fire will work best in a given situation, can be crucial to survival. There are quite a few different types of campfire, but here I will focus on the 8 that - in my opinion - matter most.
The different types of campfire go by different names, depending on the part of the world, the language and even local quirks of speech. That is why I will give several names for each, used interchangeably.
Safety
Before we get to the individual fires, a few words about how to burn them safely.
- Check the fire danger level. When it hasn’t rained for a long time, the forest floor is bone dry and goes up from a single spark, so take a look at the current map on the website of Poland’s Forest Research Institute (in Polish), and at the highest level, III, simply don’t light a fire.
- Prepare the spot. Clear dry leaves, pine needles and grass down to bare soil, roughly a metre and a half around the fire pit. Don’t build a fire under low-hanging branches, and in strong wind simply give it a miss.
- Water and a shovel at hand. Before you strike a match, put a full container of water next to the fire and keep a folding shovel with you. When a spark jumps onto the forest floor, there won’t be time for a stroll to the stream.
- Don’t leave the fire on its own. Not even for a moment, and not even if it’s a nodia that burns for hours. Someone always keeps watch over it, and when everyone goes to sleep or moves on, the fire has to be put out. I explain how to do that properly at the end of the article.
I know, it sounds a bit like a rulebook. But a forest fire started by your own campfire is not the kind of adventure you’d want to tell stories about around the next one 😉
The Dakota fire pit, also known as the Dakota fire hole or Dakota smokeless fire pit
The Dakota fire hole is an efficient and simple way to burn a fire. It produces little or no smoke at all. To make a Dakota fire, you dig 2 connected holes in the ground: one for the fuel, and the other, on the side the wind is blowing from, to give a good draught of air1. (Choose a spot with no roots or peat, ideally with mineral soil, because embers can travel along roots underground and come up to the surface far from the fire, even several days later. When you’re done, drown the fire pit with water, dig it over and fill it in.) Put the tinder and kindling into the fire hole, lay the main fuel on top and then light it.
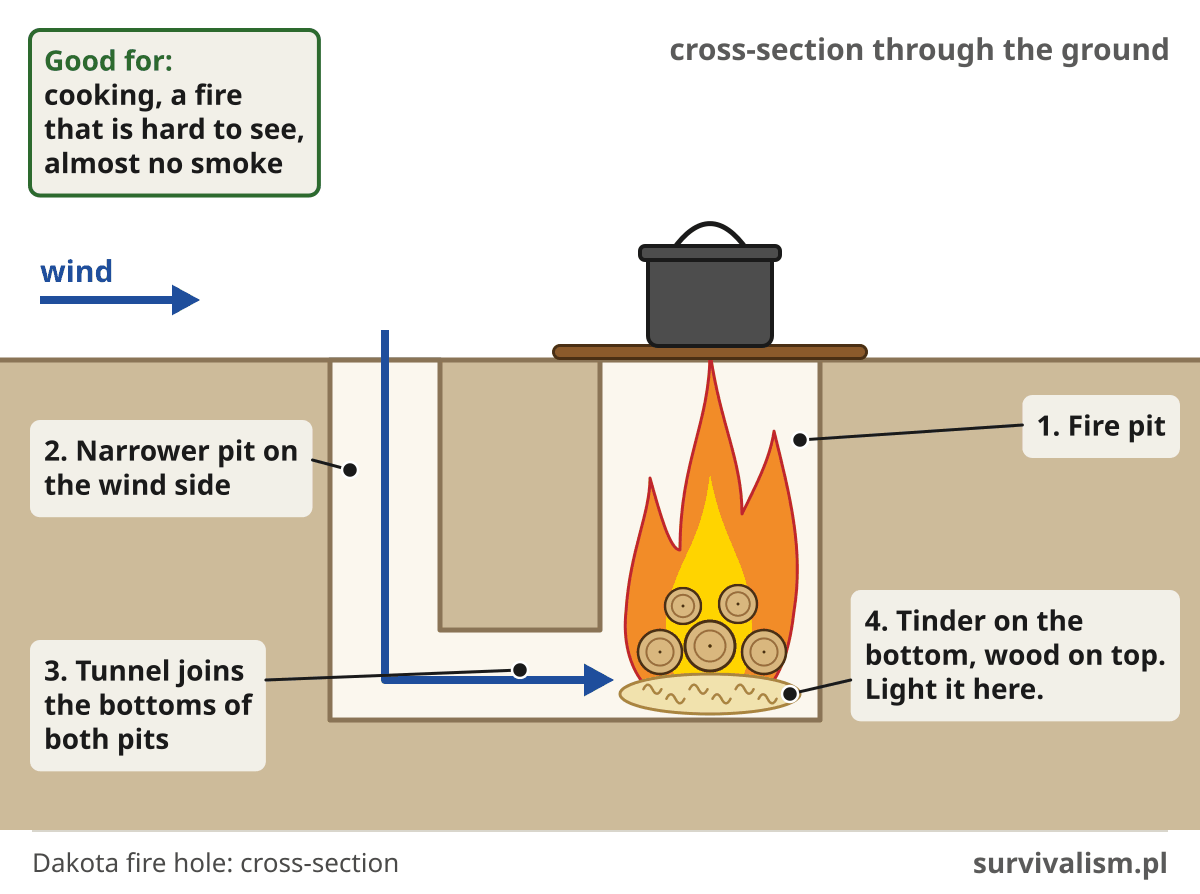
In a Dakota fire, the fire burns deep in the pit, and air flows into it from below through a side tunnel. This creates a steady, even stream of air “sucked in” through the air hole. It works on a similar principle to fireplaces and stoves (a rocket stove, for one), creating what is called a draught. Because air flows freely around the fuel, it burns almost completely, which gives you a fire that burns strong and hot, with little or even no smoke. That is why the Dakota fire is also known as the smokeless fire.
The Dakota fire pit is a fire whose flame, hidden in the ground, is hard to see from a distance; it makes little smoke and is easier to light in strong wind. That is why it is often used in combat conditions and in situations where we don’t want our fire to be easily detected and spotted.
Pros
- burns without smoke
- doesn’t catch the eye
- you can cook on it
- easy to light
- can be lit even in very strong wind
- uses less wood than a fire built on the surface
Cons
- hard to prepare
- may need tools
How do you dig a Dakota fire hole, or a fire in the ground?
A Dakota fire is really just a fire in a pit, only with a separate air channel. On the diagram above it looks simple. Most of the work is in the digging, and in hard ground you won’t get far without a folding shovel. This is the order:
- Check where the wind is coming from. Dig the air channel on the windward side, the side the wind is blowing from1. That way the wind itself pushes air under the fire and the draught is stronger.
- Dig the fire pit. The pot should rest on the edges of the pit with the fire underneath it, so make the pit as wide as the pot you use. Lift the turf in one piece and put it to one side. You’ll need it when you fill the hole back in.
- Dig the air channel. On the windward side, not far from the first hole, dig a second, narrower hole and join the bottoms of both holes with a short tunnel. Leave the strip of undisturbed soil between the two holes alone, because that is what turns the channel into a tunnel.
- Light it. Put tinder and kindling at the bottom of the fire pit, small sticks on top of them, and light it. Only add thicker wood once the fire has a good draught going.
Why go to all that effort? A fire hidden in the ground is harder to see, the strong draught makes it smoke less than an ordinary campfire, and the heat concentrated under the pot boils water faster and uses less wood7. Just don’t take the name “smokeless fire” too literally. Damp wood will smoke in a Dakota as well, and no fire is one hundred per cent invisible 😉
The Dakota fire in practice, or how it went for me
This autumn I dug a Dakota fire like this on my allotment, on the same windy day I tested the top-down fire (more on that below, under the pyramid fire). I wanted to see whether it all works outside the diagram. It does, but I had a few slip-ups along the way 😉
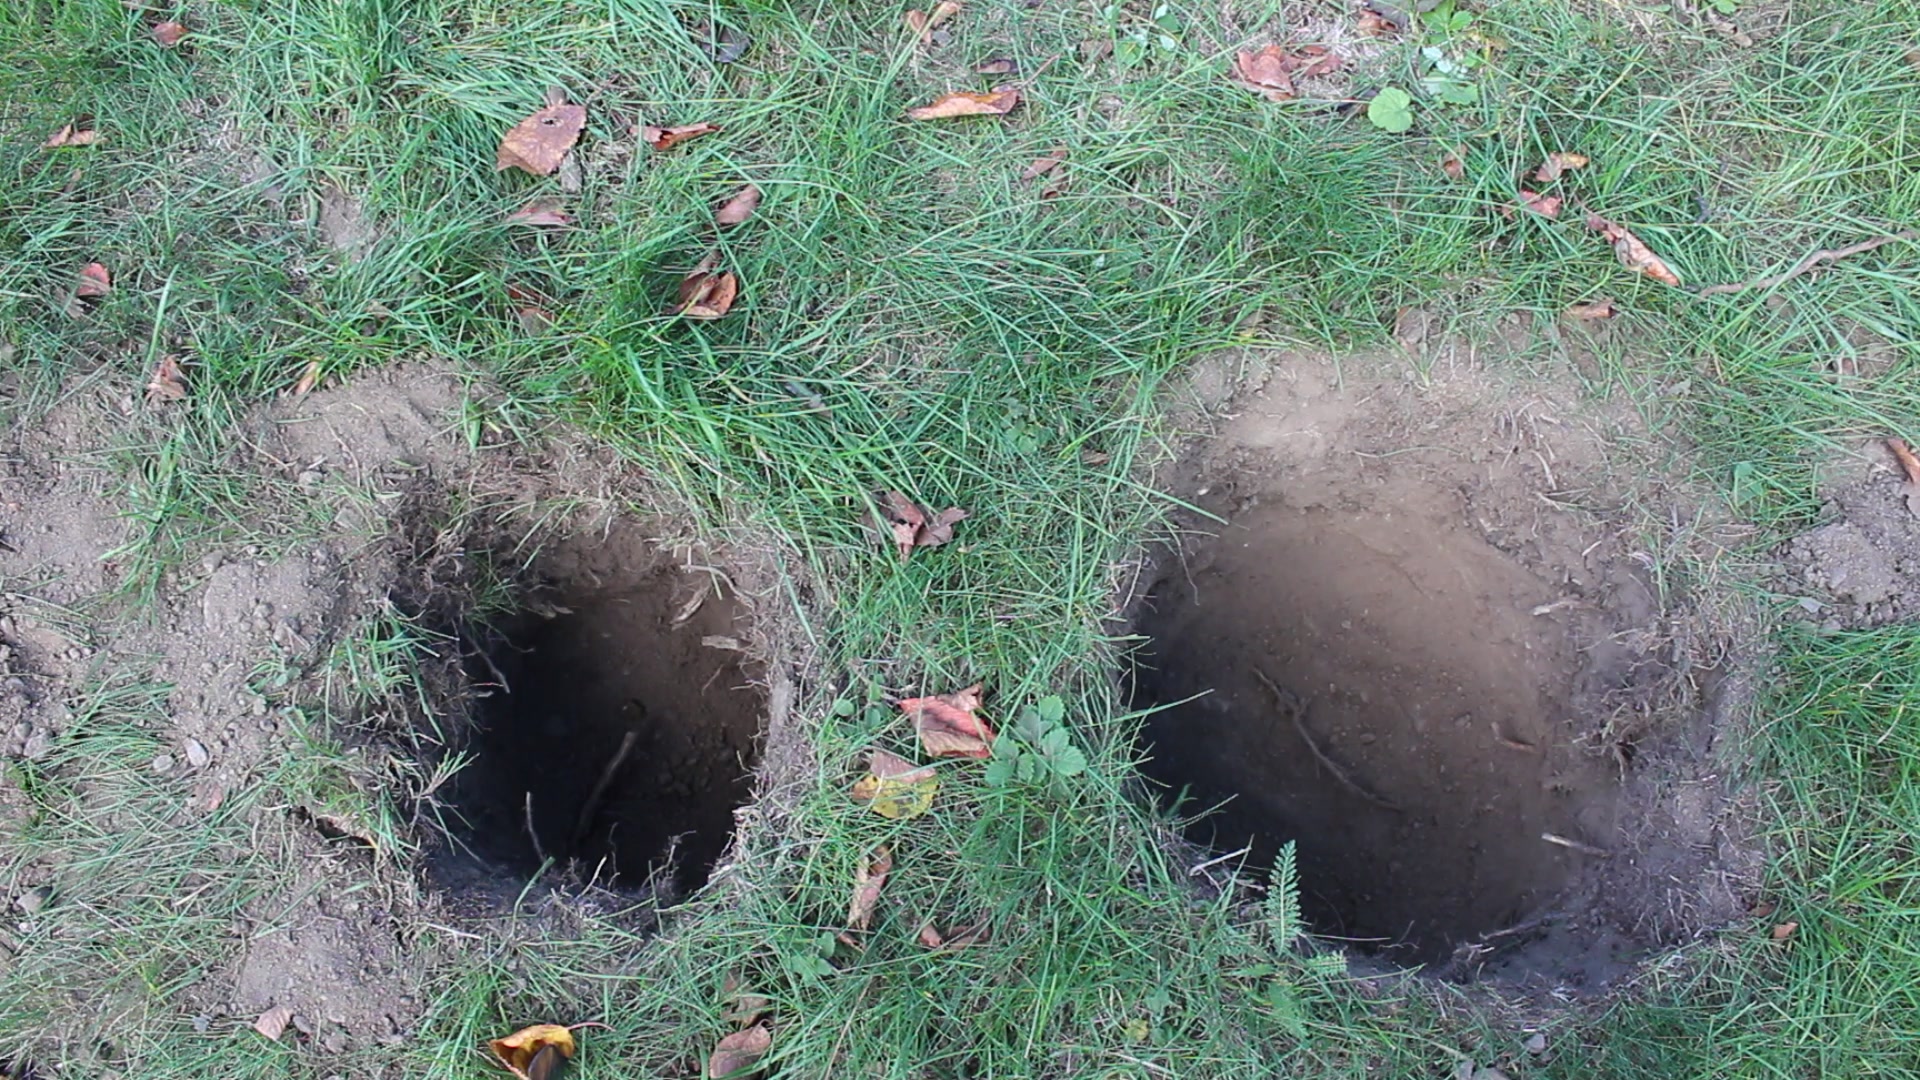
The first one came while digging. At a depth of about 40 cm I hit stones and the spade simply wouldn’t go any further. I got as deep as I could, but the fire pit is just under half a metre deep, and in my opinion it could do with a bit more. I suspect the draught would be even better in a deeper pit. It was no tragedy, though, because the fire burned anyway.
In the pit I built a top-down fire, just like the pyramid: thicker pieces at the bottom, thin sticks on top. A Dakota is lit by the same rules as any other fire, so you can build any kind of stack in it. I went with this one.
The list of pros says “easy to light” and “can be lit even in very strong wind”. It was properly windy that day, and I still had to help myself with a barbecue firelighter. So I wouldn’t sign off on those two points without reservations, except to say that it really was easier to light than a fire standing in the open. Even so, at least at the depth I managed to reach, the wind did affect the lighting.
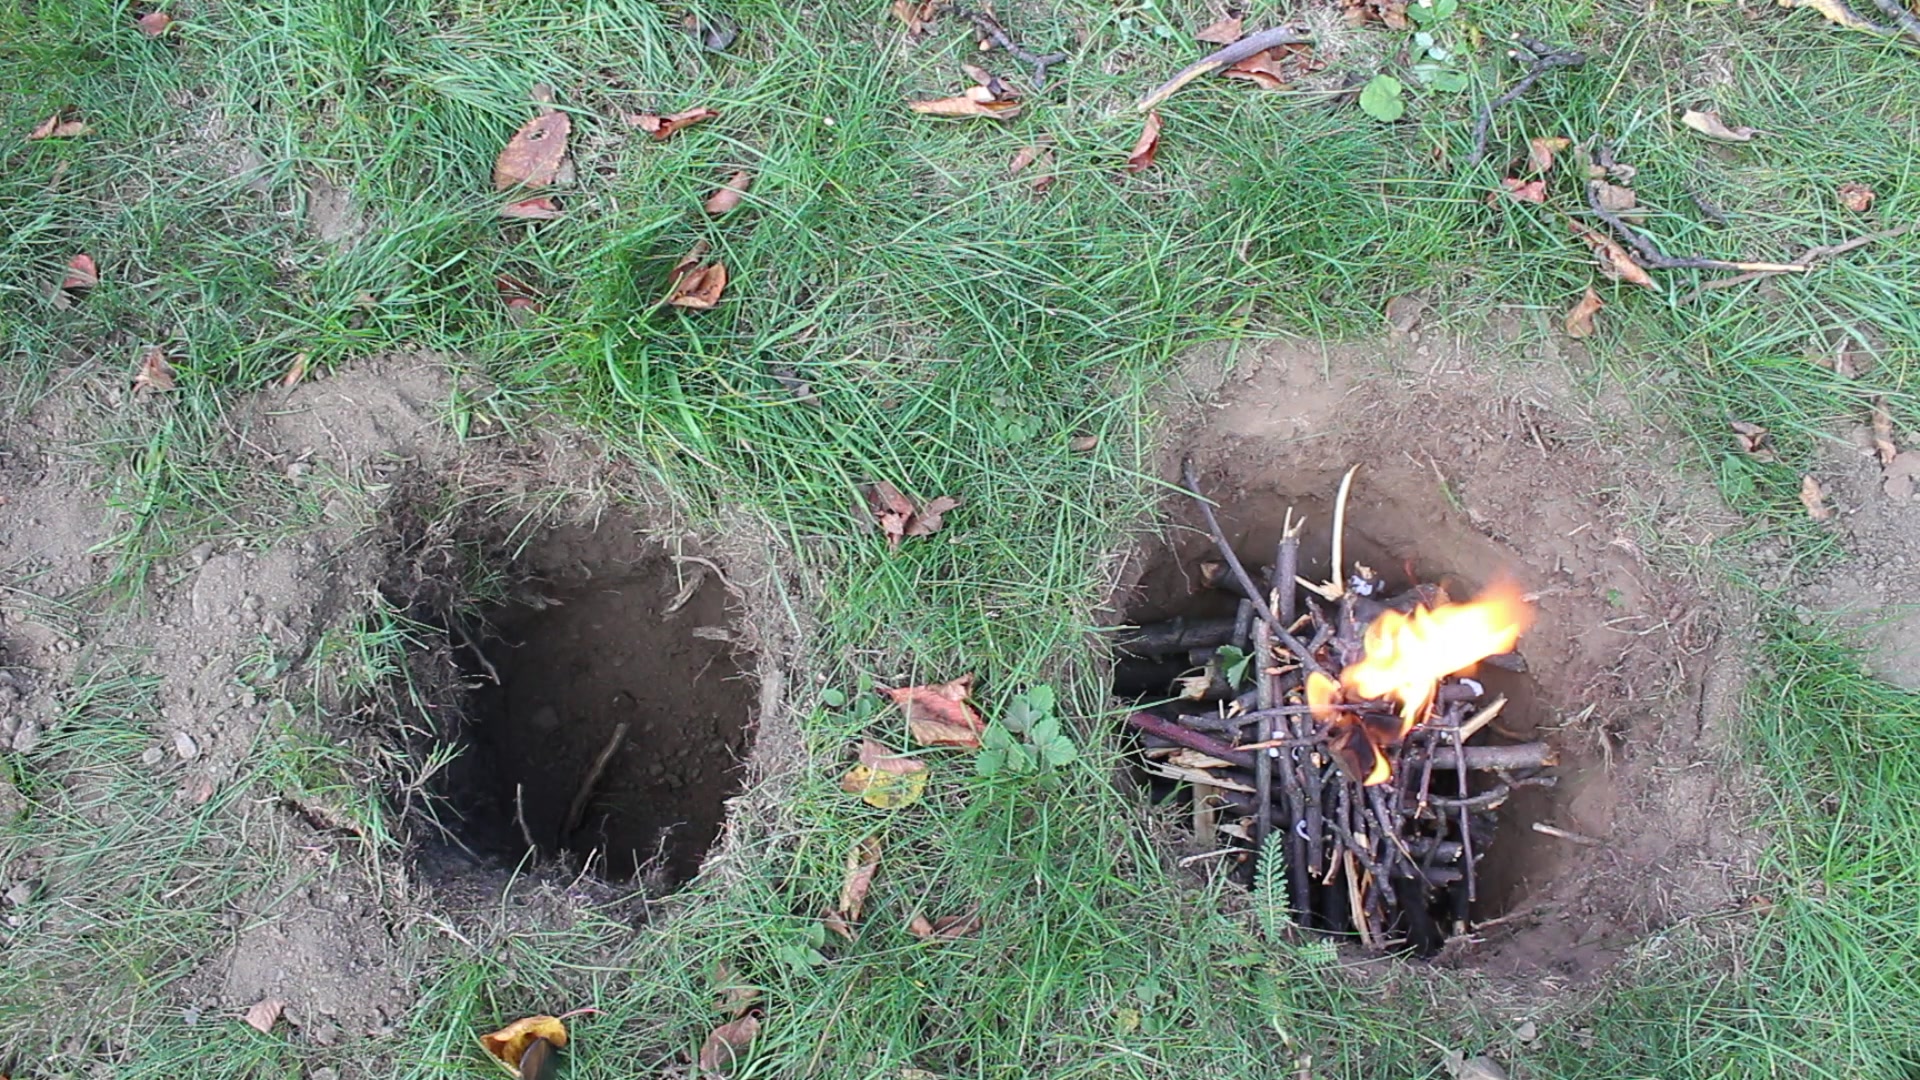
Once it got going, though, it really roared, even a little too much. The most interesting part was adding wood. I laid a few branches on top and they caught on their own, without any blowing. The air channel did the blowing for me. I think that without the channel a fire in a hole like that would burn much worse, or maybe not at all, because there is no air exchange in the pit itself.
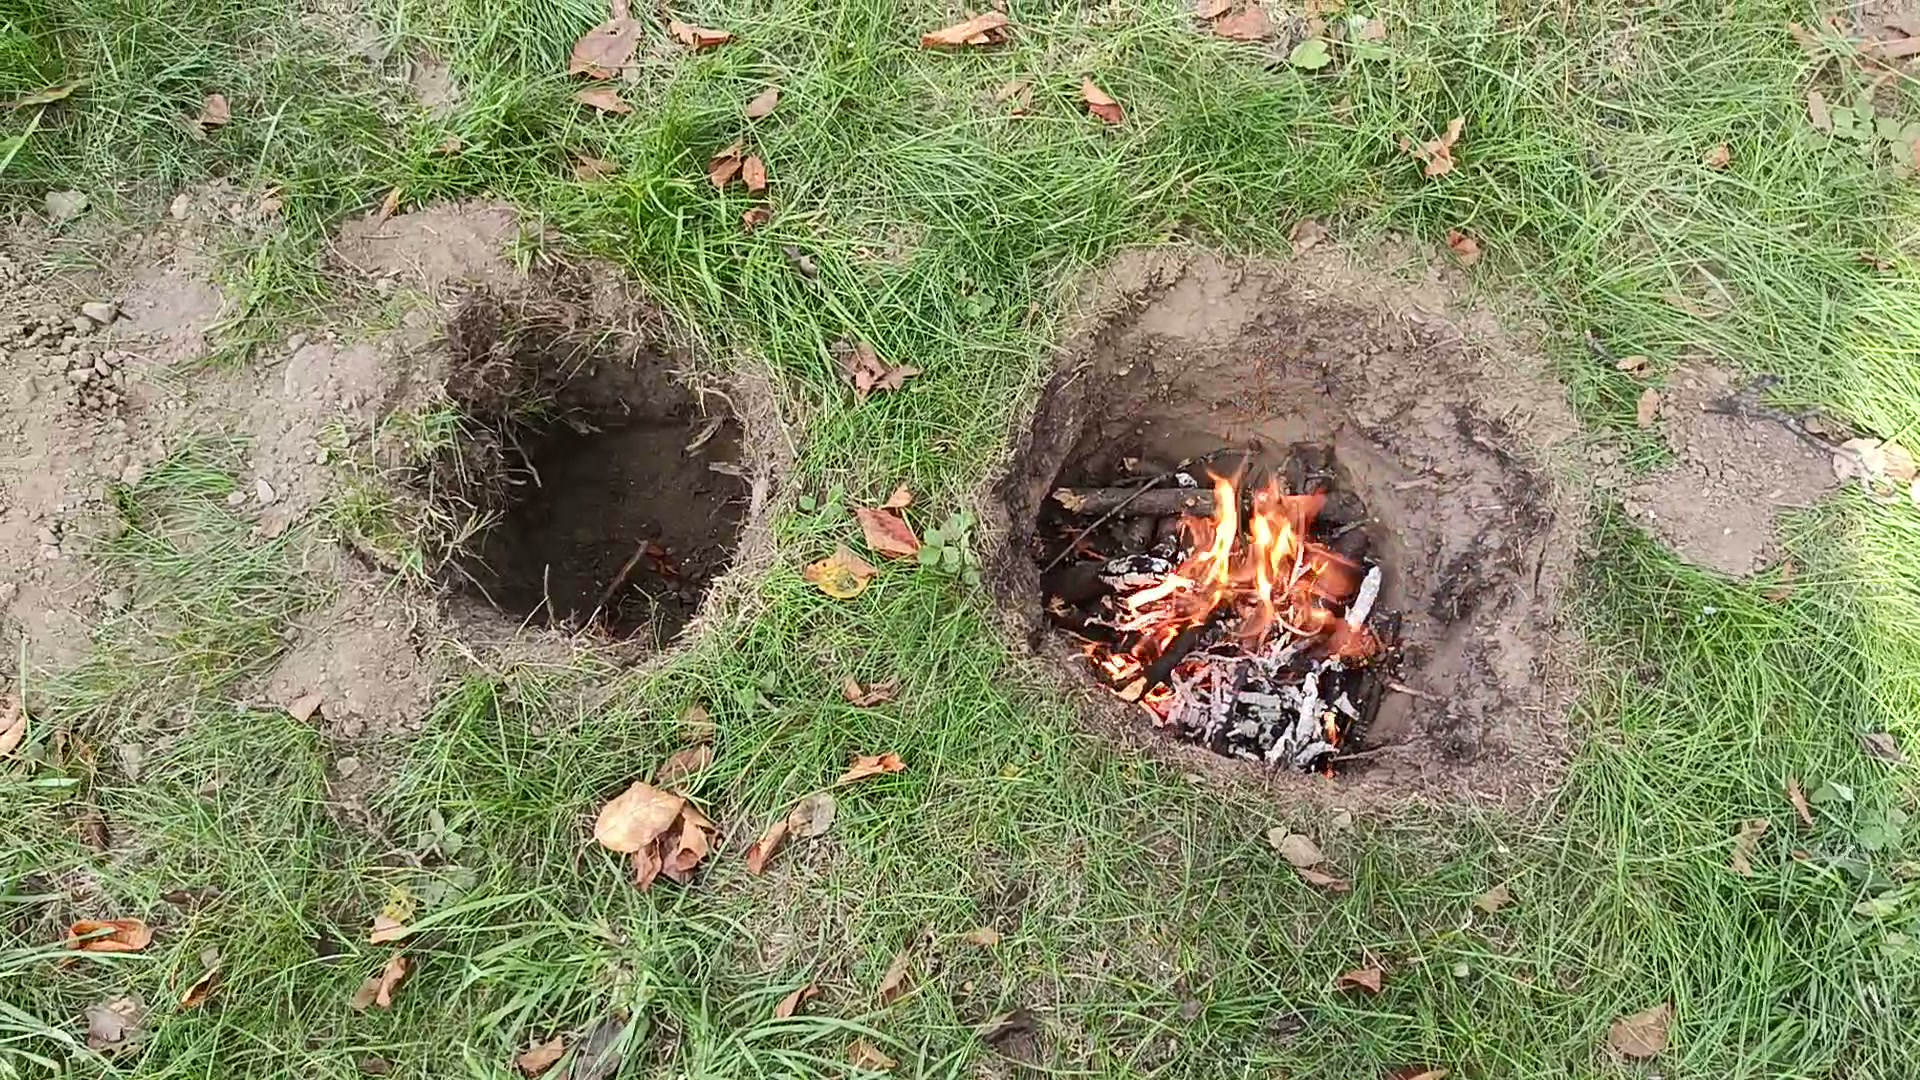
The smoke was much as I described above. Once the fire was burning, from the side you could hardly tell anything was going on in the pit. Most of the time there was hardly any smoke, though every now and then a puff escaped from the hole. So it isn’t a “smokeless” fire, but it sits low and doesn’t give off as much glow as an ordinary one, so from a distance it really is hard to spot.
I can confirm “you can cook on it”, and without fiddling with supports. I laid a piece of metal grate over the pit (in the field, fresh-cut sticks laid across will do), held it in place with two little sticks pushed into the ground so it wouldn’t slide off, and baked two tasty balls of bread dough stuffed with Gouda cheese on it. The fire was strong, so it’s better to put food nearer the edge than over the very middle. One ball fell apart and stuck to the grate, the other came out crispy, with melted cheese. A partial success.
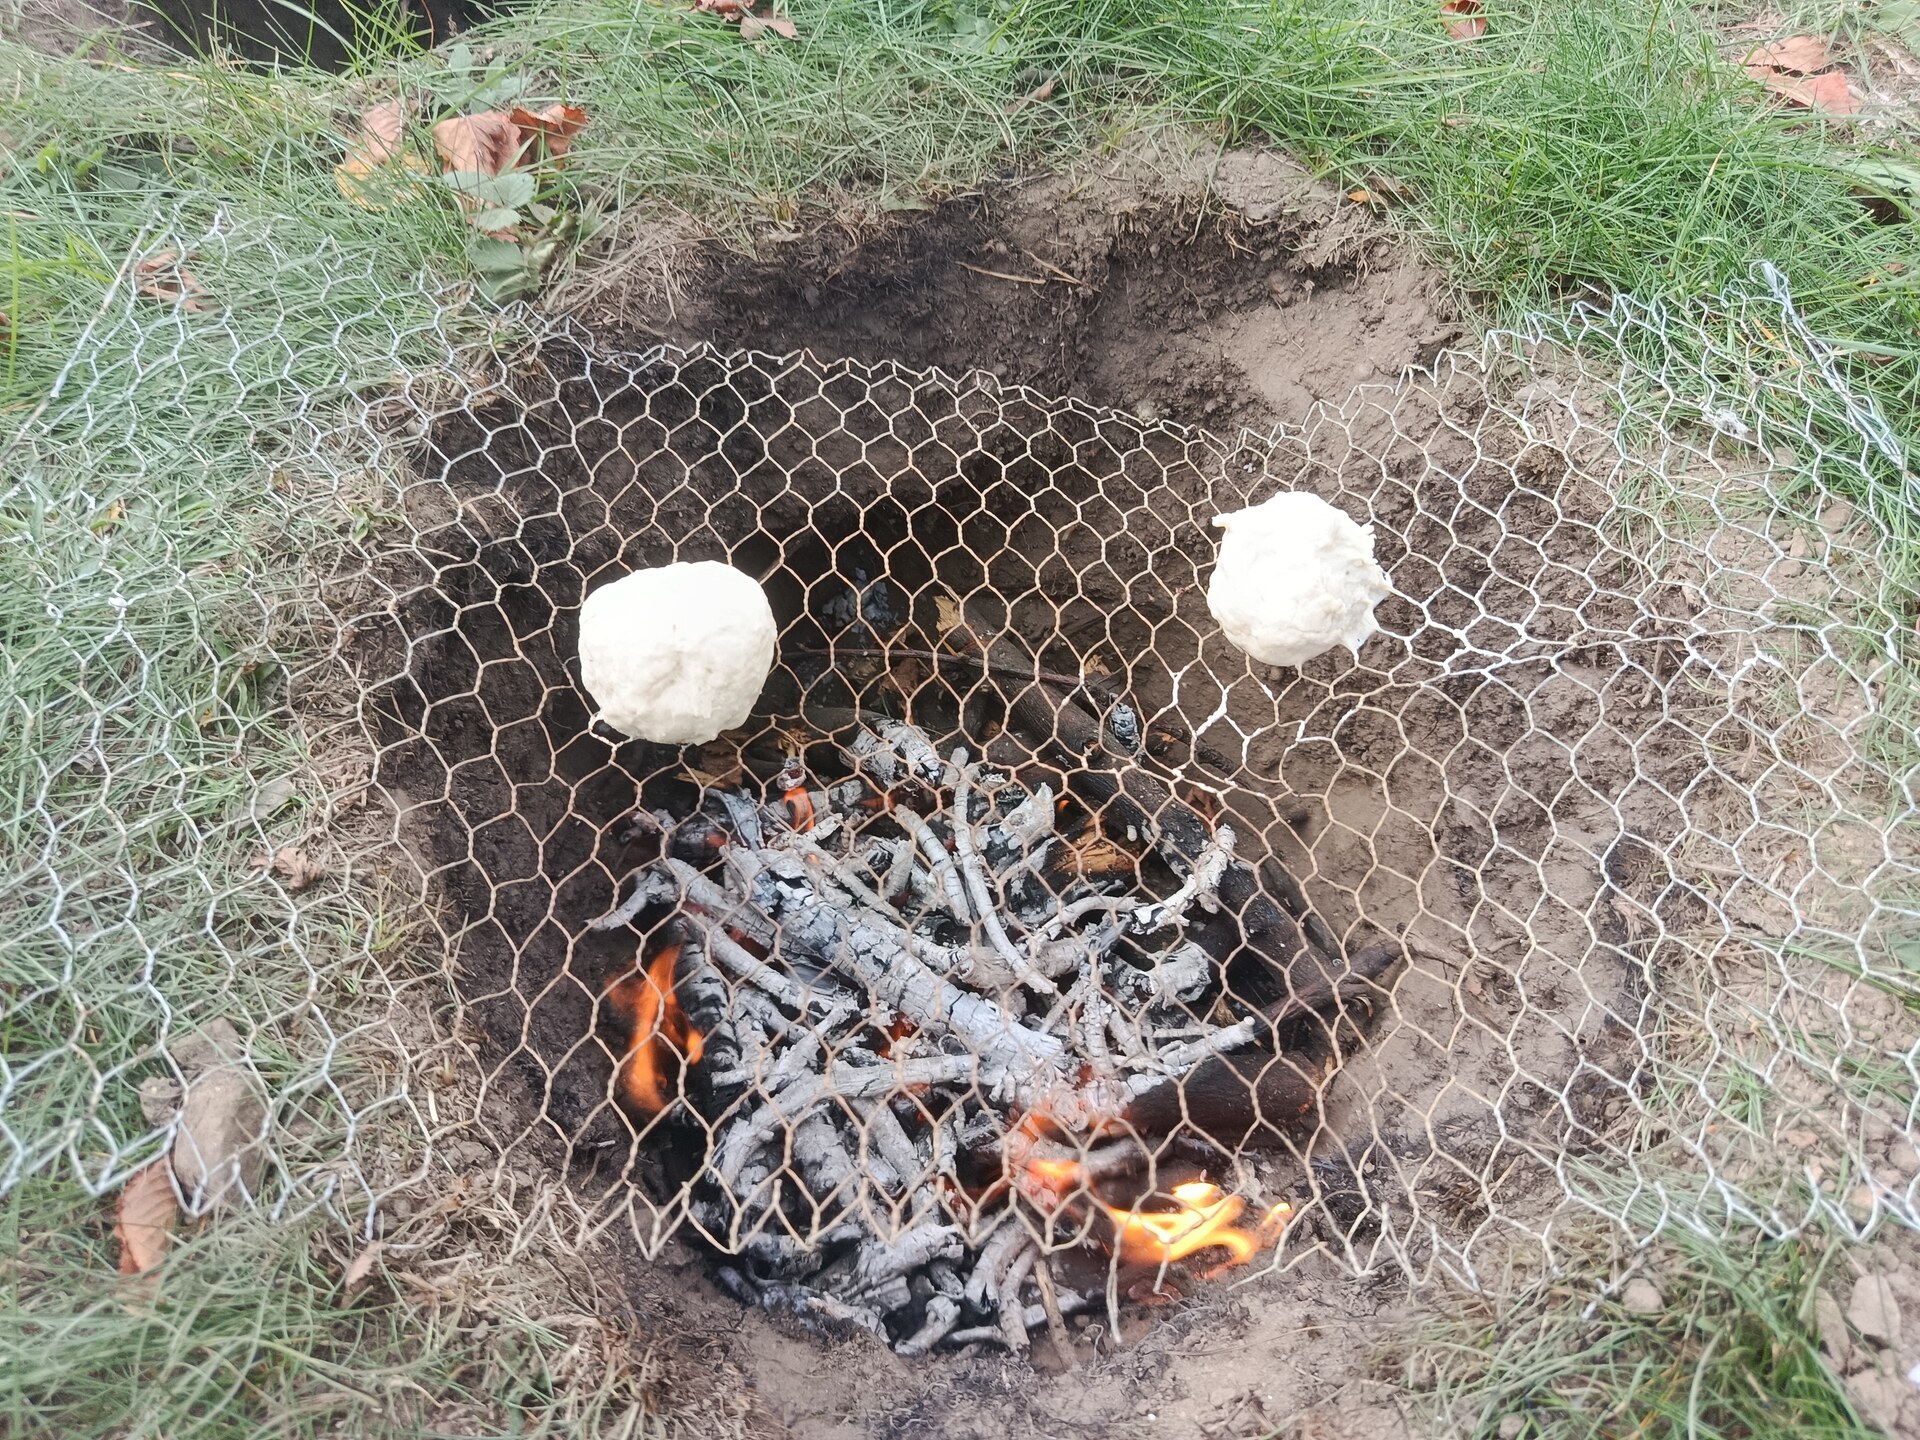
When I was done, I put the Dakota out with a watering can and didn’t spare the water. There were a few roots in the pit. Green ones, admittedly, but they were there, and embers can travel along roots underground and come up far from the fire, even several days later. On the allotment water was close at hand; out in the wild I wouldn’t have that luxury.
Finally, I filled in both holes and covered them with the clumps of turf I had set aside earlier. I was counting on there being practically no trace left after filling them in, and this is where I made my second mistake. When digging, I had thrown the soil too far away, so afterwards I had to drag it back to the hole. Some of it scattered and it made more mess than it needed to. Put it right next to the hole. A trace of the fire pit is still visible, though a small one. I think it will be gone by spring.
Do I recommend it? Yes, especially where you don’t want to draw attention and don’t want to leave a trace. Just dig deeper than I did and keep something handy to get it lit 😉
The cone fire or tipi (teepee) fire, sometimes wrongly called a “wigwam fire”
The tipi fire is one of the simplest and most popular types of campfire. You can build it from almost any fuel you happen to have to hand. The cone fire is the first kind of fire children learn to light. It burns with a bright, warm flame and copes even with damp wood1.
Because of the way it is built, the fuel may not burn completely. A cone fire burns from the bottom up and very often “produces” clouds of smoke, especially when you burn damp wood. Sometimes that smoke can actually be welcome, for example somewhere swarming with mosquitoes.
A tipi fire also needs constant watching. It has a habit of “wandering”, so you have to keep an eye on it. It’s no good for cooking either, as there is no surface you could safely stand a pot, kettle or frying pan on. You can get round that problem, though, by building a tripod to hang a cooking pot from.
This type of fire burns very quickly and needs constant feeding. It works best when you need to warm up fast, or to dry yourself and your clothes.
How do you light a tipi fire?
It’s simple: put the tinder at the bottom and build a cone of branches and sticks over it. Start with the thinner branches and finish with the thicker poles.
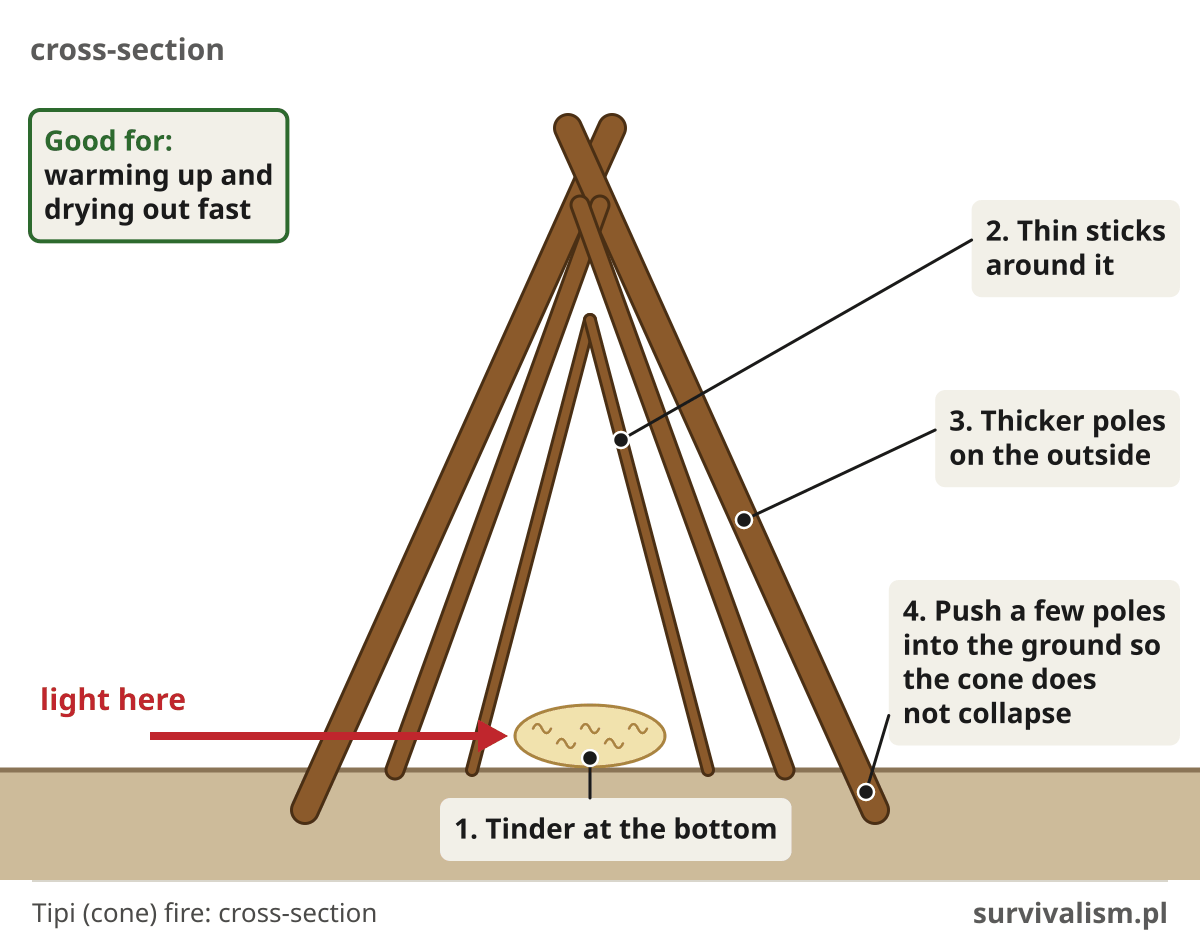
Tip: push a few of the pieces that hold the structure up into the ground, so that the fire won’t collapse so easily under its own weight as it burns.
Pros
- easy to build
- no tools needed
- needs little preparation
- easy to keep going
Cons
- burns through wood quickly
- needs constant feeding
- can be smoky
The tipi fire in practice, or how it went for me
I’ve lit a tipi fire many times, but this time the conditions were less comfortable. Autumn, on my allotment, with wet hardwood, because it had rained not long before. For tinder I used birch bark I had collected in the forest the same day. How it burns dry and how it burns wet is something I write about separately in my post on birch bark tinder.
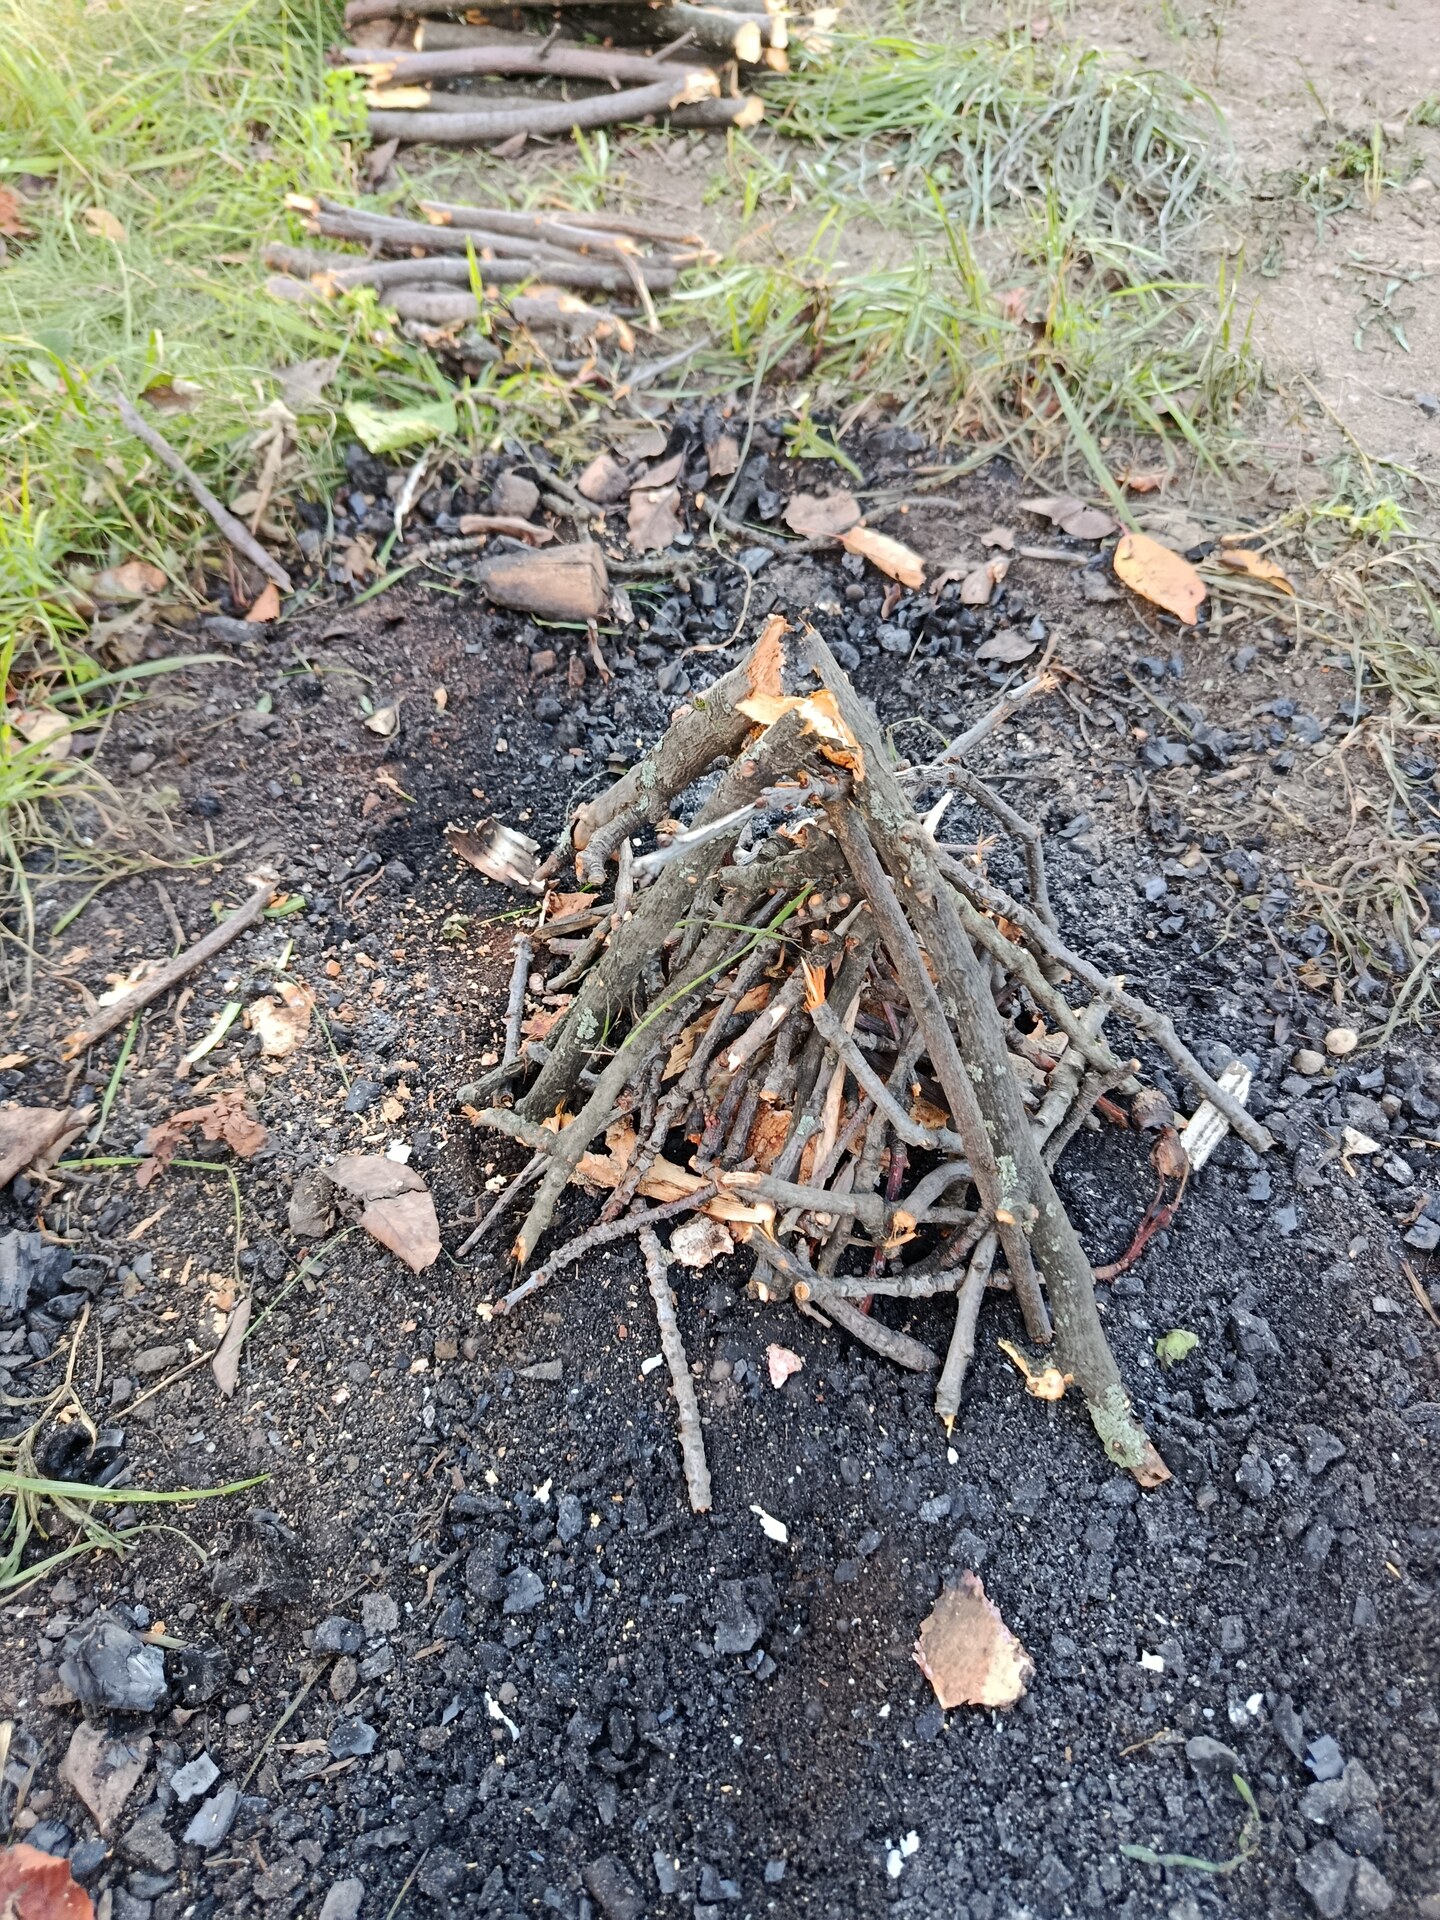
I built it exactly as in the diagram above. In the middle, right at the bottom, a small pile of birch bark. Around it the thinnest sticks, and the further from the centre, the thicker and longer they got, because they need something to lean on. Last of all the thickest poles.
While laying it, I made sure there were gaps between the sticks. A fire needs three things, fuel, heat and oxygen, the so-called fire triangle. Without any one of them there is no fire, and a stack laid too tightly would simply smother itself.
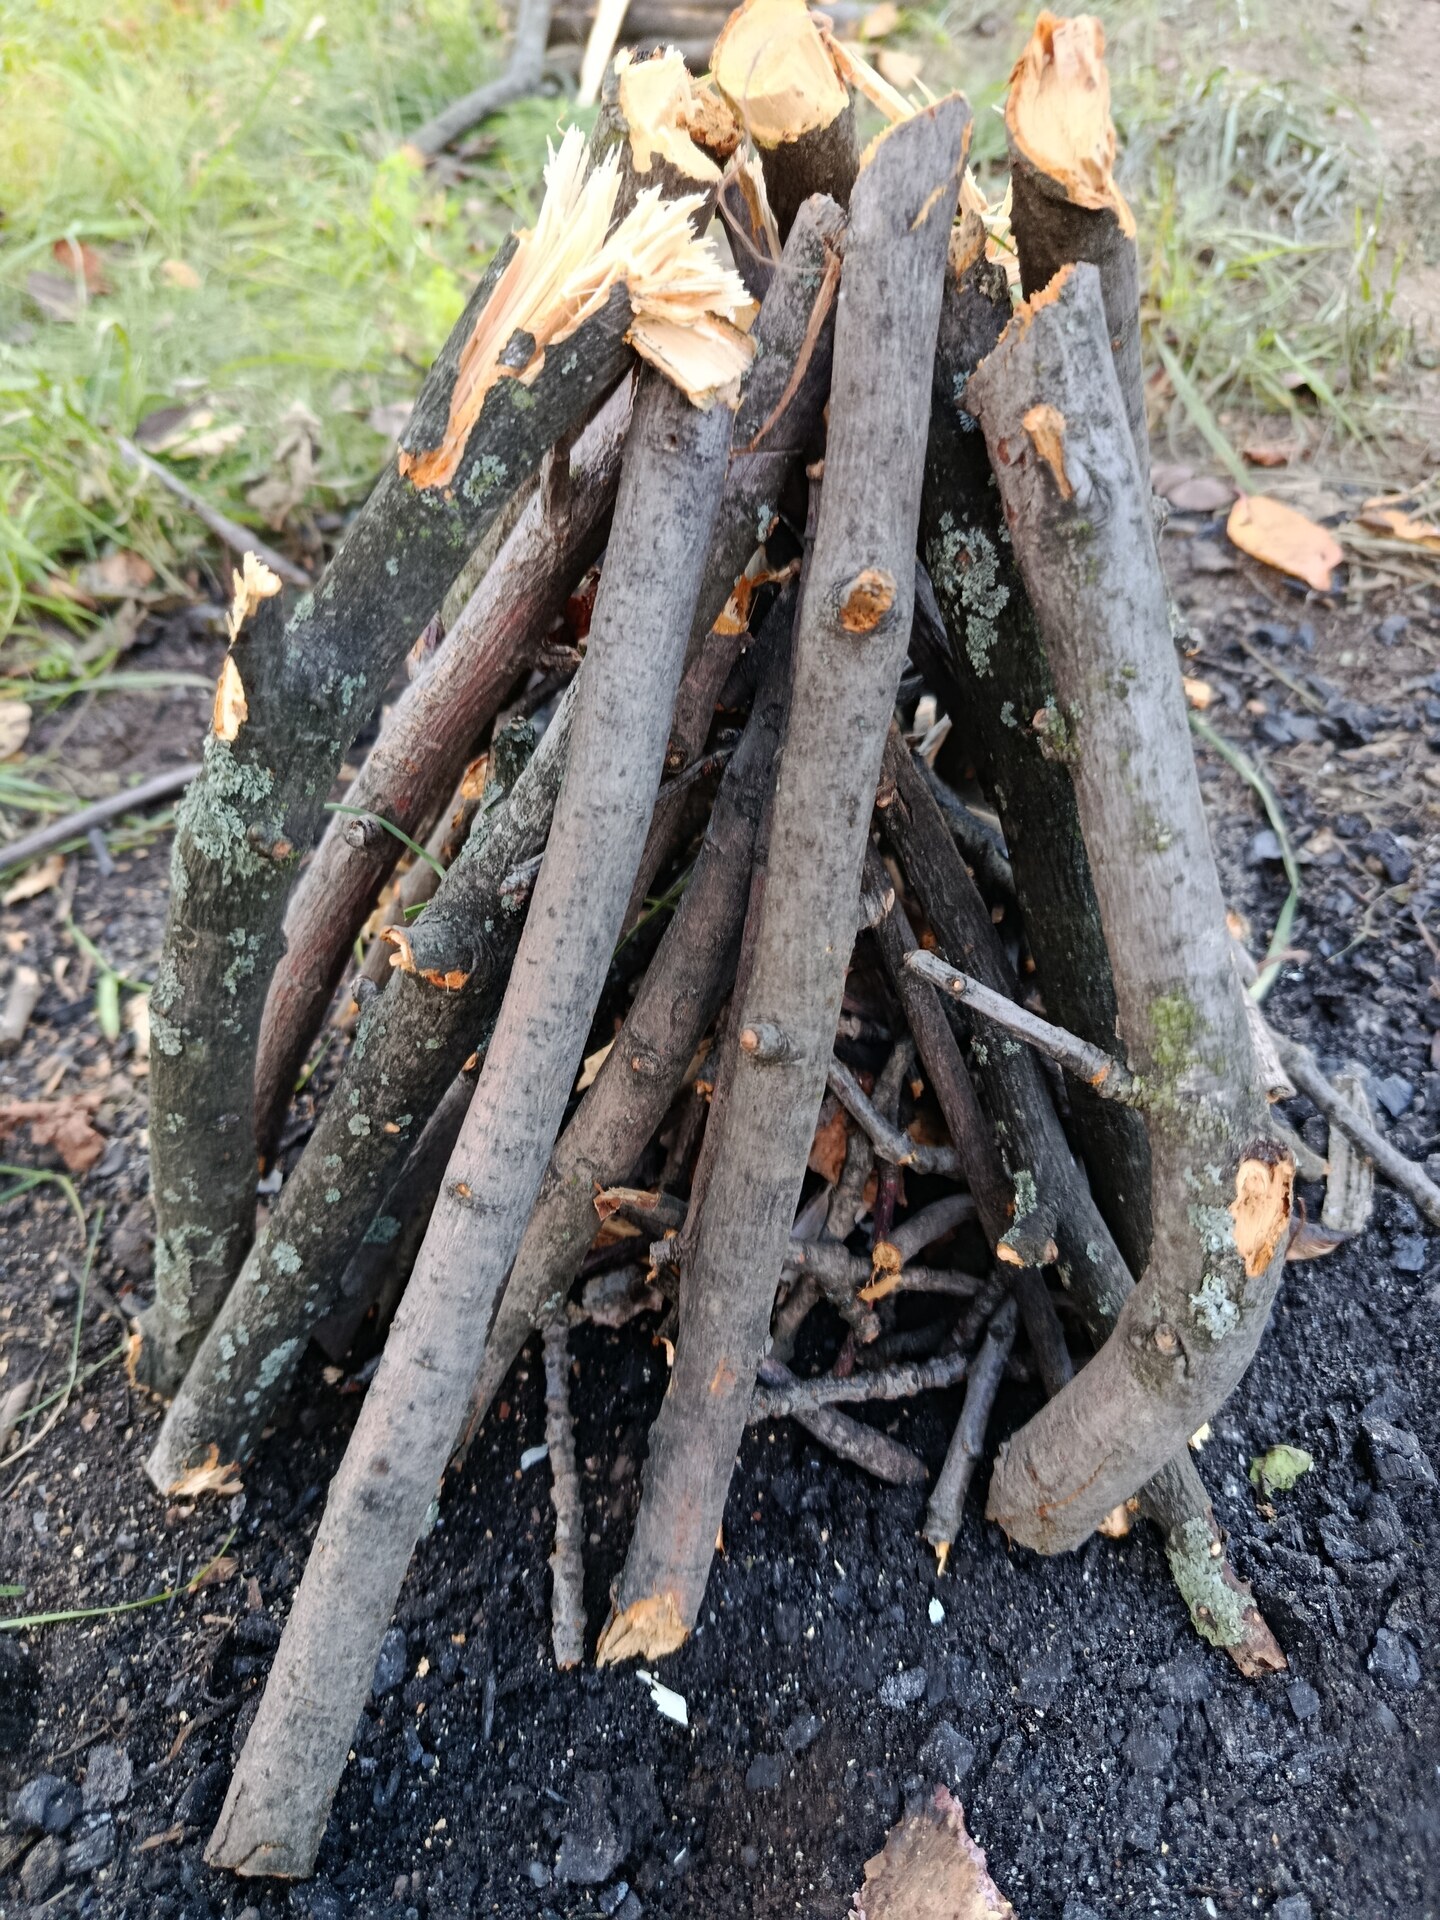
In shape it resembles a tipi, the cone-shaped hide tent the Plains peoples lived in. Hence the name. It has little in common with a wigwam, though, because a wigwam is a domed hut of bent poles, covered with bark or mats, built by the woodland peoples of north-eastern America.9
I lit the bark from below, reaching in between the poles, and after a moment it caught. The smallest sticks caught from the bark, the thicker ones from those, and so on. I can confirm the point about damp wood from the description above, at least with birch bark as tinder.
I can also confirm the “can be smoky” point. The fire had barely got going and there was already plenty of smoke, and the wet branches only added to it. On the allotment that’s no problem, but if you don’t want to give away your presence, a tipi isn’t the best choice, and it’s better to spend a little time building a Dakota fire. Once the fire got going, it smoked much less. The old rule held true as well, that whichever side of the fire you stand on, the smoke will find you anyway 😉
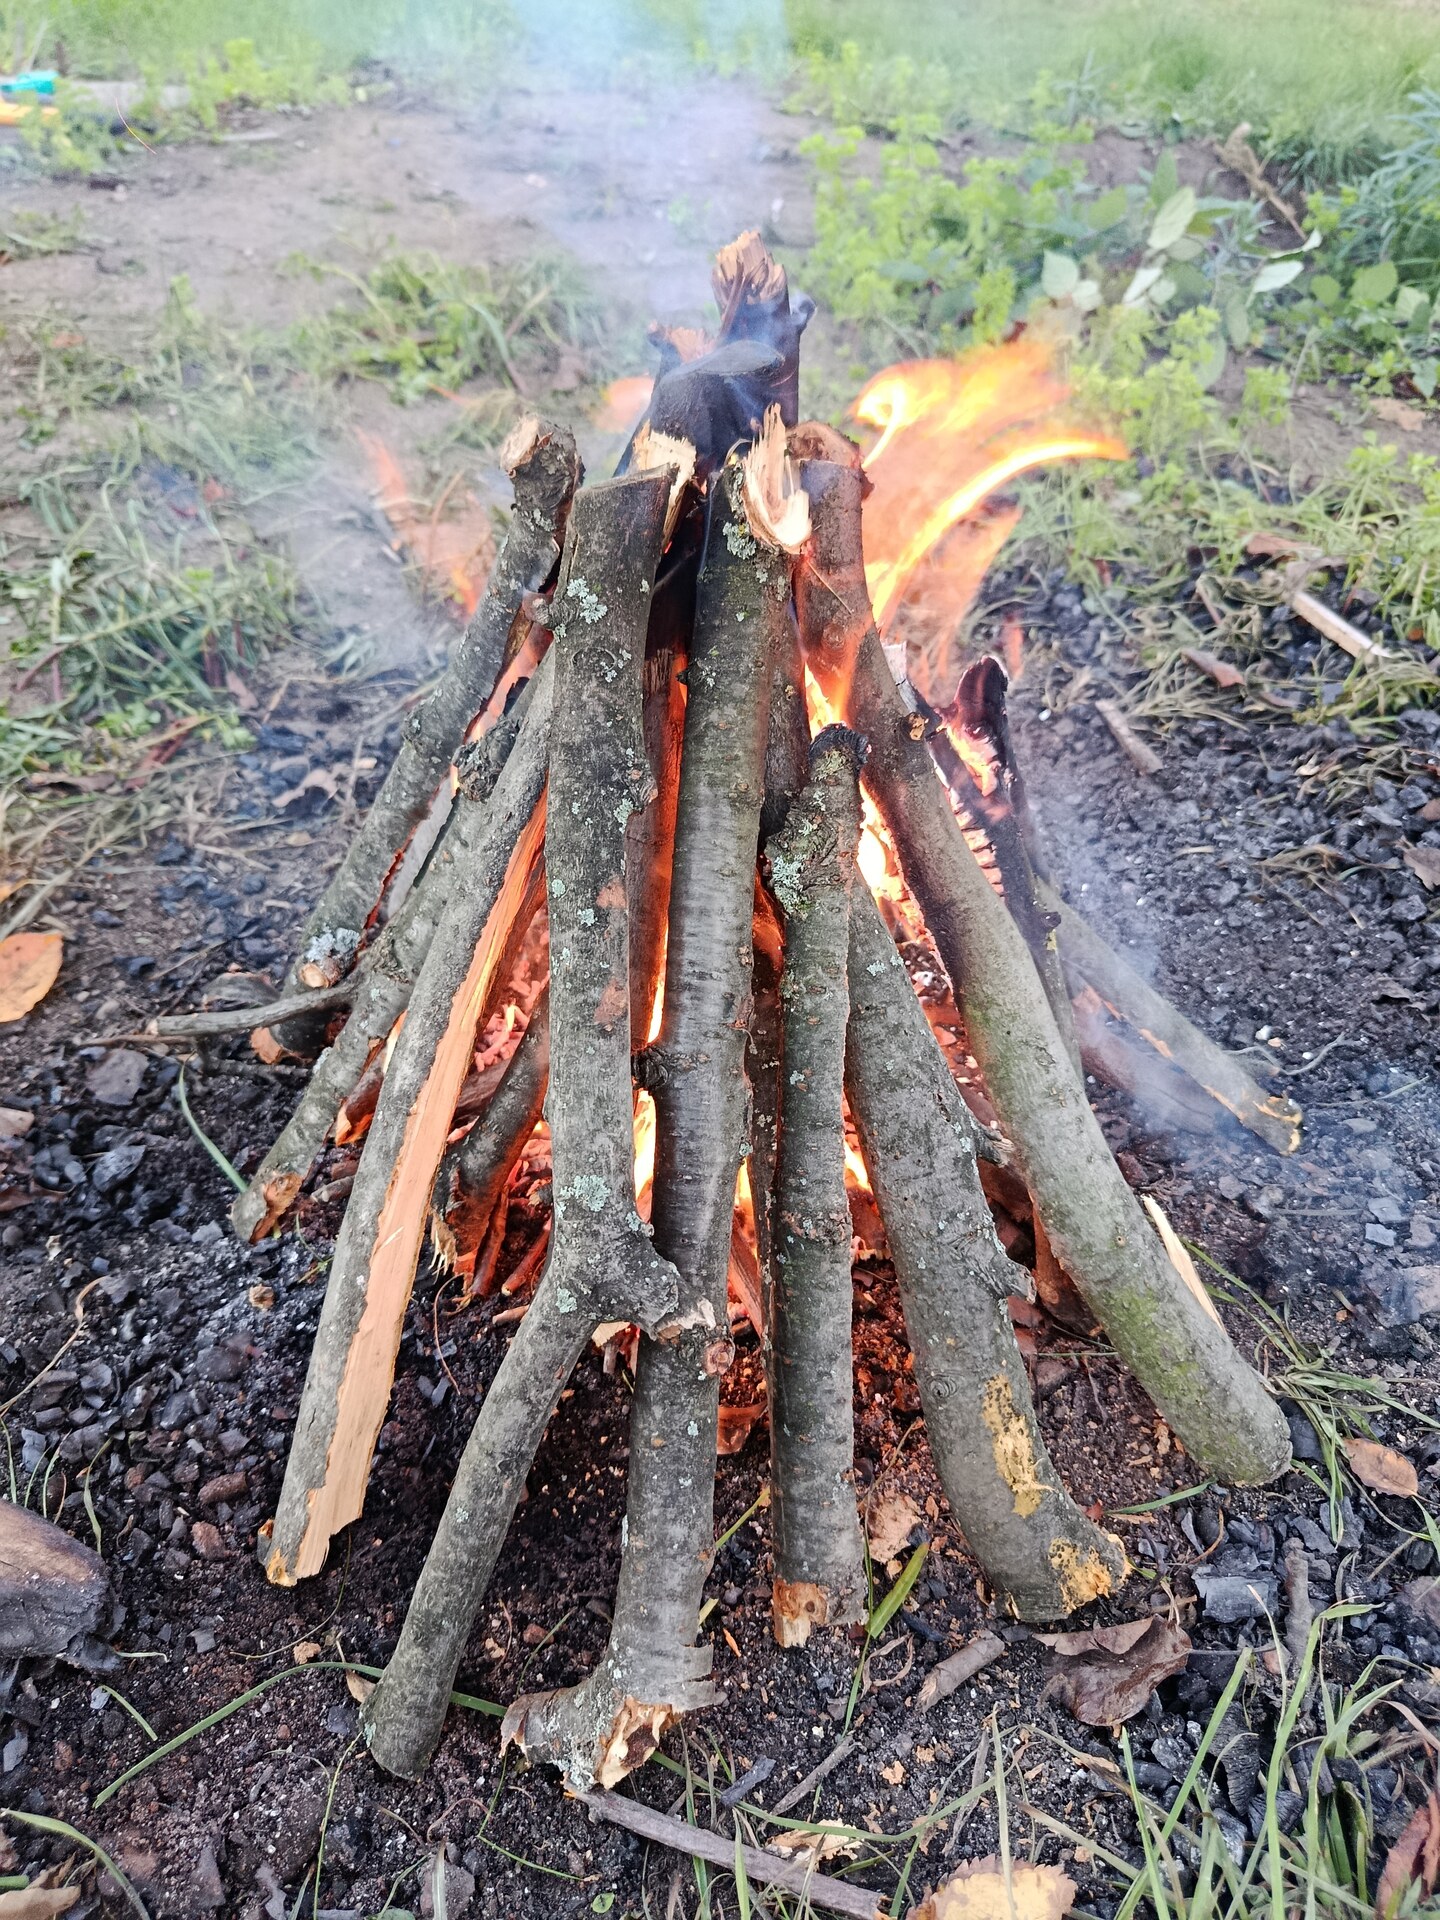
I also made one mistake. When I lit it, there was hardly any wind, but a moment later it picked up a little, and that’s when it turned out I had lit the stack from the wrong side. I should have lit it from the side the wind was coming from, then the fire would have moved evenly across to the other side. A tipi has the advantage, though, that wherever the fuel burns away, the cone simply collapses, and the poles that haven’t burnt yet slide down into the fire on their own. So it evens itself out.
For the first few minutes I didn’t touch anything. The finest sticks at the bottom burnt away, and the fire was still standing. The branches higher up didn’t catch straight away, but dried above the fire and waited their turn. After another few minutes, though, I had to help it a little. The dry material in the middle had burnt away and the outer branches were still too wet, so I moved a few pieces of wood around. Literally half a minute of work and it carried on burning without any trouble. So I give “easy to keep going” a pass with a small reservation.
When the right moment came, I added two bigger pieces of wood, charred in a previous fire. I laid them above the fire, not in it, so as not to smother it by cutting off its oxygen. If you pile on too much at once, the fire loses its air supply and goes out. Logs laid like that smoke a little, dry out and char, and then catch one from the other.
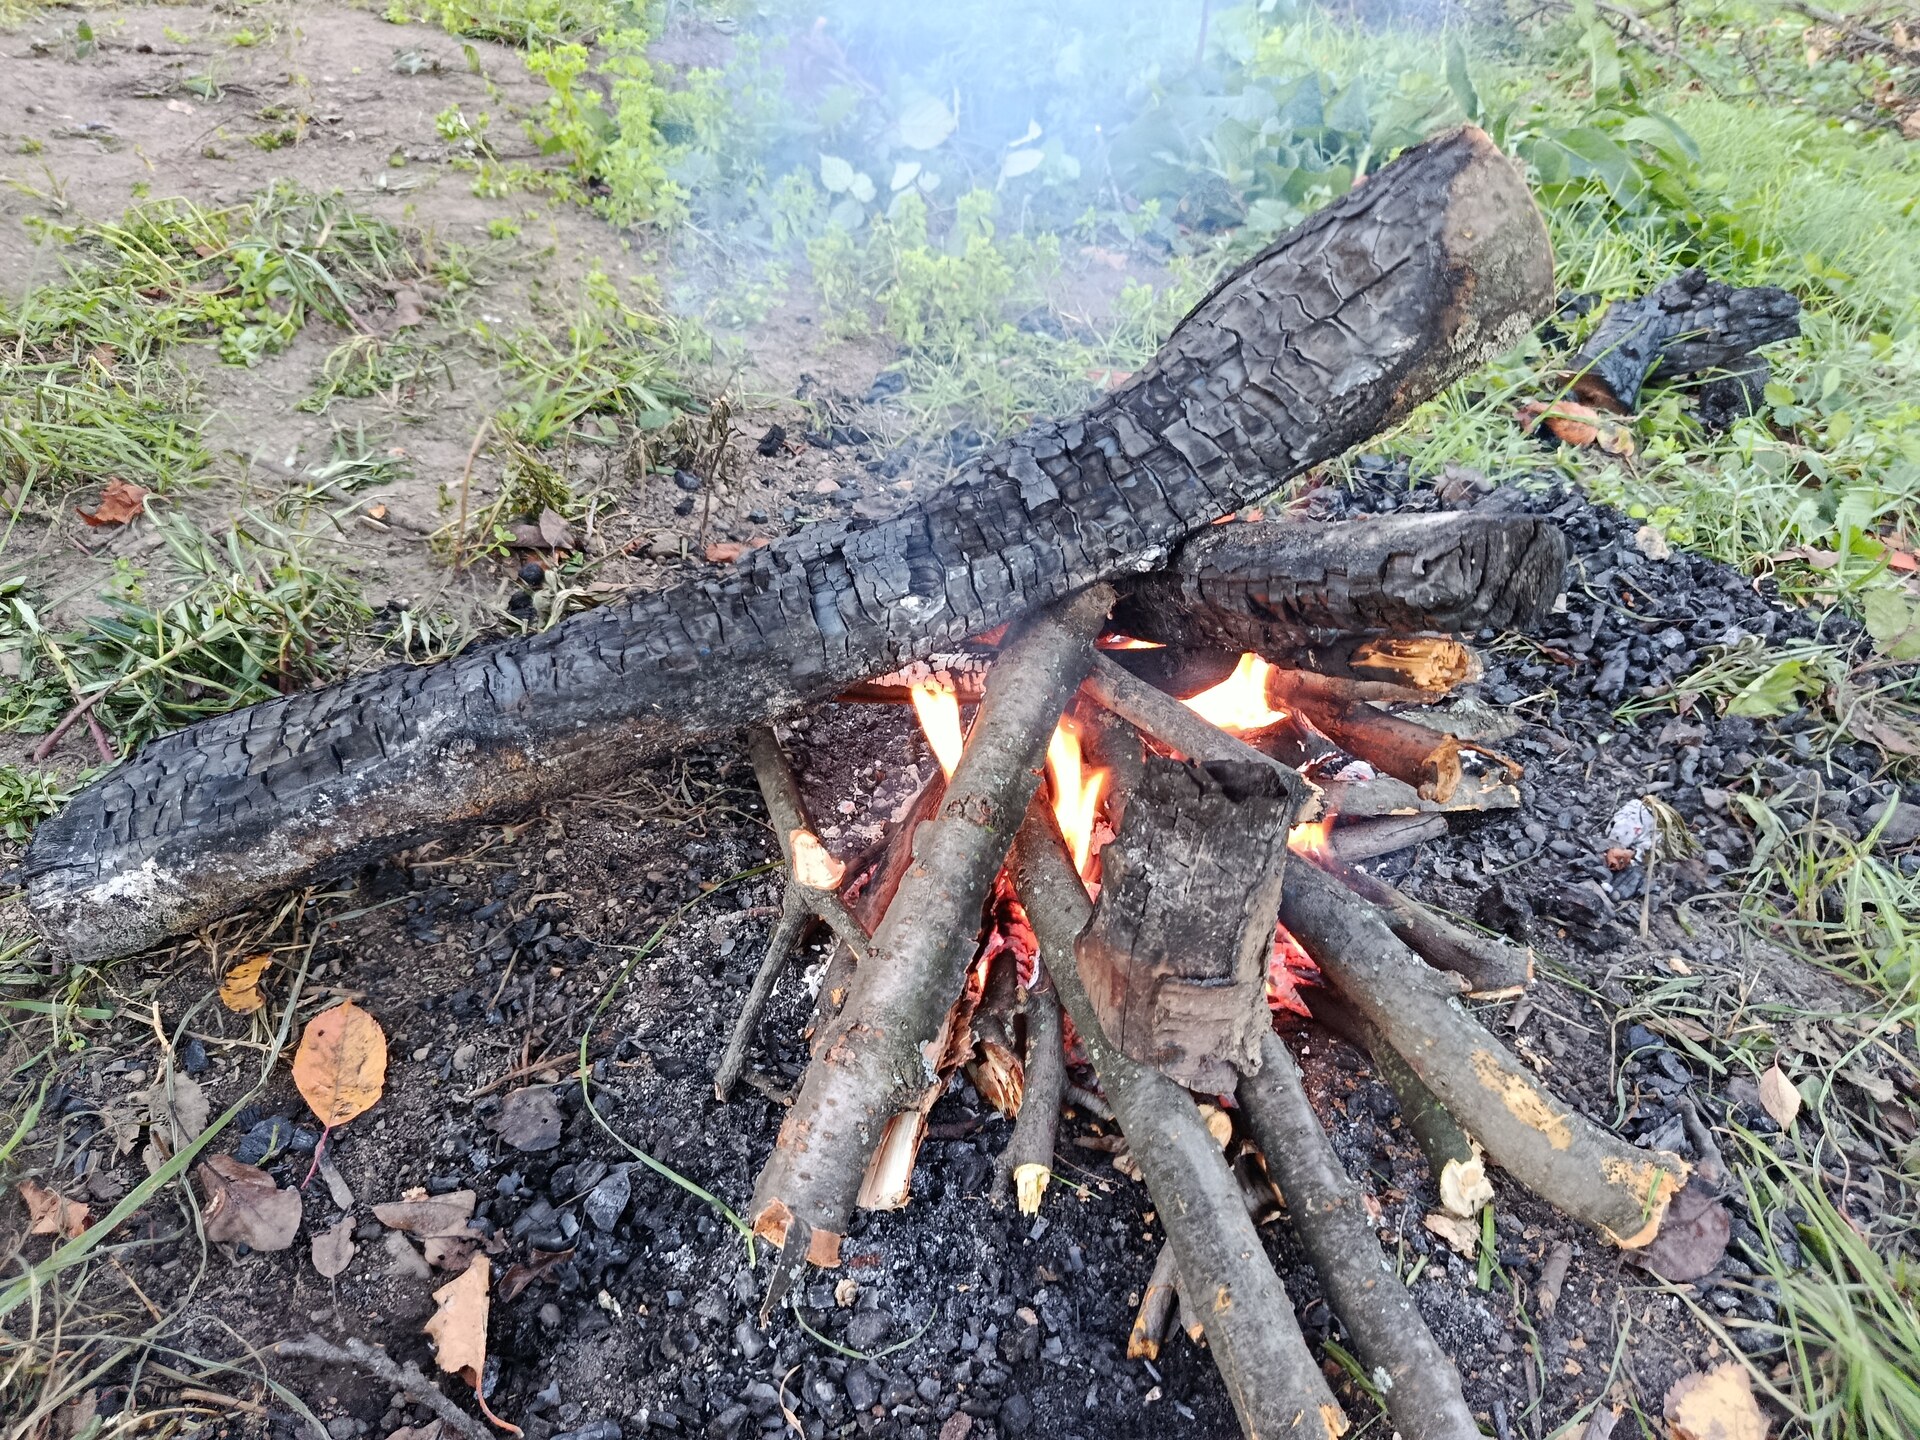
The cons from the list above are true too. If you want a tipi to burn for a long time, you have to keep feeding it. That suited me fine, as that day I was burning pruned branches from the allotment anyway 🙂
The nodia, also called nodya, najda, nojda, the Siberian log fire or simply the Siberian fire
This is a really interesting type of campfire. This way of burning a fire was probably “invented” in Siberia, but it is also known in many other places, including Scandinavia and North America. It comes in several variants too, both in how the fuel is laid and in how it is lit.
Put simply, a nodia fire is two logs (or more, in other versions) laid one on top of the other, parallel.
The nodia is a fire meant mainly to keep your sleeping spot warm. Properly prepared, it burns for a long time (as much as 8-10 hours, depending on the thickness of the logs and the type of wood) and needs only occasional tending, so you can sleep the whole night beside it (do you want to know how long you can go without sleep?) without having to add fuel. It does have its drawbacks, though.
First, in most variants you can’t cook on it. So if we want a hot meal, we should light a second, more “traditional” fire. Second, building a nodia is a lot of work and can take as long as 2 hours. And third, to make a Siberian-style fire we need tools - at least an axe or a hatchet, and ideally a saw as well.
How do you build a nodia fire?
For the most basic version, we will need two logs at least 20 cm in diameter (obviously, the bigger the diameter, the longer our fire will burn). Make sure the wood you want to use for the nodia is dry. Otherwise we may not get the fire going at all, and even if we’re lucky, the wood will spit sparks like a machine gun, which is far from ideal when we’re asleep in a sleeping bag made of flammable material.
Conifers “spit” the most, because of their high resin and essential oil content. On the other hand - for the same reason - they also burn the best. Spruce is probably the worst “spitter” of all. Pine is probably the best compromise between burning well and “low spittiness”. Just make sure it is dry, inside as well. That is why the best wood for a nodia is a tree that has died but is still standing upright, not in direct contact with the ground and the forest floor. Just remember that felling a dead tree is dangerous work and calls for a great deal of care (a dead tree can snap at an unexpected point, and dry branches fall from the crown - don’t do it alone, check which way the tree is leaning, and plan your escape route in advance).
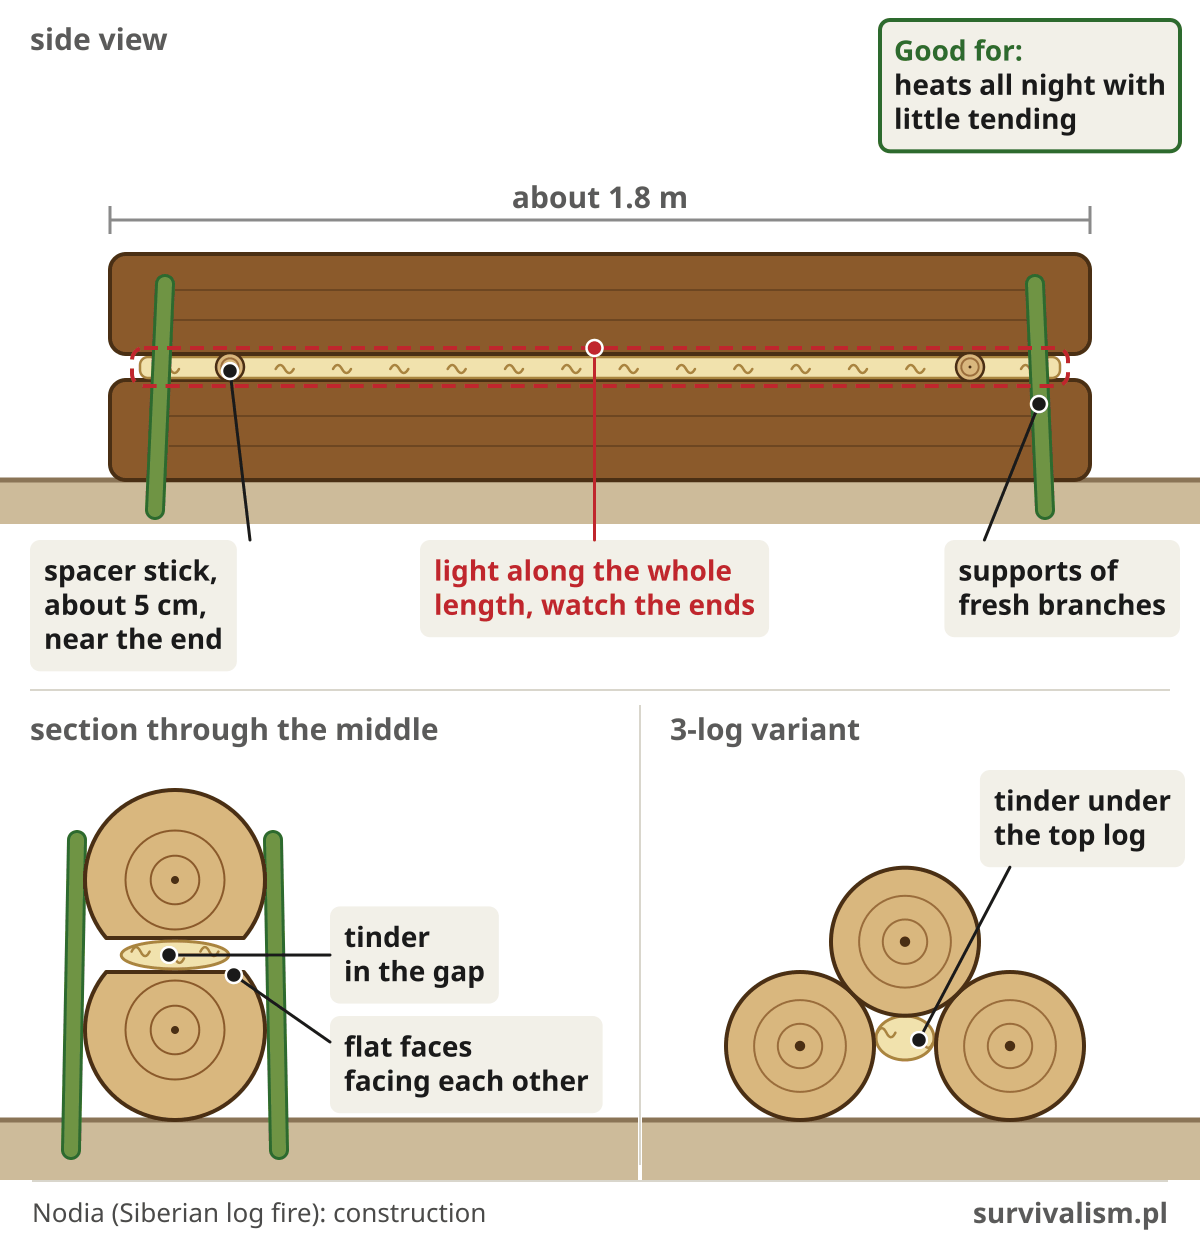
Once we’ve picked a candidate for our fire, we can start building the nodia. Cut two logs roughly as long as you are tall, and remove any branches sticking out and loose bits of bark. Then - with a saw and an axe - hew a flat face along the whole length of both logs. That flat face will make it easy to lay the tinder.
Once our logs are ready, lay one of them flat side up. Spread the tinder on that flat face. You need plenty of it, and it should be good quality too. Some of the best tinder you can find in a forest is birch bark (collect it from dead, fallen trunks; don’t strip it from living trees) and dry conifer twigs. You can also use dry grass. It is also a good idea to keep the shavings we got when hewing the flat faces I mentioned earlier. Let me stress it once more - it is very important for the tinder to be as good as possible, because the success of the whole undertaking depends on it to a large extent.
So let’s sum up our progress so far. We have two dry pine logs, about 1.8 m long and 20 cm in diameter. Both have been cleared of branches and both have a flat face hewn along their whole length. One of the logs lies flat side up. On that flat face we lay - along the whole length of the log - a layer of tinder made of birch bark, dry conifer twigs and the shavings from our work so far.
For our fire to light without trouble, we need to make sure air can circulate properly in the gap between the logs, where our tinder is lying now. We do that by laying two spacer sticks across, about 5 cm in diameter - by eye. Place them the same distance from the centre, nearer the ends of the logs, so that the whole structure stays stable2.
Now carefully lay the second log on top, this time flat side down. At this point our structure should look like this: two logs, one on top of the other, with the tinder and the spacer sticks between them.
The fire’s centre of gravity will shift as it burns, so to make it more stable, let’s also drive in some supports to stop the top log from rolling off. Make them from thick, fresh branches so that they last as long as possible before they burn through. You can also drive in more next to them, further out, as extra protection. Drive the supports into the ground at a slight angle, almost vertically, so that their tops hold up the upper log. That keeps the chances of them burning through quickly to a minimum.
Let’s light our nodia!
The momentous hour hath cometh: time to light the fire. Try to spread the fire evenly and make sure it burns along the whole length, paying particular attention to the ends where the logs meet, because that is usually where it is hardest to keep the fire going. If the ends are not burning properly, the fire will hollow out a “boat” in the middle and go out.
Remember - the whole idea of this kind of fire rests on the gap that forms between the two burning logs. If it is too small or too big (or there is no gap at all), the fire won’t burn. That is exactly why we put in the spacer sticks, which - once the fire has properly caught - you can remove.
That’s it. From the moment the fire is burning evenly along its whole length without any help from us, we’re “sorted”. The fire should burn for a long time, as much as 8 hours or even longer. You can lay your sleeping bag alongside the fire and enjoy the warmth all night (but far enough away that sparks can’t reach it - a single spark can easily burn through a synthetic sleeping bag or tent. If there are several of you, sleep in shifts so that someone is always watching the fire, and when the forest floor is dry, don’t light a nodia at all). Also remember that a nodia shouldn’t really burn with a bright flame, or it will burn out too quickly. What we want is warm, steady embers, without flames. (In the morning, before you move on, pull the logs apart, drown them with water, stir the embers and drown them again - thick logs can smoulder for hours.)
Other versions of the nodia
The procedure I’ve described is not the only way to light a nodia. There are other methods too.
You can, for example, light the tinder first and only put the second log on top once the fire is burning fairly strongly. You can skip the flat faces and still get it lit, but you’ll “wear yourself out” a lot more trying to keep the fire going in its early stage. There is also an option where, instead of laying dry tinder, you put in embers from a fire you lit earlier. It’s worth testing which method suits you best. A lot depends on the conditions you find yourself in and on what nature throws at you.
An interesting variant of the nodia is the three-log version. Lay two logs side by side on the ground, parallel to each other, and the third on top between them, making a mini pyramid3. Some people may find this method simpler, though it is probably more work to prepare.
Pros
- needs only occasional tending
- burns for a very long time
- warms your whole body well and evenly at night
Cons
- needs tools
- hard to prepare
- takes a long time to prepare
- gives little light
- you can’t cook on it
The Swedish fire, Swedish torch or Swedish fire log
Tradition credits the invention of the Swedish fire, also called the Swedish torch, to - obviously - the Swedes, and more specifically to Swedish soldiers in the Thirty Years’ War (1618-1648). You will also come across the names Canadian candle and Finnish candle, though. Personally, I’d lean towards the first option 🙂
The Swedish torch has become quite popular in recent years. You can even buy ready-made ones that you just have to light. The only thing it really shares with the torch you carry in your hand is the name (if that’s the one you’re after, have a look at the article on how to make a torch).
A Swedish-style fire is very economical with fuel. It burns noticeably longer than a tipi fire on a similar volume of fuel - usually 2 to 5 hours, depending on the size of the log4. It also needs only occasional tending. On top of that, you can stand pots and other cookware on it. Its heat goes mainly upwards, though, so it is great for cooking but does less to warm the people sitting around it.
This type of fire comes in many variants, and there are several ways to make one.
Making it takes a bit of practice and some skill with tools. First you need a suitably sized chunk of wood, ideally a cleanly cut section of tree trunk 0.5-1 metre tall. Split this round lengthways (with a saw or an axe) into at least 4 roughly symmetrical pieces.
Next, you need to remove part of the core of the log, so that when you put the pieces back together there is a hollow space in the middle.
Once the split log is back together, you also need to tie it all “together”, ideally with wire or a chain, so that everything is stable and doesn’t fall apart. As a last resort you can use string, but bear in mind that sooner or later it will burn through.
You can also put small spacer sticks between the split pieces to let more air through. Naturally - oxygen is one side of the fire triangle.
Once the structure is ready, put the tinder inside and light it. Getting a Swedish torch going properly can be tricky, so have plenty of tinder ready in advance and add more as needed.
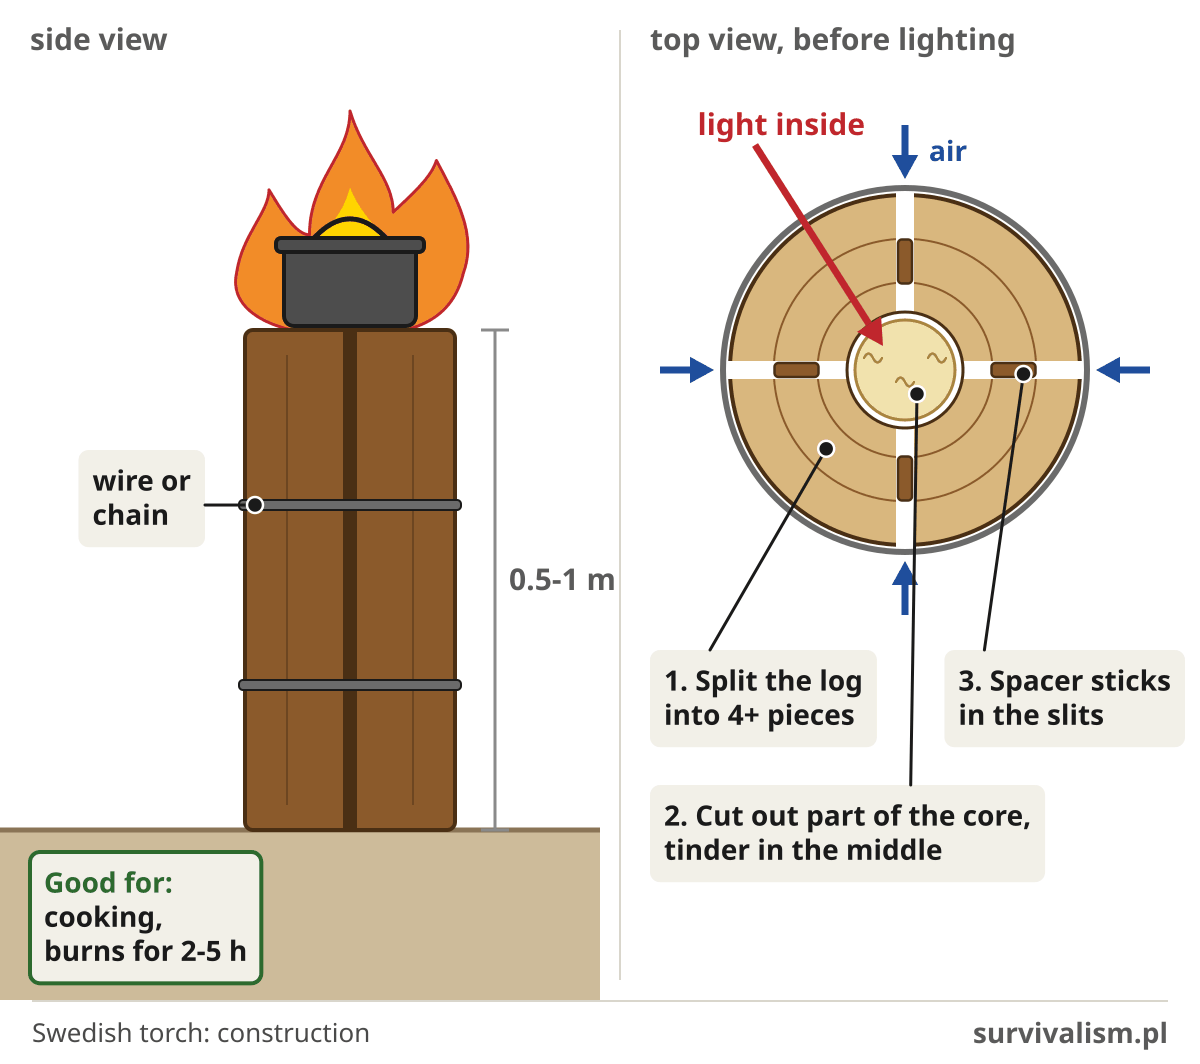
Once a Swedish fire has caught, you don’t need to worry about it any more - it needs no feeding and will burn for a very long time without you doing anything. (Don’t leave it unattended, though - as with any fire.)
Pros
- needs only occasional tending
- good for cooking
- long burn time (usually 2-5 hours, depending on the size of the log)
- fuel-efficient
Cons
- needs tools
- takes longer to prepare
- hard to light
- needs a lot of tinder
- you need a big “chunk of wood”
The pyramid fire, also known as the “stack”
The pyramid fire is a very efficient and clever way to burn a fire out in the field. It has plenty of advantages, especially if you want to spend a warm night without waking up every so often to put more wood on.
The pyramid fire, or in more old-fashioned Polish the “stos” (stack) fire (thanks, Tomek, for that one), is a type of fire that burns from the top1. Because of that it doesn’t give off much smoke and burns evenly. It doesn’t need constant watching either.
Putting this type of fire together is simple but can take a while. Start by gathering suitable branches of different thicknesses. At the very bottom, lay two or three of the thickest pieces parallel to each other. That will be the base of our structure. Then lay a layer of slightly thinner branches at right angles to the first. Each layer after that is again thinner and laid at right angles to the one below. This way we build a pyramid with the tinder laid on top. Now all you have to do is light the tinder and your fire is ready.
Also make sure not to pack the branches in each layer too tightly. The point is for the burning fire to have a steady supply of oxygen.
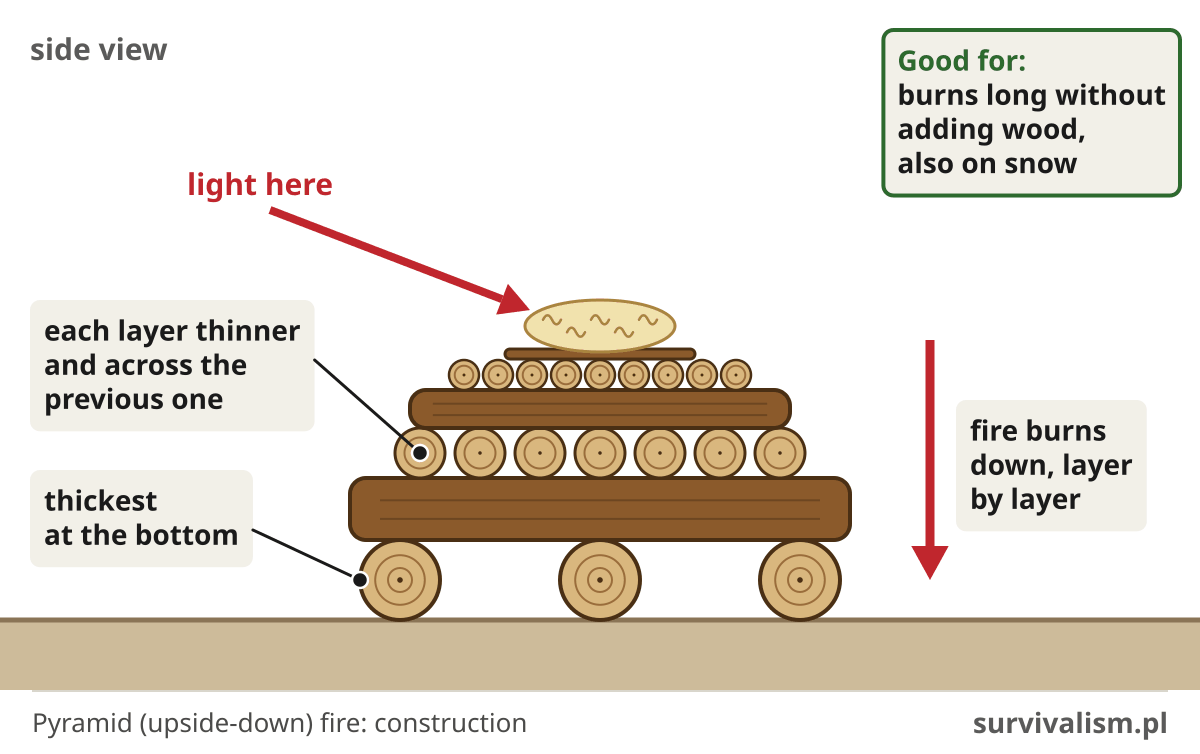
Depending on the number of layers, the thickness of the branches we used and the height of our pyramid, it can burn for anything from an hour to several hours without adding wood (you still need to keep an eye on it). If the fuel burns out, just throw on a few new branches.
If we want our pyramid fire (also called the “upside-down” or inverted fire) to burn longer, we can pack the wood a little more tightly to limit the oxygen supply. We can also sprinkle a little soil, sand or any loose, non-flammable material “here and there”.
The fire will then burn more slowly, but in most cases it will give off more smoke.
A big advantage of this type of fire is that you can light it on snow or on waterlogged ground.
Pros
- fairly simple to build
- doesn’t need much attention
- easy to light
- can be lit even on snow
Cons
- may need tools
- takes time to build
The top-down fire in practice, or how it went for me
So much for theory. This autumn I built a top-down fire like this on my allotment and checked how many of the promises above survive a meeting with wet wood and gusty wind. I’ll say up front that it didn’t go without a bit of improvising 😉
I sorted the wood from the thickest pieces to the thinnest and laid it out in a row on the grass, so that while building I could reach for the next piece without searching. The stack doesn’t have to be perfect. You could cut the wood into neat, even blocks so it looks like something out of a brochure, but who has the time? The gaps between the sticks matter more, because the fire needs air. My wood was uneven, so the gaps pretty much made themselves. For kindling I cut an ordinary small plank into thin pieces. I simply used what I had to hand.
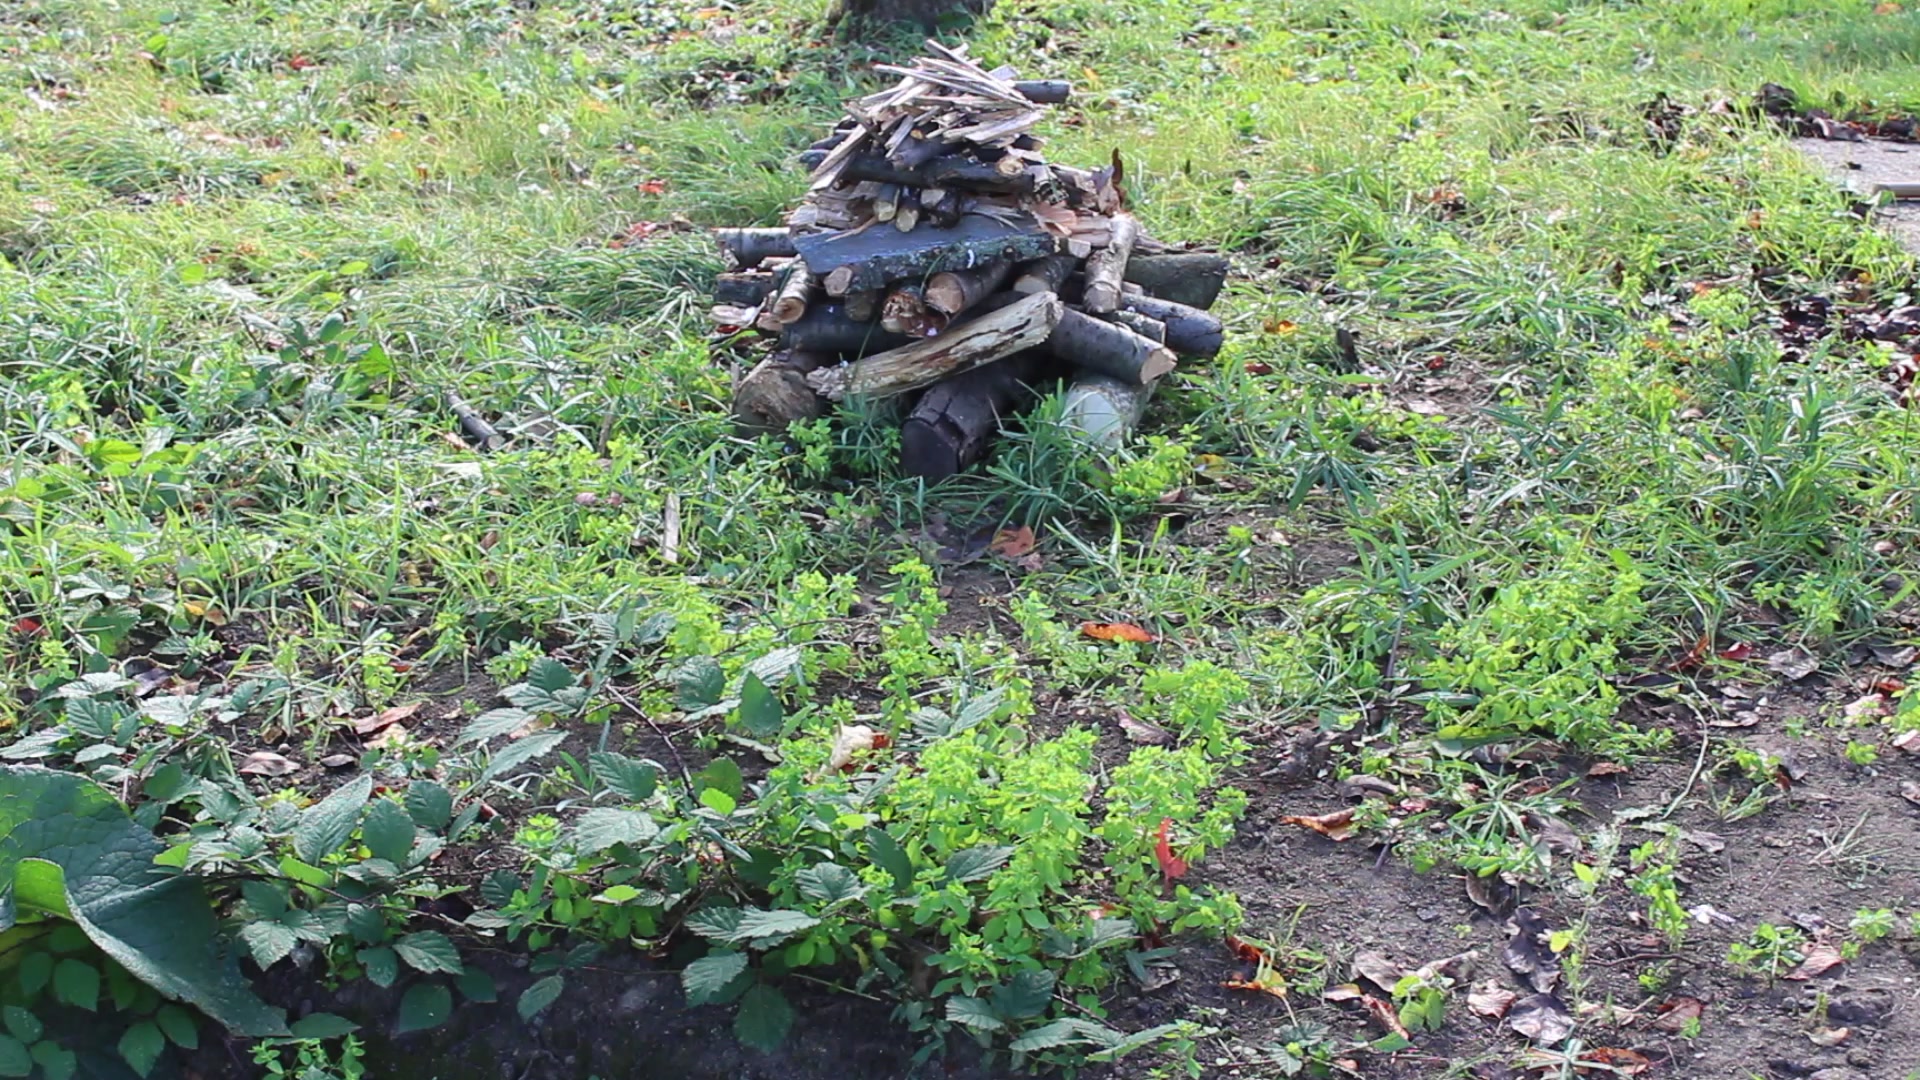
It was very windy that day and it had rained the day before, so the wood wasn’t completely dry. Normally I would light a fire in a sheltered spot, but I wanted everything to be clearly visible, so the stack went up in a place more exposed to the wind. You’ll probably notice that it stands on grass, while at the start of this article I advise clearing the ground down to bare soil and giving up in strong wind. On the allotment the grass was wet after the rain and water was close at hand. In a forest, in wind like that, I wouldn’t have lit this fire.
On top went shavings carved from a candle with a knife. I’ve used them many times, but not all candles are equal, because each has a different wax. This time I had an ordinary white candle and its wax turned out to be very weak. Oil candles work best for this. On top of that, in strong wind it is very hard to get a fire going, even with good tinder. After a few minutes I had to accept defeat. It was clear that it wasn’t going to catch like this on such a windy autumn day.
This is where I cheated and used a barbecue firelighter. With a little help, but it worked. That’s why I’d argue with “easy to light” on the list of pros, at least in wind and with wet wood.
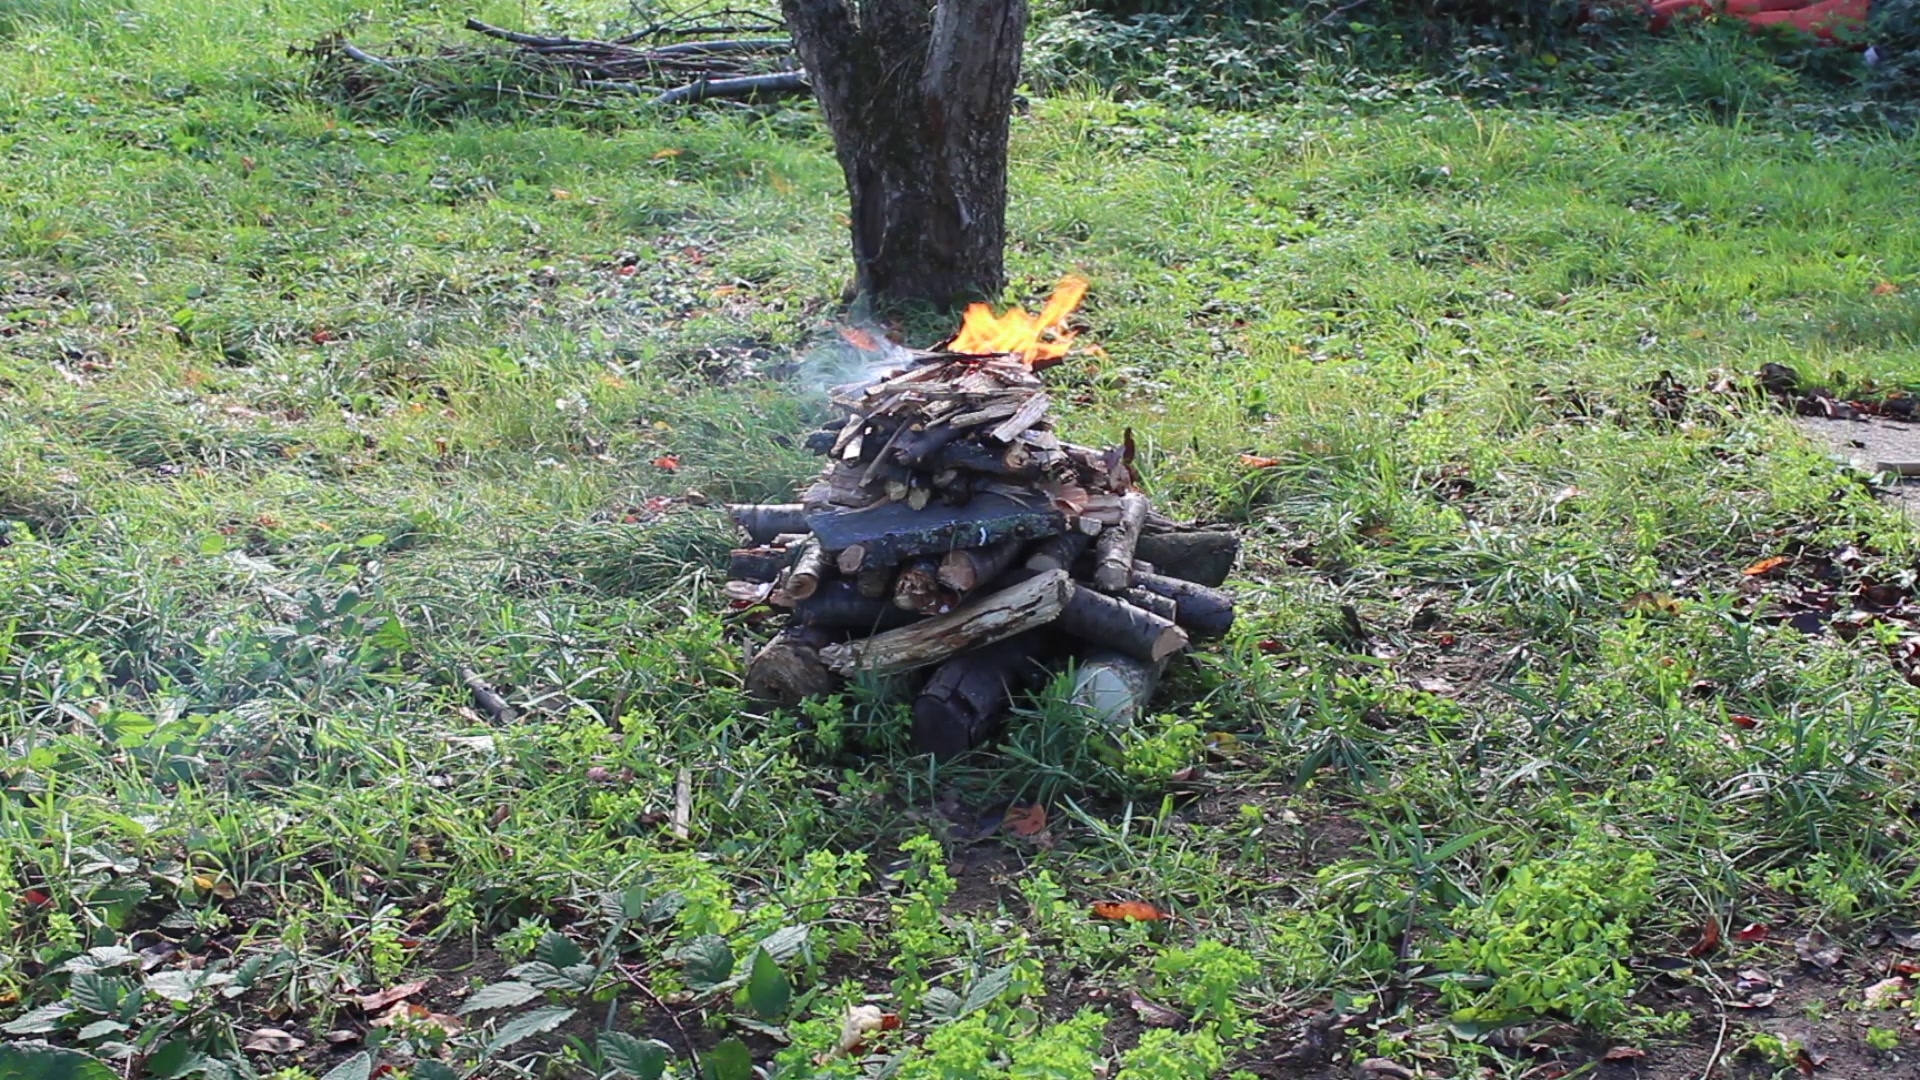
What happened to the wind afterwards was interesting. While lighting it was the biggest obstacle, but once the fire had caught, it became its ally and only fanned it.
So did it then burn on its own? Yes, and that part of the promise held up. Once or twice I had to nudge a piece of branch that had rolled over, and that was it. I didn’t add any wood, and more than an hour after lighting I was still baking bread dough over it. When I finished, roughly two hours after lighting, the fire was still going and I had to pour two watering cans of water on it. It would probably have kept burning for at least another half hour, maybe even an hour. So a stack like this is good for two to three hours of burning without adding anything at all.
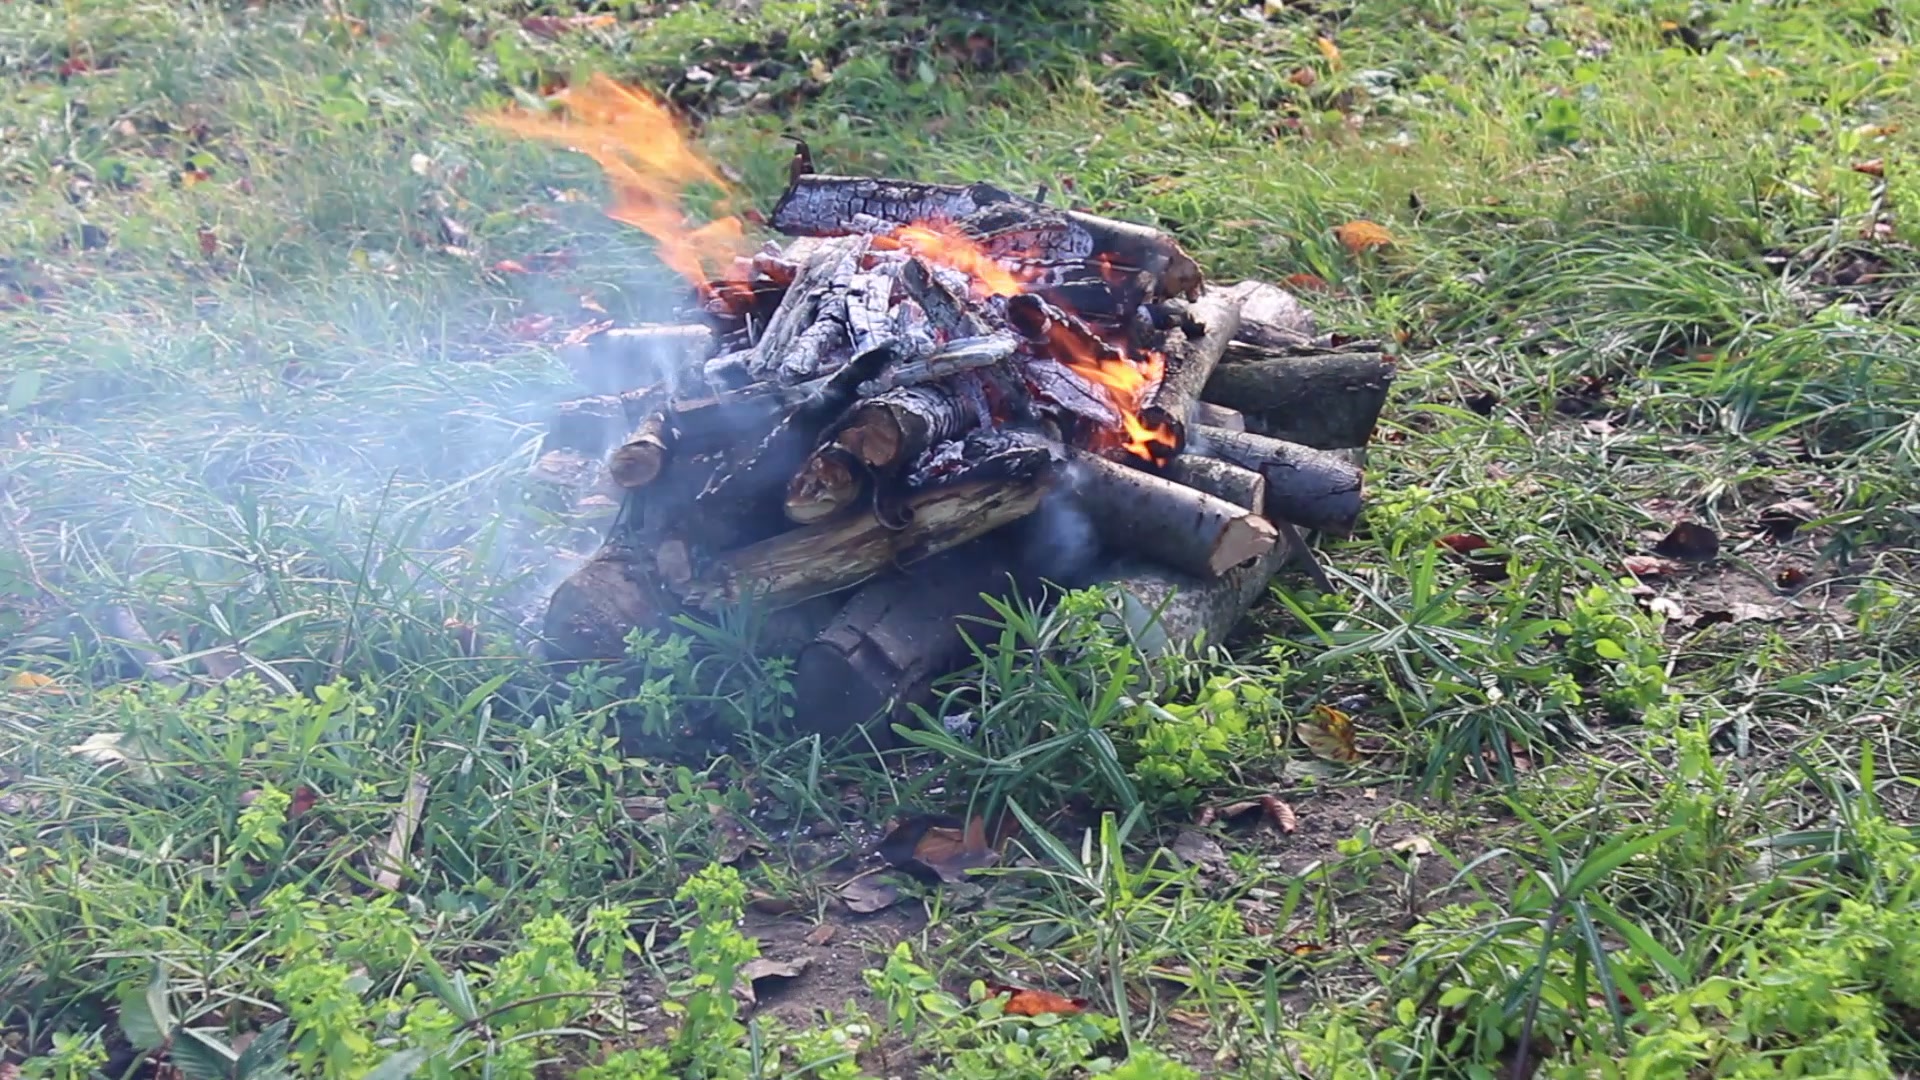
The smoke was much like the lighting. For the first half hour, on damp wood, you can see plenty of it in the photos. Once the fire was burning evenly, it smoked very little. It burned down a bit unevenly, but that’s no problem, because you can rake the embers over to another spot later.
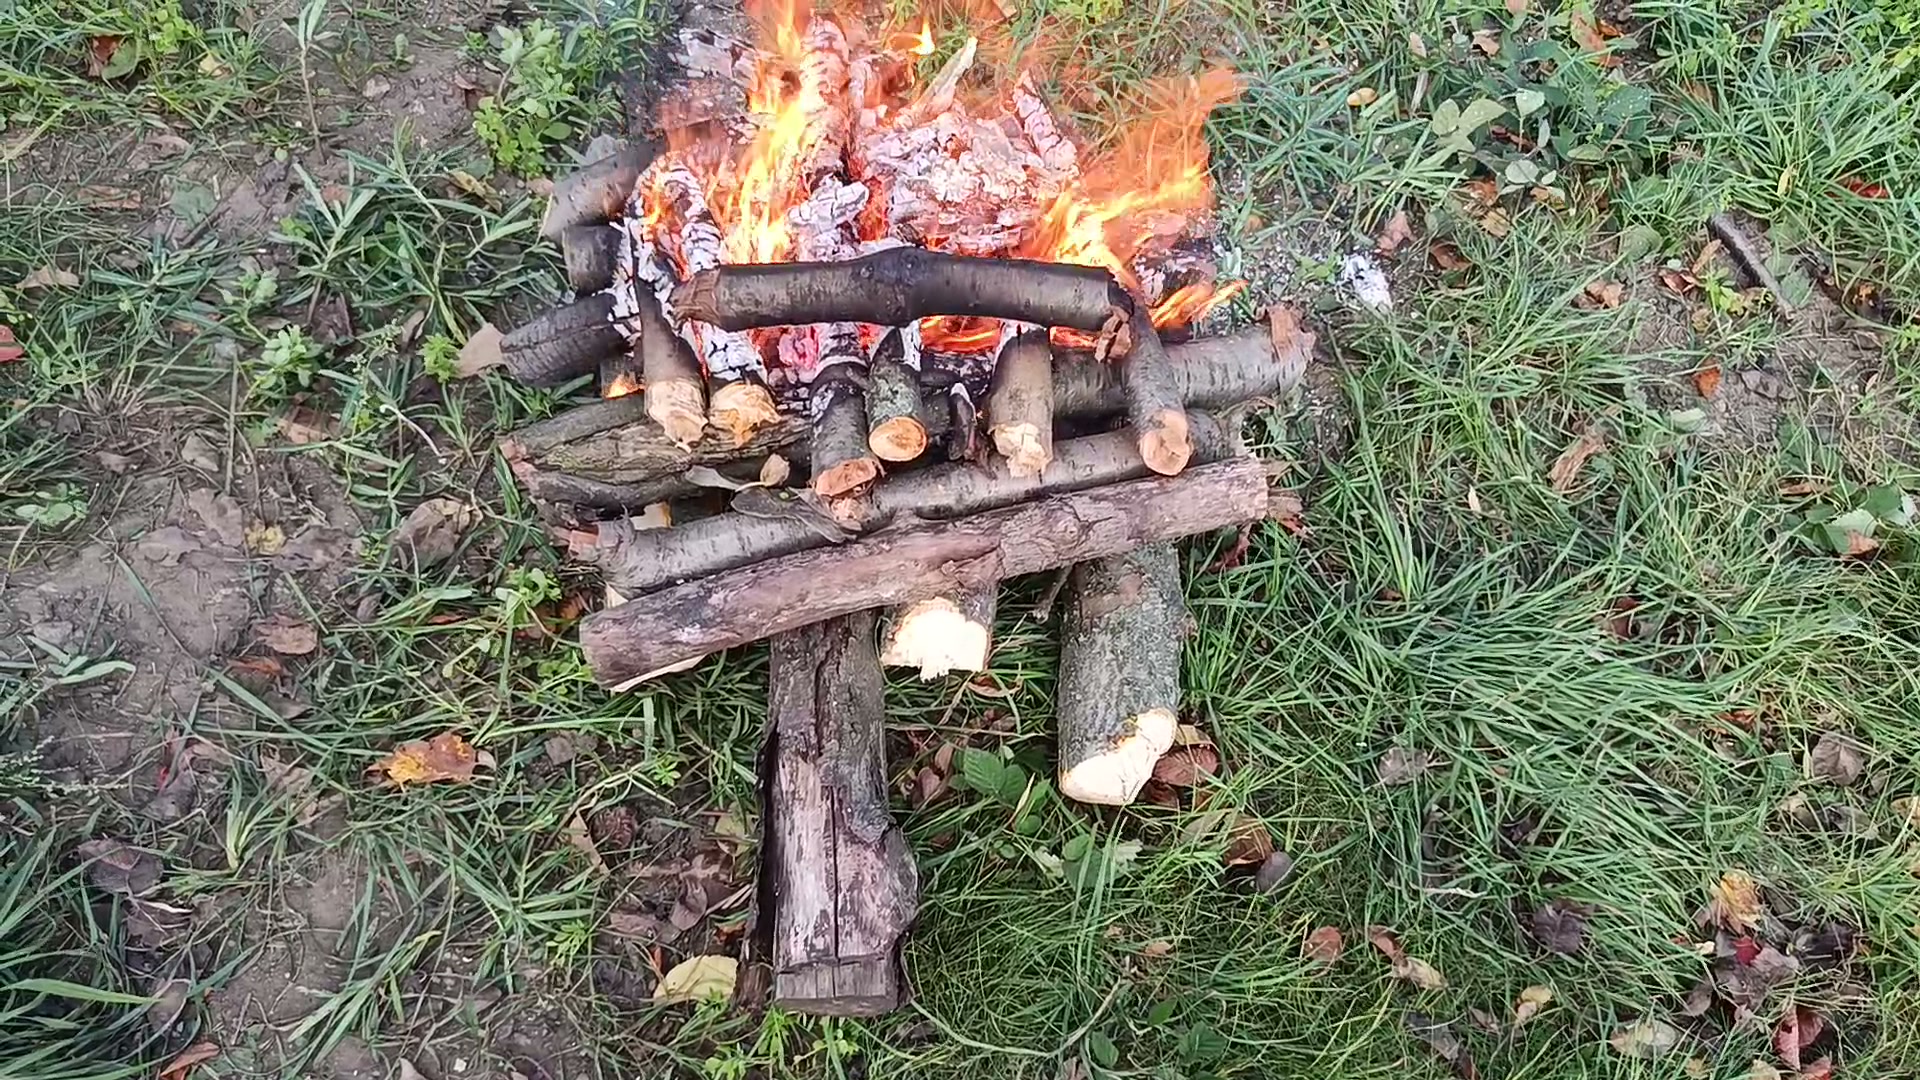
I felt the biggest drawback before I even started stacking the wood into a pyramid. Preparing wood in several thicknesses takes a lot of time, it is hard and tiring work, and without tools it’s difficult to even start. “Burns on its own” also only means that you don’t have to add wood. Branches can roll, as I saw with my own eyes, so you have to keep an eye on the fire until it’s out.
The log cabin fire
The log cabin fire is a type of fire that sometimes gets mixed up with the pyramid fire. This type of fire isn’t really suited to extreme situations. It is more of a nice-looking show. The log cabin fire burns from the bottom. It gives a strong, bright flame, but gets through fuel quickly.
To build one, we need split logs or branches that are fairly straight and of similar thickness.
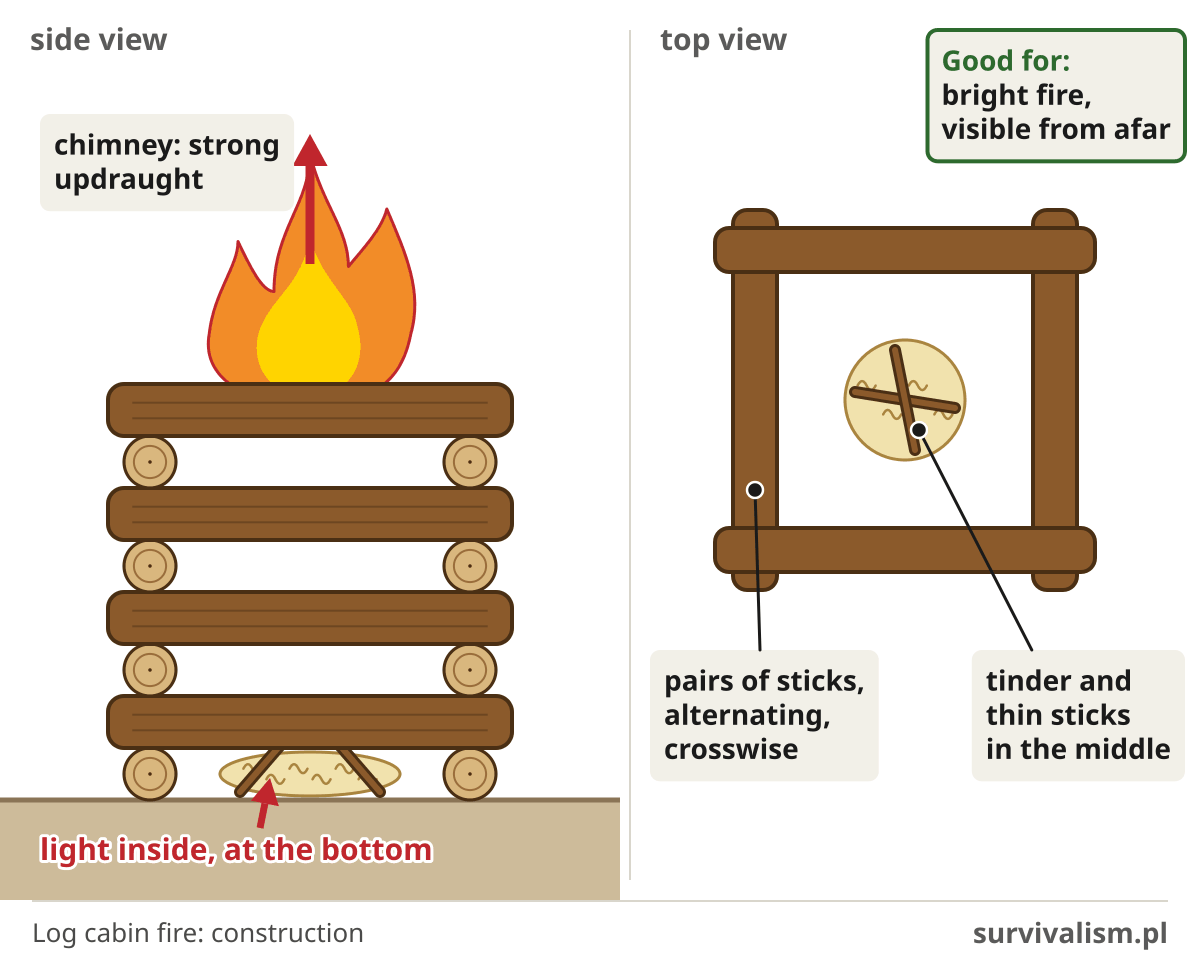
Lay the sticks two at a time, alternating, so that each layer sits at right angles to the one below. This gives you something like a chimney or, as the name says, a little log cabin. Put the tinder inside and light it5. The fire burns fast, and before long the whole structure will probably collapse on you 🙂
One of the commenters, Marian, rightly pointed out that the main purpose of a log cabin fire is that it can be seen from a long way off. And indeed, in an extreme situation, when we need to attract attention, it may be the best option.
Pros
- looks nice
- gives off a lot of heat
- visible from afar
Cons
- needs tools
- takes time to build
- mostly a fire for “showing off”
The star fire
The star fire is a type of fire that burns for a long time and needs minimal watching, although it doesn’t look after itself entirely. It is also easy to build and light.
To build one, we’ll need a few thick branches. Lay them with their ends pointing inwards so that they almost meet at a single point. Almost, because we have to leave a bit of space for the tinder. The branches form a shape that looks like a star, hence the name of this type of fire.
Once it is built, light the tinder. As the wood burns down, simply push it further in towards the centre6.
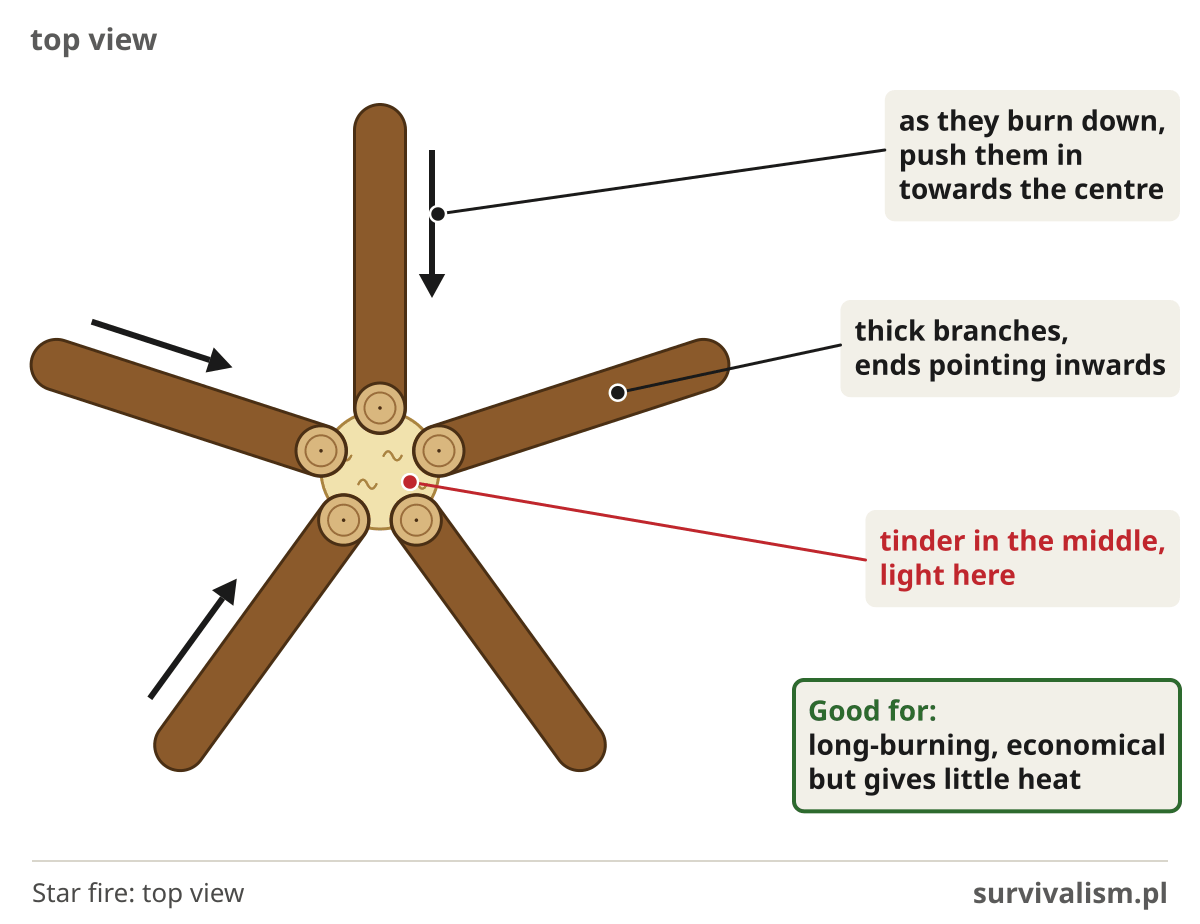
The downside of this type of fire is how little heat it gives off. It is, however, fairly economical in terms of the amount of fuel it uses.
Pros
- long burn time
- easy to light
- easy to build
- fairly efficient
Cons
- doesn’t give much heat
- needs a base if you light it on waterlogged ground or snow
- may need tools
The lean-to fire, or slanting fire
The lean-to fire is a type of fire that you can get going quickly and easily. That makes it the classic fire to light in an emergency. It also does brilliantly in windy weather, and you’ll have no trouble burning even wet wood on it. There are several ways to build a lean-to fire.
I’ll describe what is probably the simplest one here. All we need is one thick branch or log. Against it we lean the ends of thinner branches, laid in a row - one next to the other. Put the tinder under this layer of branches. To make lighting a lean-to fire easier, you can temporarily take off a few branches that get in the way of the tinder.
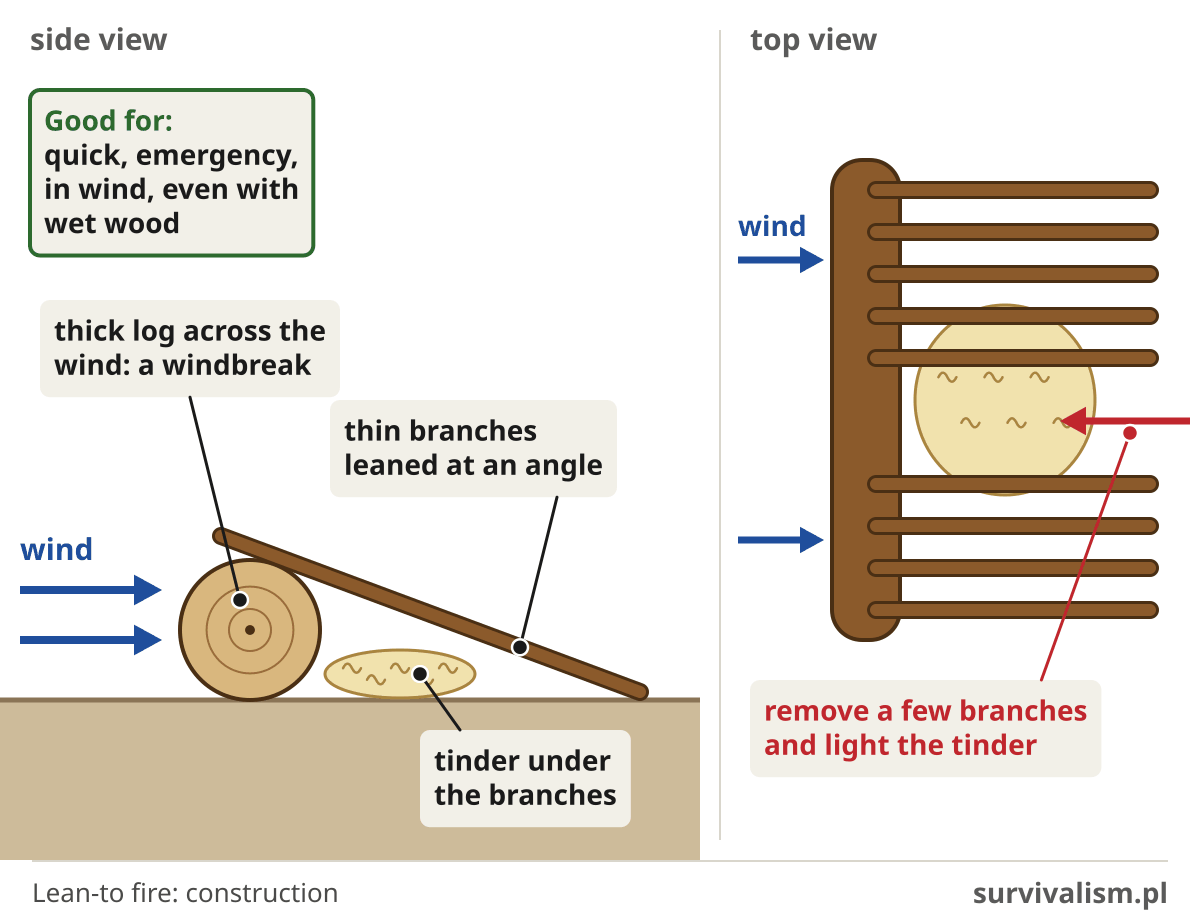
Once the tinder is lit, fill in the gaps so that the branches form a single, fairly even layer. Here too, make sure that the individual pieces are not too close together. That helps the air circulate and makes it less likely the fire will smother itself. It also cuts down the amount of smoke.
A lean-to fire burns well even in quite a strong wind, as long as you set it up facing the right way, that is, with the main support at right angles to the wind direction and the tinder lying on its sheltered side6.
The downside of this type of fire is that on snow or waterlogged ground you have to build a raised base or platform for it. It also burns fairly quickly, so it is not a good choice where fuel is scarce.
Pros
- easy to build
- burns even wet wood
- the best type of fire for emergencies
- burns even in quite strong wind (if set up correctly)
Cons
- burns out quickly
- can be hard to light on snow or waterlogged ground
Fire lays, or the scouting names for campfires
If you’ve ever been a scout, you’ll know some of these fires as fire lays. Polish scouting materials list the log cabin (in Polish “studnia”, the well) and the star under the same names I use in Polish, while my cone fire, the tipi, is what Polish scouts usually call a wigwam5, 8 (I know, I wrote above that the name is wrong, but it has stuck). Watch out with the pyramid. Some materials use that name for the cone, others for a stack built of ever shorter, solid layers of wood, which is closer to what I described above as the pyramid. The log cabin, in turn, sometimes goes by the name of the square stack.
Polish scouts also have a few fire lays that I don’t describe separately here:
- raft - a base of thicker pieces of wood laid in a square, a second layer crosswise, and the actual fire on top. It comes in handy on wet or snow-covered ground.
- pagoda - a stack similar to the log cabin, but built of solid layers of wood. It burns for a long time, but gives little light.
- Polynesian fire - a pot-sized hole in the ground with a cone fire built in it and the edges lined with thicker branches. It’s a sort of cousin of the Dakota, just without the air channel, so in the same way, don’t dig it where there is peat or roots underneath.
- Siberian fire - a fire with a screen, that is a wall of branches laid horizontally across two stakes driven into the ground. You light it when keeping warm matters most. Don’t confuse it with the nodia, which is also sometimes called the Siberian fire.
My eight are more survival than scouting, hence the Dakota, the nodia, the Swedish torch and the lean-to fire, which you’re unlikely to find in Polish scouting lists.
Which campfire should you choose?
It all depends on what you need the fire for. Below is a cheat sheet of what I wrote above about each of the fires.
| You need | Fire | Why |
|---|---|---|
| warmth all night | nodia | burns for as much as 8-10 hours and needs only occasional tending |
| to cook something | Swedish torch or Dakota | you can stand a pot on the torch, and in a Dakota the heat goes straight up under the pot |
| a fire that makes little smoke and is hard to see | Dakota | the flame is hidden in the ground, and the strong draught keeps the smoke down |
| a fire fast, in an emergency | lean-to | you can get it going quickly, even in wind and with wet wood |
| to warm up and dry your clothes fast | tipi | gives a bright, warm flame, but eats through wood quickly |
| a fire on snow or waterlogged ground | pyramid | you can light it where other fires need a base under them |
| to save wood | Swedish torch or star | the torch burns for a long time from a single log, and with the star you only push the logs in towards the centre as they burn down |
| to be seen | log cabin | the tall, bright flame can be seen from far away |
How do you put out a campfire?
Every fire described above has to be put out at some point, and that is less obvious than it sounds. A fire that looks dead on the surface can hold embers under a layer of ash for a very long time. So put it out in four steps:
- Drown. Pour plenty of water over the fire and keep pouring until the hissing stops. Pull thick logs apart, for example from a nodia or a Swedish torch, and drown each one separately, from every side.
- Stir. Use a shovel or a stick to stir the ash and embers into the water, so you reach whatever is still dry at the bottom. Scrape the embers off the charred ends of the logs too.
- Drown again. Keep adding water and stirring until everything is cool.
- Feel. Hold the back of your hand close to the ash and the charred wood. If you can feel heat, go back to step one. If it’s too hot to touch, it’s too hot to leave.
Don’t just bury the embers with soil. Soil covers a fire, but it doesn’t put it out. The embers keep smouldering underneath and can break through to the surface long after you’ve gone. If you’re short of water, you can mix soil or sand into the embers, but only as a supplement to water, not a replacement for it.
Take extra care wherever there may be roots or peat under the fire pit. As I mentioned with the Dakota fire pit, embers can travel underground and come to the surface far from the fire, even several days later. In a spot like that it’s best not to light a fire at all. If you have to, dig over and drown the ground under and around the fire pit as well. Only leave when everything is cold. Not “almost cold”. Cold.
Common questions about types of campfire
Which fire gives off the least smoke?
The Dakota fire pit, which is why it is also called the smokeless fire or smokeless fire pit. The pyramid makes little smoke too, because it burns from the top and evenly. Whatever the type of fire, though, the wood matters most. Wet and green wood always smokes, so if the smoke bothers you, burn dry wood.
Which fire burns the longest?
Of the eight described here, the nodia burns the longest, as much as 8-10 hours, depending on the thickness of the logs and the type of wood. A Swedish torch usually lasts 2 to 5 hours, and a pyramid anything from an hour to several hours without adding wood. The tipi, the log cabin and the lean-to burn out the fastest.
How do you light a fire on snow?
On bare snow a fire soon melts itself a hollow and goes out in its own puddle. So make a base. Lay several fresh, green logs side by side, roughly as thick as your wrist, add one or two more layers on top, and lay the last one crosswise1. Of the eight fires described here, the pyramid copes best on snow, while a star or a lean-to fire will be hard to keep going without a base.
What is the difference between a log cabin fire and a pyramid fire?
Both are built in layers laid crosswise, so they are easy to mix up. The log cabin is hollow inside, the tinder goes into the middle, and the fire goes from the bottom up, as in a chimney. It burns fast, bright and tall, so it is good for signalling, but not for keeping you warm all night. The pyramid is filled with wood, each layer is thinner than the one below, and the tinder lies right on top. The fire slowly works its way down, so it burns for as long as several hours without adding wood.
Final word
So there you have it: 8 types of campfire, picked fairly subjectively. There are a few more, but I think I’ve covered all the most important ones. What about you, do you have a favourite type of campfire? If so, tell me about it in the comments.
Sources
- U.S. Army, FM 3-05.70 “Survival”, chapter 7 “Firecraft” (paragraphs 7-7, 7-8, 7-14, 7-17): landsurvival.com/07.htm
- Wikipedia (Finnish), “Rakovalkea”: fi.wikipedia.org/wiki/Rakovalkea
- Wikipedia, „Najda” [Nodia]: pl.wikipedia.org/wiki/Najda (in Polish)
- Wikipedia (English), “Swedish torch”: en.wikipedia.org/wiki/Swedish_torch
- Harcopedia (a Polish scouting website), „Rodzaje ognisk” [Types of campfire] (26 March 2023): harcopedia.pl (in Polish)
- Will McGough, Backpacker, “The 5 Types of Campfire and When to Use Them” (3 January 2018): backpacker.com
- United States Marine Corps, Mountain Warfare Training Center, “Survival Manual Summer 2002”, chapter 4 “Expedient Shelters and Fires” (MSVX.02.04), p. 04-7, “Dakota Hole”: archive.org
- 18th Łódź Girl Scout Troop “Wierchy”, „Budowa ogniska i stosy ogniskowe” [Building a campfire and fire lays]: osiemnastka-zhp.blogspot.com (in Polish)
- Wikipedia (English), “Wigwam”: en.wikipedia.org/wiki/Wigwam and “Tipi”: en.wikipedia.org/wiki/Tipi
Leave a comment