- 1 Main directions or world directions in English
- 2 How not to get lost? It’s simple: find the north!
- 3 Azimuth
- 4 Compass and compass
- 5 In the wilderness
- 6 East-west – so where does the sun actually rise and set?
- 7 How not to die, or other ways to find midnight without a compass
- 8 East, west and the shadow and stick method
- 9 Method of finding north, using the Pole Star (in the northern hemisphere)
- 10 The clock method (in the northern hemisphere)
- 11 Moss, ants and more
- 12 Something of a conclusion
It has been known since the dawn of time that there are four basic geographical directions: east, west, north and south. These are the so-called cardinal directions. In this article, you will learn a little more about the world directions and how to determine the directions with limited resources, for example when you are away from civilisation.
Main directions or world directions in English
Thegeographic directions have the aforementioned names in Polish, but you will often come across an international nomenclature based on English. You will find out what an azimuth is later in the text.
The table below shows all the main geographical directions in English.
| World directions | World directions in English and their abbreviations | Azimuth |
|---|---|---|
| north | N | 0°(360°) |
| east | E | 90° |
| south | S | 180° |
| west | W | 270° |
All main and intermediate directions are shown on the so-called wind rose
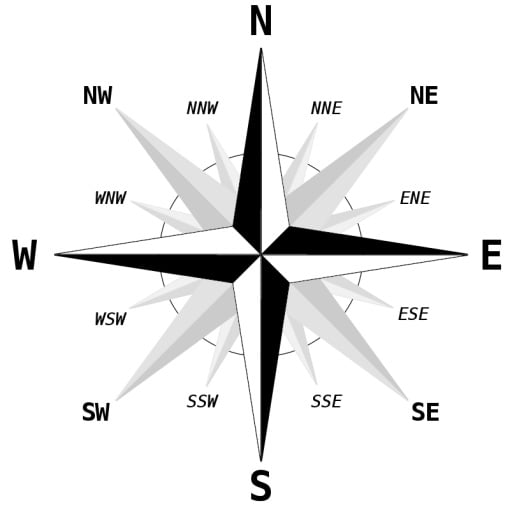
By convention, all maps are oriented north-south, where north means up and south means down. Correspondingly, the right side is east and the left side is west. This is not the only way of representing maps, for example in ancient and medieval times maps were oriented towards Jerusalem. In New Zealand and Australia, you can also buy a postcard that depicts the world like this:
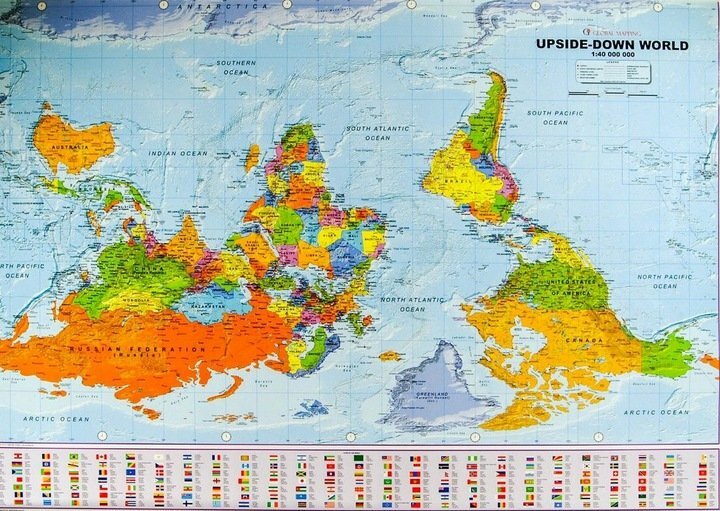
Width: 106 cm, height: 70 cm, scale: 1:40 000 000
How not to get lost? It’s simple: find the north!
The ability to find your way in the field is based on the ability to determine geographical directions, which in practice means finding one direction and, based on that, determining others. The direction we will be looking for most often is north. How do you find out where north is and where south is? There are a number of ways to find the north direction (south will be on the opposite side, of course), but the simplest and surest is to use a compass.
We can make a primitive compass ourselves. All we need is that we have a wine cork and an ordinary needle or a straightened safety pin. We rub one end of the needle against a magnet, or if we do not have a magnet as a last resort we can rub it against our clothes or hair. We then pierce the cork with the needle and place the whole thing on the surface of the water, in a plastic bowl or bucket. After a while, the cork should align itself in a north-south axis.
Azimuth
Azimuth is the angle between the north direction and the walking direction. We measure it clockwise. Of course, we could specify our direction descriptively, for example “north-east”, “south-west”, etc., but this is not a precise enough way. With an azimuth, we can determine our position on the map and our direction of march more precisely.
This would seem to be the end of the story. There is one big catch here: the compass needle shows us the so-called magnetic pole. The problem with this is that the magnetic pole is not fixed and is constantly shifting and ‘wandering’. At the moment it is somewhere in northern Canada. The needle of any compass will point in that direction. You will admit yourselves that for precise geographical directions, a reference point that is constantly shifting and “wandering” on the map is not very suitable.
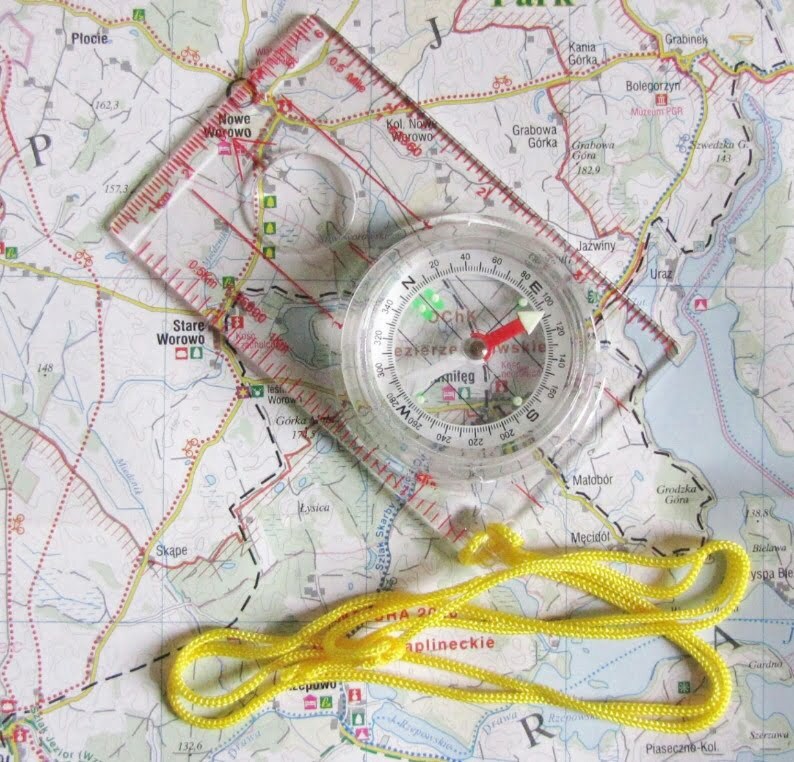
This problem was also recognised by cartographers, which is why they established the so-called true north, which is exactly at the geographical north pole. This is how all maps are oriented. True north is always in the same place on the map and can therefore be relied upon.
It is therefore important to bear in mind that the direction shown by the compass is not exact geographical north, and that the error of measurement depends on the point at which it is taken and the current position of magnetic north. If you are looking at the compass near the equator then the error will be relatively small, but the closer to the pole the error will be more noticeable.
However, there may be a situation where we take a measurement that is between magnetic north and true north. In such circumstances, the compass becomes practically useless. Well, unless we know the magnitude of the deviation error, the so-called magnetic declination or, in other words, magnetic deviation.
The current magnetic declination should be on any good terrain map. If you do not know its value, you can use this declination calculator
For example – in Rzeszów, at the time of writing this article, the declination was 5° 55′
The concept of magnetic declination should not be underestimated. Even a slight three-degree magnetic deviation results in a distance difference between geographical and magnetic north of the order of 50 m for every kilometre travelled. Quite a lot.
Another important thing to take into account when using a compass is various magnetic anomalies. In most cases the compass always shows magnetic north, but sometimes it happens that its indication is incorrect.
The cause of such an error can be, for example, a metal object in the vicinity of the compass. For this reason, when measuring your direction with a compass, pay special attention to this: do you have a metal canteen or machete strapped to your belt? Or is your favourite camera hanging around your neck?
The operation of the compass can also be disrupted by natural anomalies. Some iron-rich rocks can cause the compass needle to deflect. Also man-made objects can affect the measurement error. Make sure that no underground sewage pipes, high-voltage power lines, railway tracks or similar objects run close to the measuring point.
When moving to azimuth (about which there will be a separate article, as the subject is not trivial), check the compass readings regularly. Not everyone realises that humans never move in a straight line.
The best way to remedy this is to set yourself some sort of landmark to guide your walking along this section of the route. The top of a hill, a tall building, a group of rocks or even a broken tree will do. When you reach the point, look at your compass and map, look around and find the next landmark. We repeat the process. This way of walking minimises the chance of getting lost.
Compass and compass
I mentioned the compass earlier. Some people insist on dividing the compass and compass. Personally, I don’t think this division is valid. A compass is simply a slightly more complicated compass – with a scale and a rotating dial. In everyday language, the difference between a compass and a compass becomes blurred. As with the term mass and weight: to a physicist, mass and weight are two different physical properties, but in colloquial speech the two words are used interchangeably. The analogy is with a compass and compasses, so for the purposes of this text I will not make a distinction between the two terms.
Any well-made compass is suitable for field use. It is good when its pointer is immersed in liquid. This reduces vibration and oscillation of the pointer when reading the direction. Probably all compasses available on the market have a rotating dial with a scale. Thanks to this graduation, we will be able to determine the azimuth and it will significantly facilitate our accurate orientation in the field.
In the wilderness
However, what should we do if we are in unfamiliar terrain and do not have a compass? Fortunately, we can easily make one ourselves. I have mentioned this method before, but in the field we may have to improvise more.
North south, or a compass made of wire
To make a simple compass, we will need a metal needle, one that can be magnetised. Aluminium, for example, or copper will not be suitable, so make sure the metal is magnetic first. The magnetisation of the needle is achieved by rubbing it against your hair or part of your clothing. Remembering to keep one direction of movement when rubbing.
If we do not have a needle, we will have to improvise. Consider where you could source a piece of straight metal wire from. Perhaps from the headphones you have in your pocket? Or from a zipper? In this situation you will need to be inventive.
Place the magnetised needle on something that floats, such as a piece of leaf, paper or a thin piece of bark. Our floating platform should not be too heavy. Also make sure that the surface of the water is reasonably calm. It is best to use a puddle for this purpose. Its depth does not matter, as long as our device floats freely on its surface.
After a few moments, the floating needle should align itself in the north-south axis. To find out which direction is north and which is south, remember that the sun is on the eastern side of the sky before 12 noon, and on the western side after noon.
The needle gets demagnetised after a while, so you need to re-magnetise it every so often.
East-west – so where does the sun actually rise and set?
The names of the geographical directions east and west, as you may have guessed, take their names from sunrise and sunset. Intuition tells us that these are the places where the sun rises and sets, which sounds logical.
However, contrary to intuition, in this case the matter is not so simple. Indeed, the sun rises in the east and sets in the west only twice a year! Specifically, this occurs during the spring and autumn equinoxes. Without going into detail, this is due to the phenomena of precession and nutation and is related to the effect of the sun and moon’s gravity on the Earth and the tilt of its axis at an angle of 66 degrees.
The exact east-west axis, therefore, you can determine with the Sun only 2 times a year: 20/21 March (spring equinox) and 22/23 September (autumnal equinox). The further away from these dates, the greater the measurement error.
So keep in mind that in most cases, you cannot use sunrise and sunset to determine the east-west directional axis.
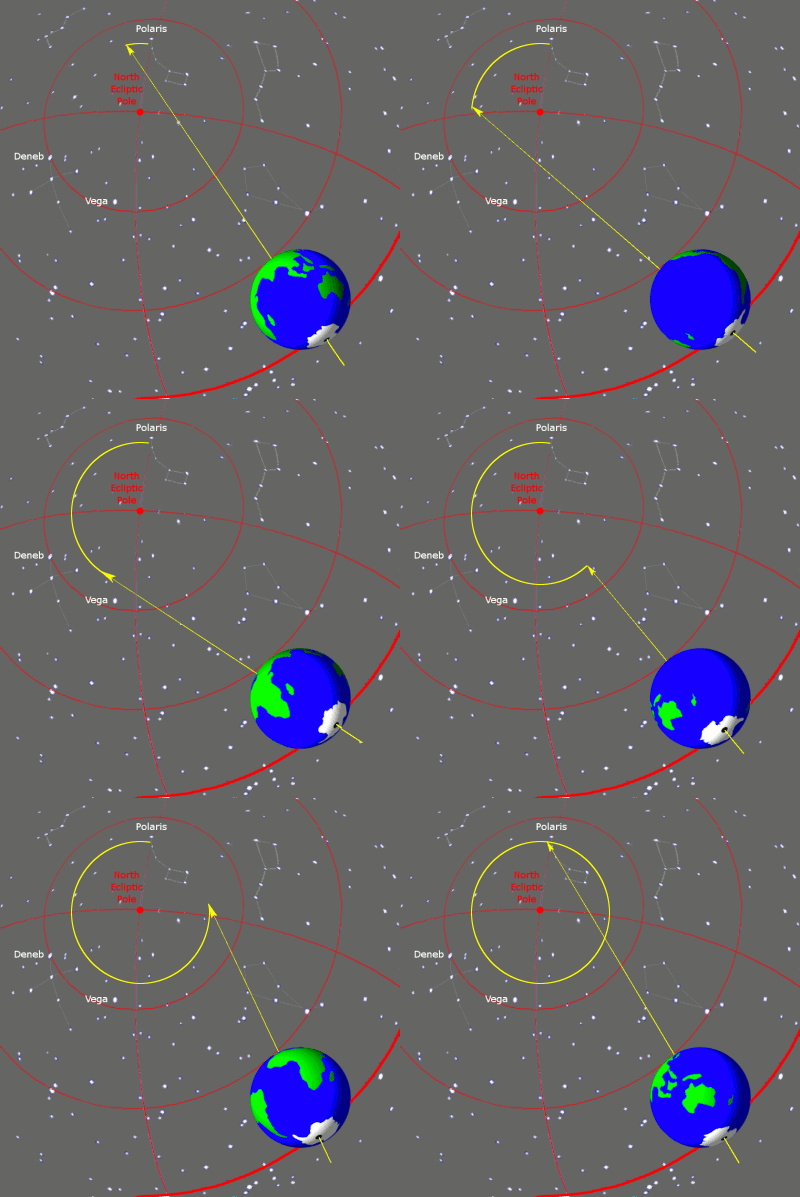
Animation courtesy of Tfr000
How not to die, or other ways to find midnight without a compass
I mentioned earlier that the sun does not rise in the east and does not set in the west. This is a particularly important point, especially for beginner survivalists who are going out into the field for the first time, for example into the mountains. After all, there are ways in which we can use the sun to determine the geographical direction of north quite precisely.
East, west and the shadow and stick method
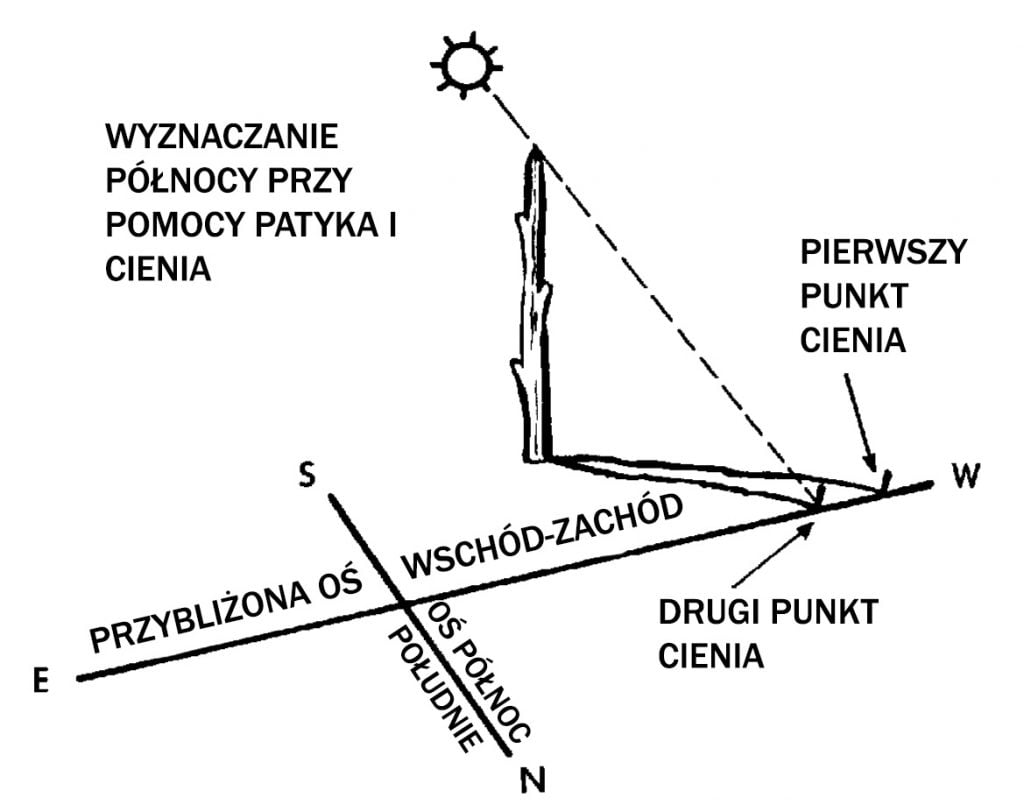
This is a very simple and very effective method that can be used practically anywhere the sun shines.
- stick a stick into the ground and mark the end of its shadow with a stone.
- wait ten to fifteen minutes. During this time, the shadow will move a little.
- place a second stone on the end of the shadow. In this way, a straight line is created between the two stones on an east-west axis.
- stand with your back to the line formed so that your left foot is on the first stone and your right foot is on the second stone. In this way we stand with our face facing north.
Method of finding north, using the Pole Star (in the northern hemisphere)
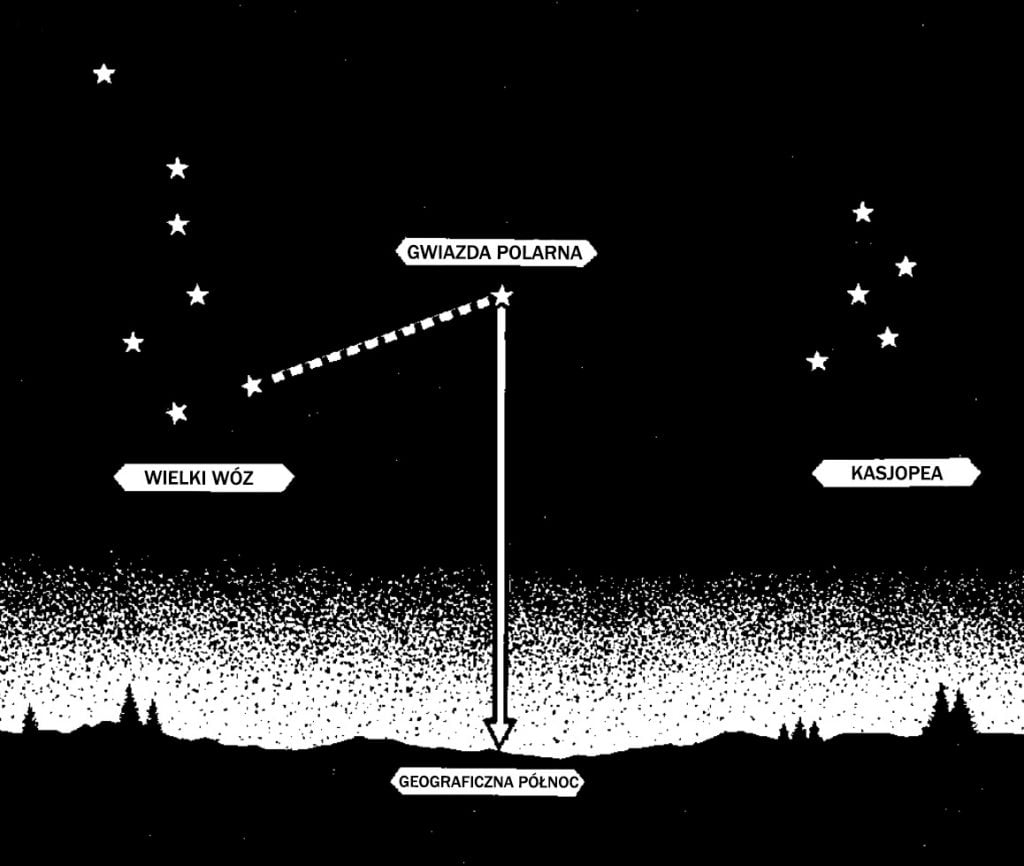
We start by finding the polar star in the sky. We will do this by finding the characteristic constellation of the Great Cart. The last two stars of the Great Carriage form a segment, the extension of which will show us the Polar Star. Now all we need to do is determine some characteristic point of the terrain above it and we have our north.
The clock method (in the northern hemisphere)
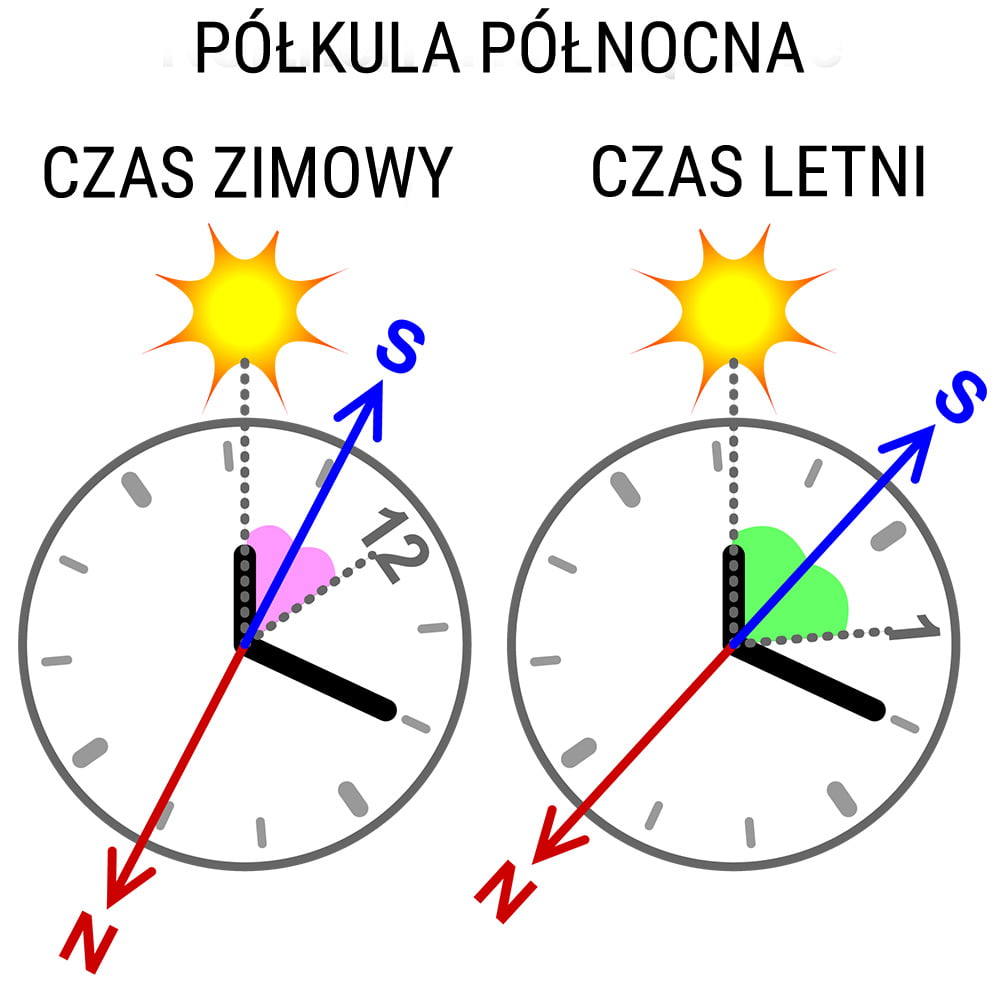
If you have an analogue watch that indicates the time correctly, you can use it to determine the north direction.
- Place the watch on your hand or on some flat surface.
- Then point the hour hand towards the sun.
- Now half the distance between the hour hand and the 12 o’clock position on the dial will show us the south direction. North, of course, will be on the opposite side.
Moss, ants and more
In many textbooks you will come across information about how moss grows on this side of the stones and not the other, tree rings are arranged one way or another, or anthills are more sloping on the northern side.
Well, I personally think that such a way of determining direction can do more harm than good. Moss just grows in the shade and it is not necessarily the north side. The tree rings are sometimes arranged quite randomly, so this is another deceptive method. I would not rely on moss, tree rings and anthills under any circumstances.
The methods I have given above should be quite sufficient to determine geographical north quite accurately, there is no need to resort to looking at moss on stones.
Something of a conclusion
At this point I will conclude the text, although I realise that the subject is vast and I have certainly not exhausted it. I do plan to have further material on the subject, particularly with the azimuth march in mind.
If you have any comments on the text, have spotted an error, or just want to say ‘hi’, then feel free to leave a comment.
