
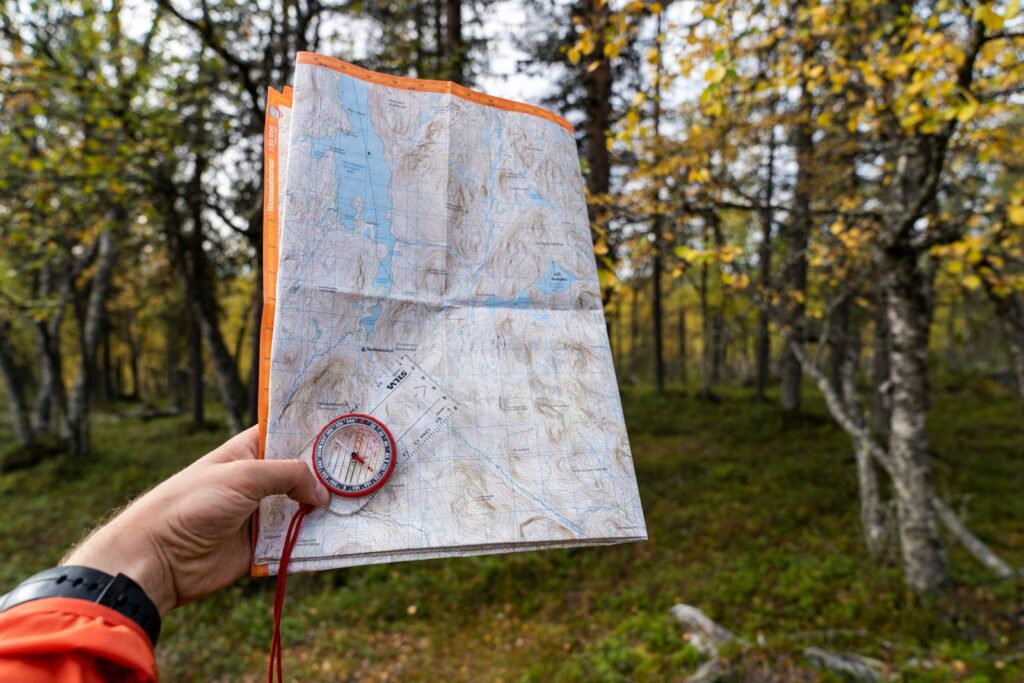
Picture this. You are walking through a forest that was supposed to be a short cut to the trail. The path gets narrower and narrower, then disappears, and mist starts creeping up from the valley. Your phone shows 4% battery and is about to die. You know from the map that the trail is roughly one and a half kilometres to the north-east. But where exactly is north-east when all you can see around you is identical spruce trees?
At a moment like that, a skill that sounds very military but is surprisingly simple (attention!) comes in handy: walking on a compass bearing (at ease!). In the article on the cardinal directions I promised you a separate post on this. I promised it more than four years ago. Oh well, better late than never 😉
In this post you will find out what a bearing is, how to read it from a map and from a compass, what the current magnetic declination in Poland is, and how to walk on a bearing so that after a few kilometres you come out where you wanted to, and not in some farmer’s back yard.
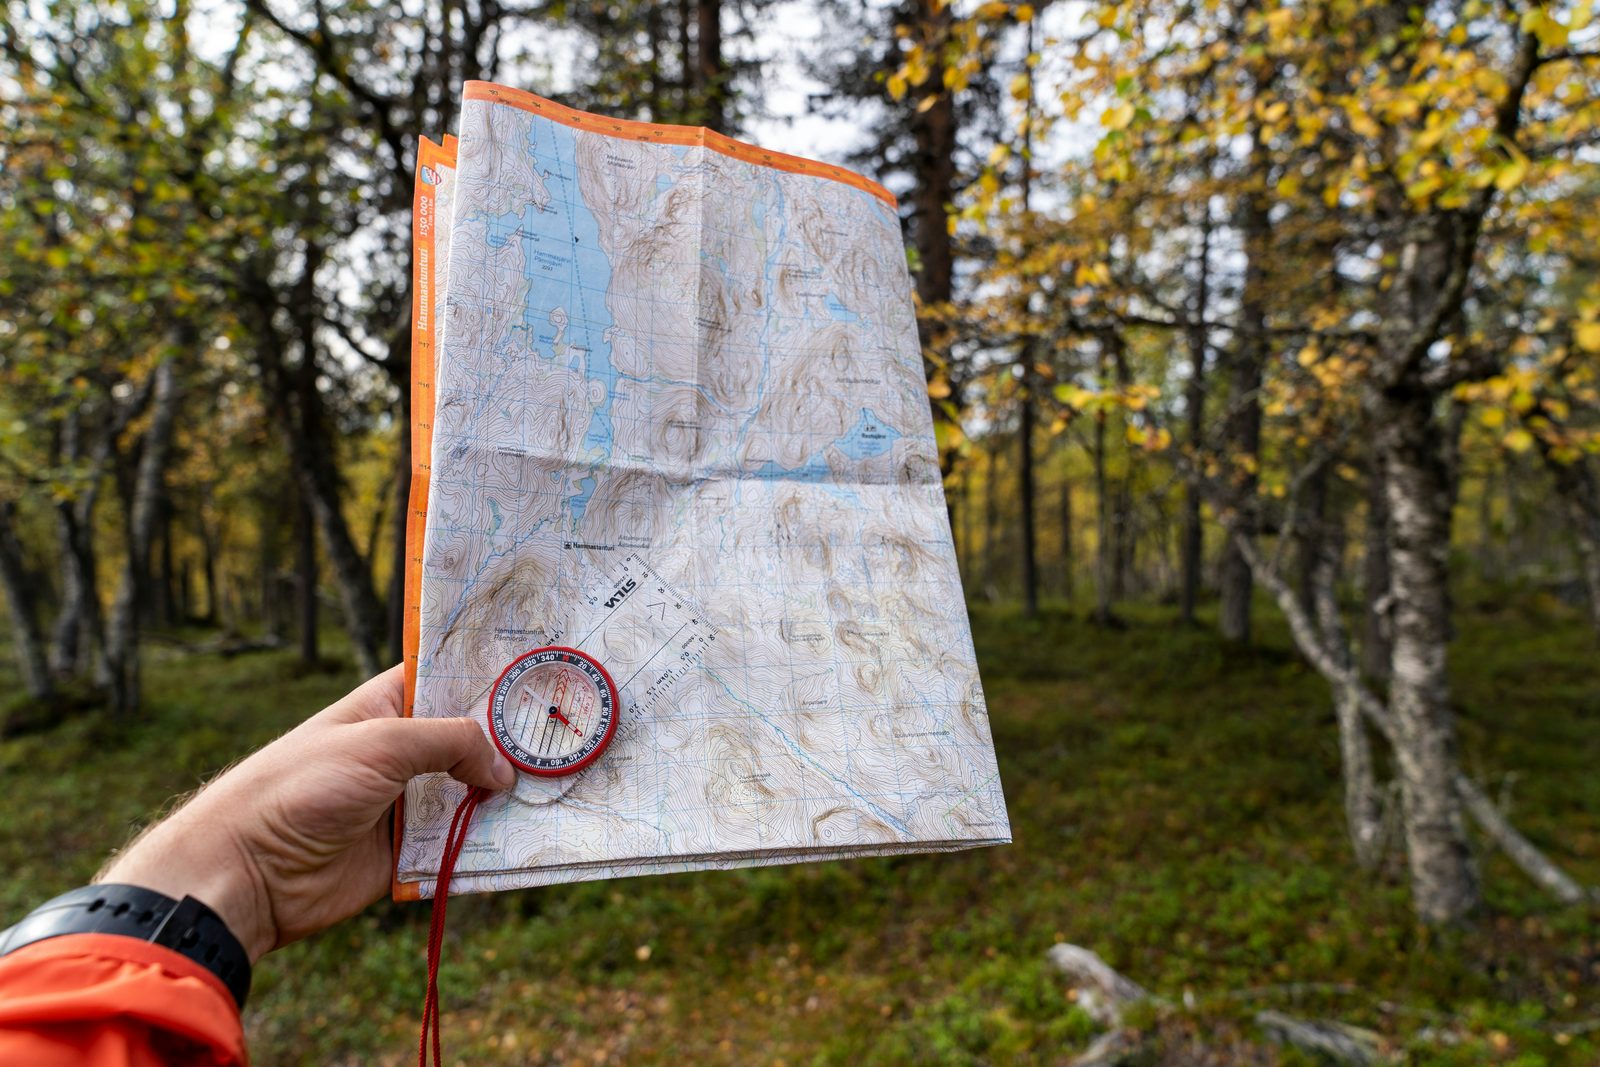
Photo: Hendrik Morkel, Unsplash.
Why a map and compass when you have a phone?
You are probably thinking: why would I need a paper map? I take out my phone, I have GPS and I can see straight away where I am. And if the battery runs out, I’ll charge it.
I’m not telling you to throw your phone away. GPS works without mobile signal too, and a map downloaded offline beforehand will show you where you are more precisely than any compass. The thing is, we have got used to always having a phone in our pocket. In an emergency it may turn out that this one item is exactly what we don’t have with us: it was left in the car, fell into a stream, smashed on the rocks or simply ran flat, and there are no sockets in the forest. In the cold the battery melts away before your eyes (I wrote about this in my post on the mountains in winter).
A paper map and a compass need no power and no charging. They work always and everywhere, and only stop working after a close encounter with a flame or, in the case of the compass, with a hammer 😉 Treat them like a spare wheel: you rarely need it, but when you do, you really do.
A bearing, or the angle that leads you to your target
A bearing (also called an azimuth) is the angle between north and the direction you want to walk in, measured clockwise from 0 to 360 degrees. You will find a table of directions with their bearings in the article on the cardinal directions.
The catch is in the word “north”. Because there is more than one north, and the result depends on which one you measure from:
- a geographic bearing is measured from geographic north (in the article on the cardinal directions I called it true north), that is, from the direction to the North Pole. This is the north shown by the meridians on a map;
- a magnetic bearing is measured from magnetic north, that is, from where the compass needle points;
- a grid bearing is measured from the vertical lines of the kilometre grid on a topographic map. Meridians converge towards the pole while the grid is straight, so its lines can be a few degrees off them.
On the map you measure a geographic or a grid bearing. Out in the field you walk with a compass, that is, on a magnetic bearing. The whole trick is to get from one to the other without getting confused about whether to add or subtract the declination. Don’t worry, in Poland it is always one simple sum.
The baseplate compass: what is what
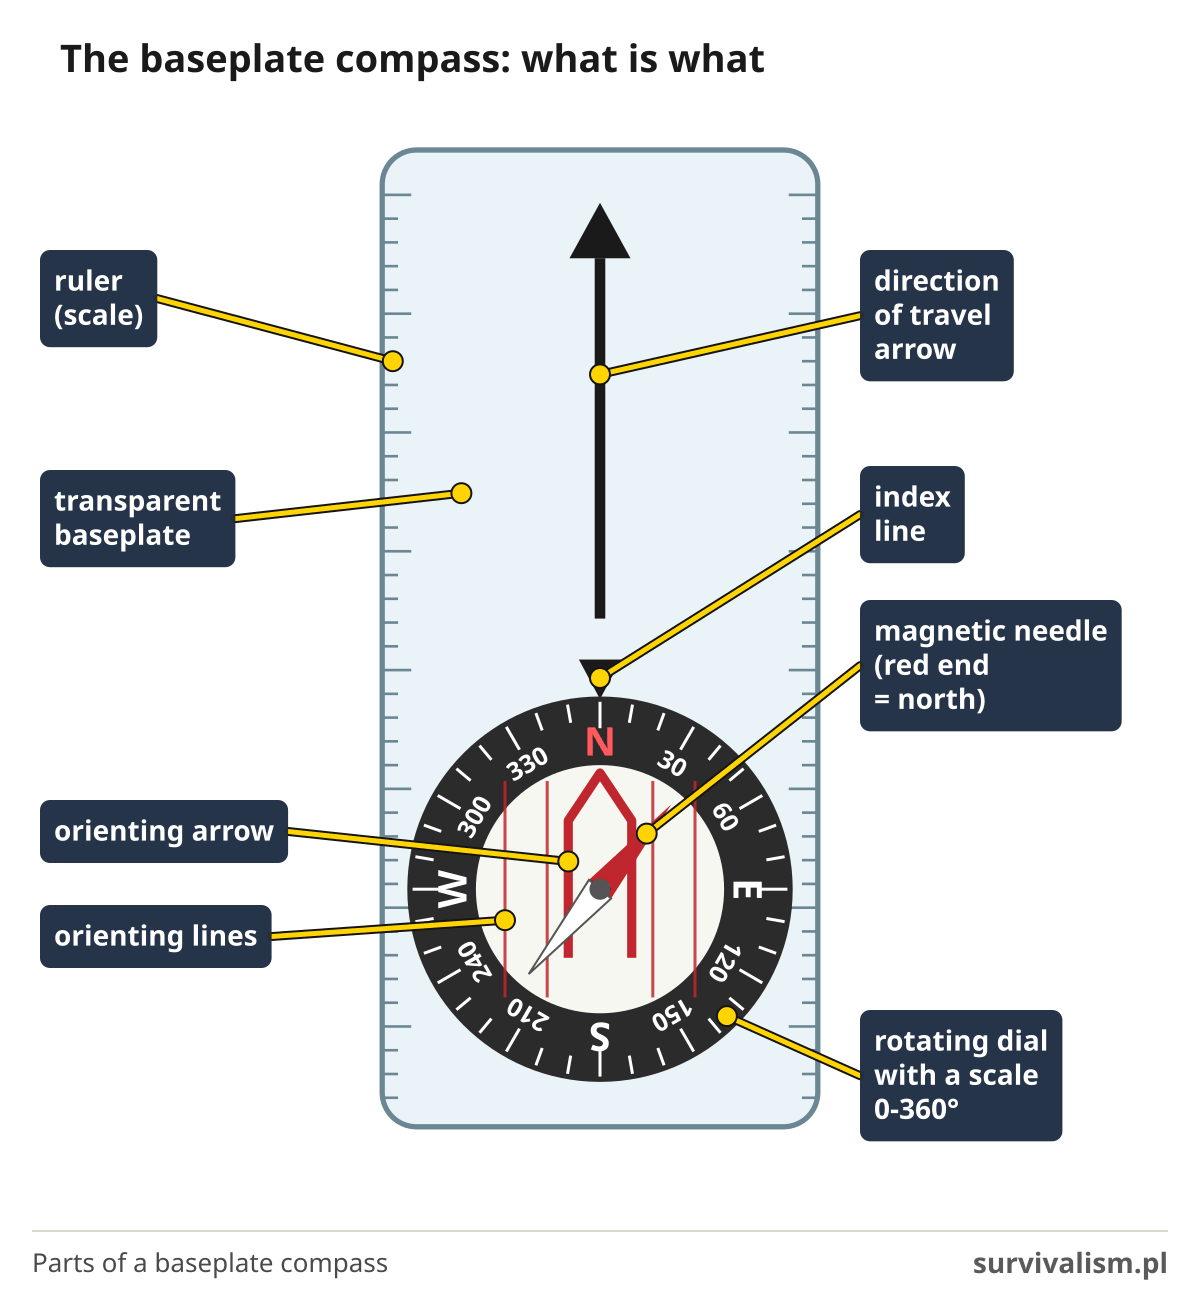
The best compass for walking on a bearing is a baseplate compass. In the article on the cardinal directions I wrote that I don’t draw a line between a compass and a sighting compass, so I won’t here either. A compass like this has everything you need:
- a transparent baseplate with a ruler, so you can see the map through it;
- a direction of travel arrow on the baseplate. This is what shows where you are going;
- a rotating dial with a scale from 0 to 360°, usually marked every 2 degrees;
- orienting lines on the bottom of the dial and an orienting arrow, often red and shaped like a gate;
- a magnetic needle immersed in liquid. Its red end points to magnetic north;
- an index line on the edge of the dial, where you read off the bearing.
A little button compass from a key ring won’t do, because you can’t set a bearing from the map on it.
Declination in Poland: small, but it’s there
A compass needle doesn’t point at the geographic pole. It lines up with the Earth’s magnetic field. The angle between geographic north and magnetic north is the magnetic declination. I described where it comes from and why it changes in the article on the cardinal directions.
In Poland the declination is small and to the east. I checked it in September 2026 in the NOAA calculator:
- Szczecin: about 5.6° east,
- the Owl Mountains (where I live): about 5.7°,
- Wrocław: about 5.9°,
- Zakopane: about 6.3°,
- Rzeszów: about 6.8°,
- Gdańsk: about 6.9°,
- Warsaw: about 7.0°,
- Białystok: about 7.8°.
The declination grows every year by about 0.1-0.14°. That sounds like nothing, but in Warsaw in 2006 it was about 4.4°, and today it is 7°. So on a map from twenty years ago you may find a value that is more than 2.5 degrees too low. Before you head out, check the current value for your area in the calculator.
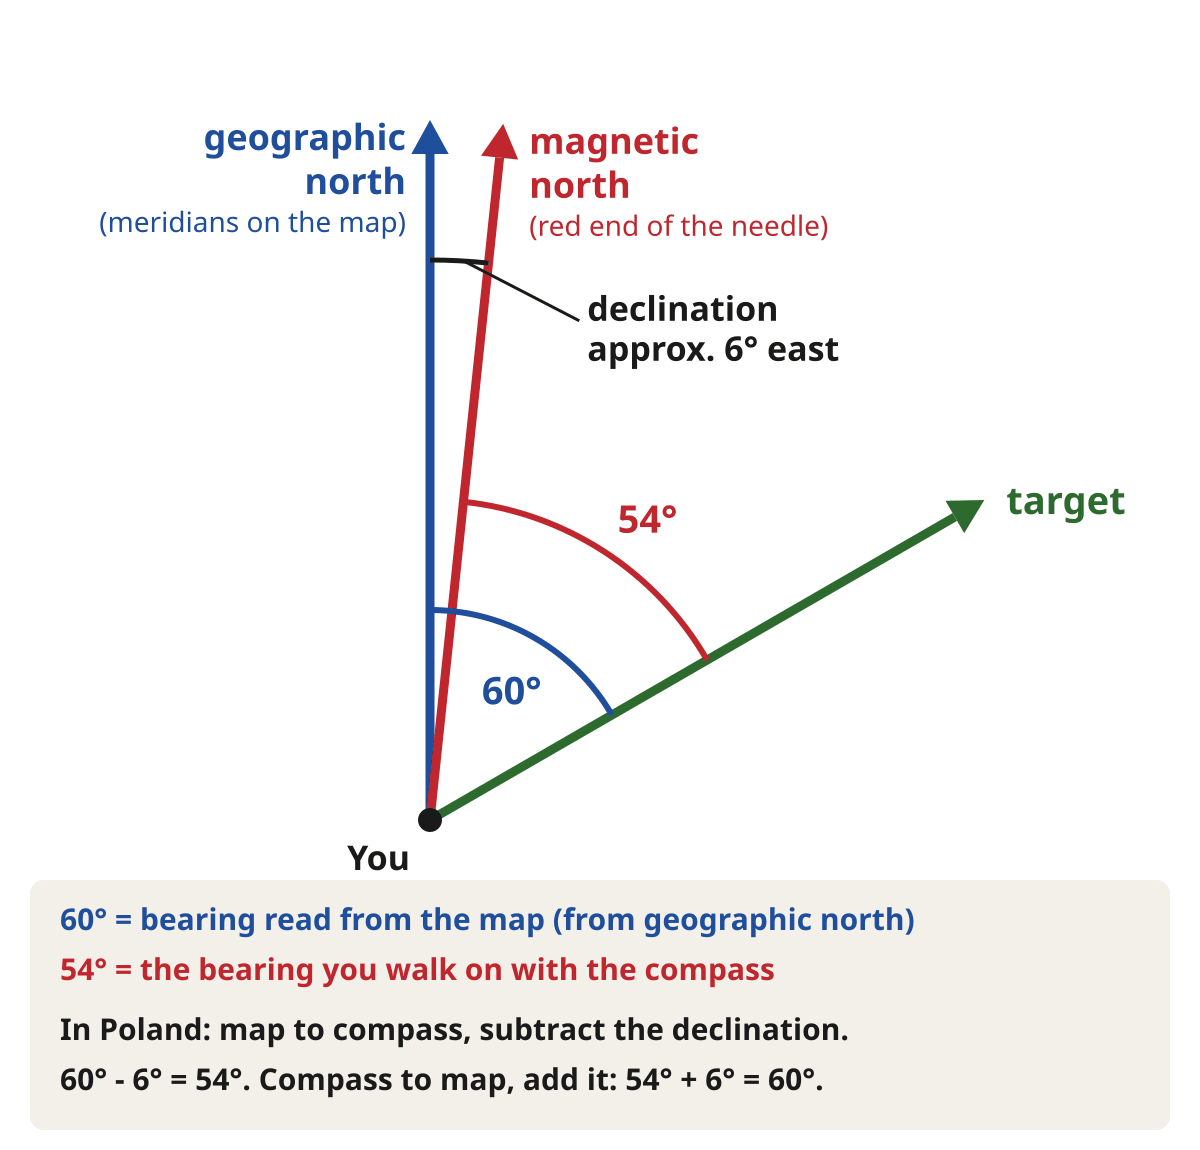
An easterly declination means that magnetic north lies slightly to the right of geographic north. Hence a simple rule:
- from map to compass: subtract the declination. The map gives you 60°, the declination is 6°, so you set 54° on the compass;
- from compass to map: add the declination. The compass shows 54°, so you transfer 60° onto the map.
But does it actually matter? Let’s do the maths. An error of one degree means drifting off by about 17 m over a kilometre of walking. Ignoring 6° of declination already means about 105 m for every kilometre. In open country with good visibility nothing will happen. In a forest and in fog, 100 m is enough to walk past a mountain hut, a bridge or a pass without even noticing.
What about the grid on the map?
If you line the compass up with the lines of the kilometre grid rather than with the meridians, there is also grid convergence to take into account. On Polish topographic maps in the 1992 coordinate system, the grid lines in the west of the country point slightly west of geographic north, and in the east slightly east of it, by up to about 3.5°. So the total correction ranges from about 4.5° in the east to as much as about 9° in the west of Poland.
The solution is simple: read the notes in the map margin. A good topographic map gives the declination there, its annual change and the grid convergence, or straight away a ready-made angle between the grid and magnetic north (the technical term is grid magnetic angle). If the map gives nothing, subtract the declination alone and walk in short legs, from point to point.
How do you take a bearing from a map?
I’m assuming you know where you are and where you want to get to. Then:
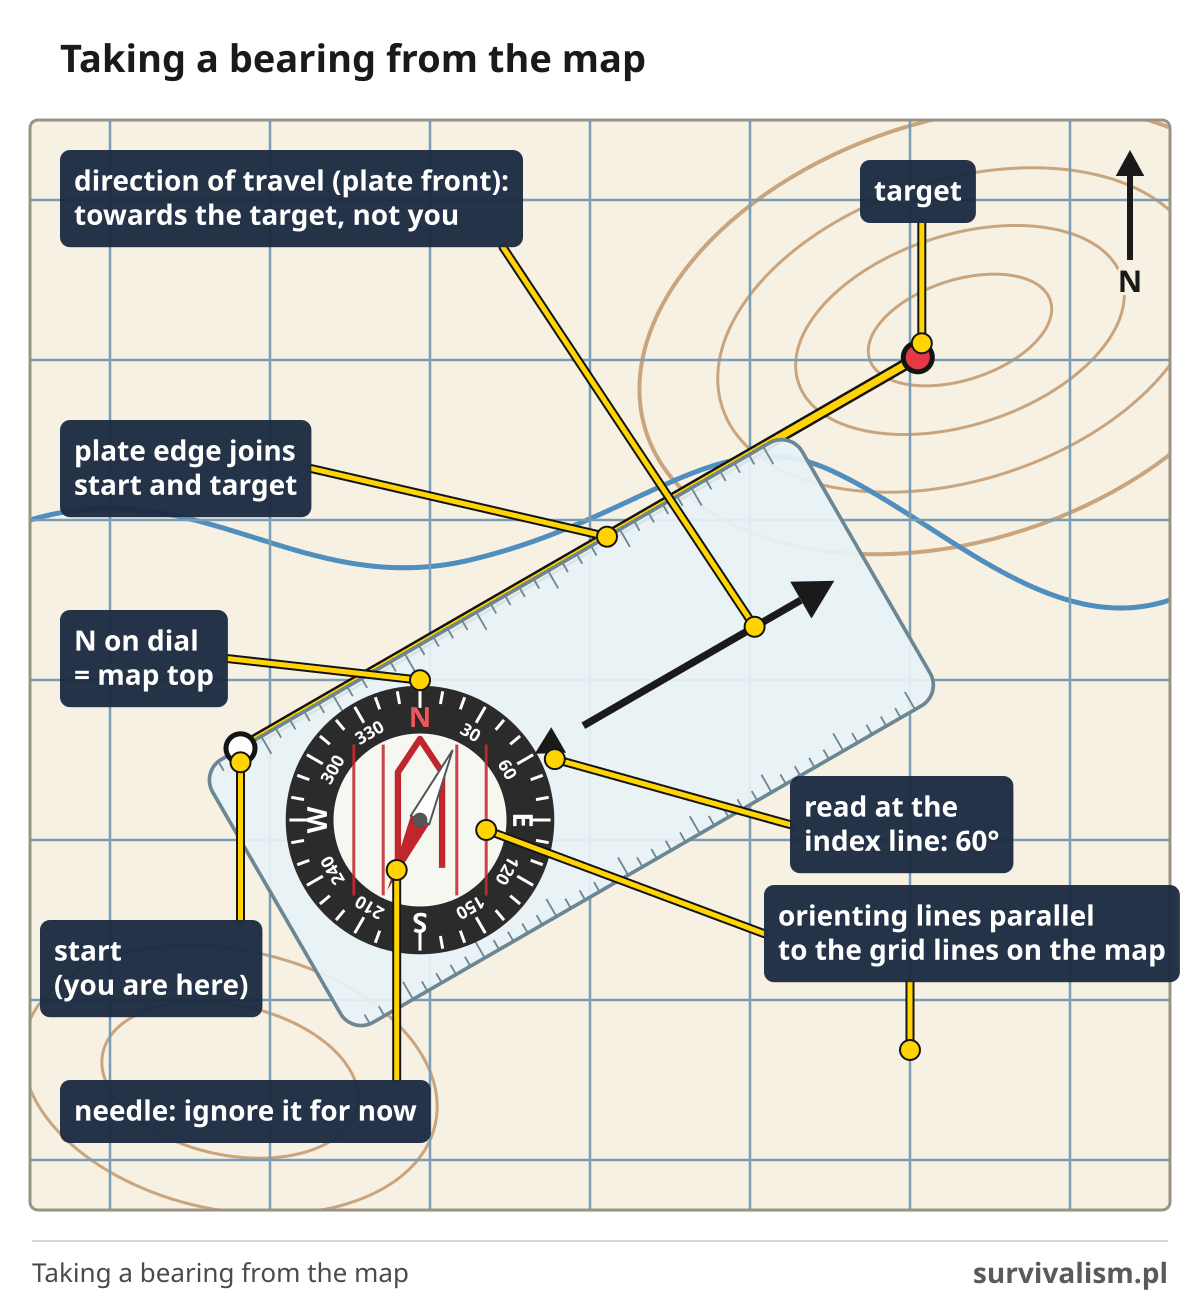
- Lay the compass on the map so that the long edge of the baseplate joins the place where you are standing with your target, and the direction of travel arrow points at the target, not at you.
- Hold the baseplate still and turn the dial so that the orienting lines are parallel to the meridians (or the grid lines) and the letter N on the dial points to the top of the map, that is, north.
- The needle doesn’t matter at this point. Don’t look at it, and you don’t need to turn the map either.
- Read the bearing at the index line, for example 60°.
- Subtract the declination and turn the dial to the result. Where I live, near the Owl Mountains, that’s 60° - 6° = 54°.
- Take the compass off the map, hold it level in front of you at waist height, and turn your whole body until the red end of the needle sits inside the orienting arrow. Remember it like this: the red car drives into the red garage 😉
- The direction of travel arrow now shows your direction.
How do you take a bearing on a landmark?
Sometimes it’s the other way round: you can see a mast, a summit or a lone tree and you want to get there before the fog hides it.
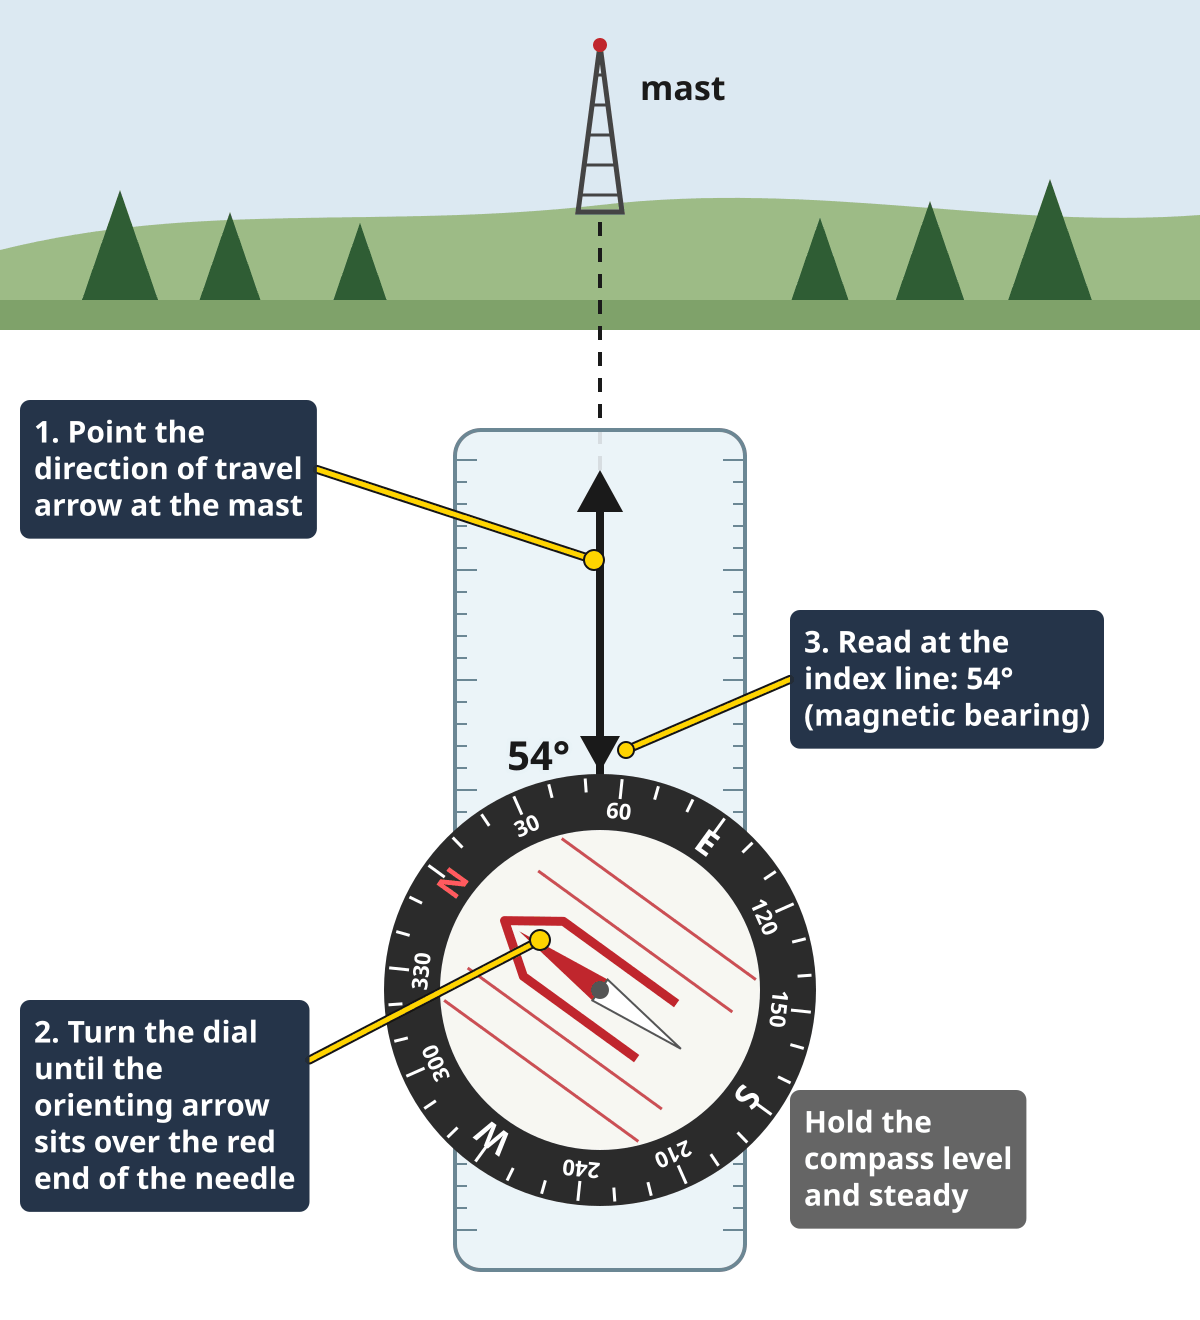
- Point the direction of travel arrow at the landmark. Hold the compass level and steady.
- Turn the dial until the orienting arrow sits over the red end of the needle.
- Read the bearing at the index line. It’s a magnetic bearing, so you can walk on it straight away, with no corrections.
- If you want to draw this direction on the map, add the declination to it.
And write the bearing down. Seriously, in pen on the map or even on your hand. After an hour of walking in fog you may no longer remember whether it was 54° or 45°.
Walking on a bearing in practice
A compass that’s set is only half the job. In the article on the cardinal directions I mentioned a 2009 study: people walking through a forest under an overcast sky walked in circles, although they were sure they were going straight. That’s why it’s not enough to glance at the compass once and set off by feel.
Walk from point to point
Don’t walk with your nose in the compass. Stop, set the direction and find something distinctive on the line of the arrow: an oddly shaped tree, a boulder, a post or a big, distinctive cactus 🙂 Something you won’t mix up with anything else as you get closer to it. Put the compass away, walk to the point whichever way suits you, and once there, check the direction again and pick the next point. In dense forest these legs may be 30 m each, in open country even a kilometre.
And what if you have reached the place where the point should be, and it isn’t there? Don’t carry on at random, because the errors from successive legs add up. Land navigation guides advise searching for it within a circle with a radius of about one tenth of the distance covered, so after a kilometre of walking, within a radius of about 100 m.
A friend out in front
What if there are no points, because it’s dark, foggy or all the trees look the same? Then the point becomes a person, if you have one “at your disposal”. Send your companion ahead, as far as you can still see them clearly, and guide them with your hand or voice (“more to the left, a bit more, stop”) until they are standing exactly on your bearing. You walk up to them and repeat. Slow, but very accurate, and at night a head torch on their head works brilliantly. This is in fact how the army does it (the US land navigation manual FM 3-25.26 recommends it).
Count double paces
You also need to know when to stop. You can measure the distance on the map with the ruler on the compass baseplate (I wrote about map scale in the article on types of maps), and out in the field you measure it out in steps.
Instead of counting every step, count double paces, that is, every second step, for example each time your left foot touches the ground. It’s easier that way and harder to lose count. One double pace is on average about 1.5 m, but everyone’s is different, so you need to measure your own:
- Find a stretch of known length. The easiest is a running track at a stadium (400 m in the first, inside lane) or a piece of straight road measured in a map app. Some running apps also work out your average stride length.
- Walk it at your normal, relaxed pace and count the double paces.
- Do it 2-3 times, take the average and convert it to 100 m.
Most adults get about 60-70 double paces per 100 m on the flat. Just remember that out in the field this number goes up. Uphill, in mud, snow and long grass, into the wind, with a heavy rucksack and in the dark you take shorter steps. Downhill, longer ones. Write down your result from the track and add a margin, especially in the mountains.
So you don’t lose count on a longer leg, move a pebble from one pocket to the other every 100 m, or tie a knot in a piece of string. It sounds like a scout camp game, but after four hundred double paces you really don’t remember whether you moved the pebble three or four times 😉 A handier version of the knotted string is a cord with beads: you slide one along every 100 m.
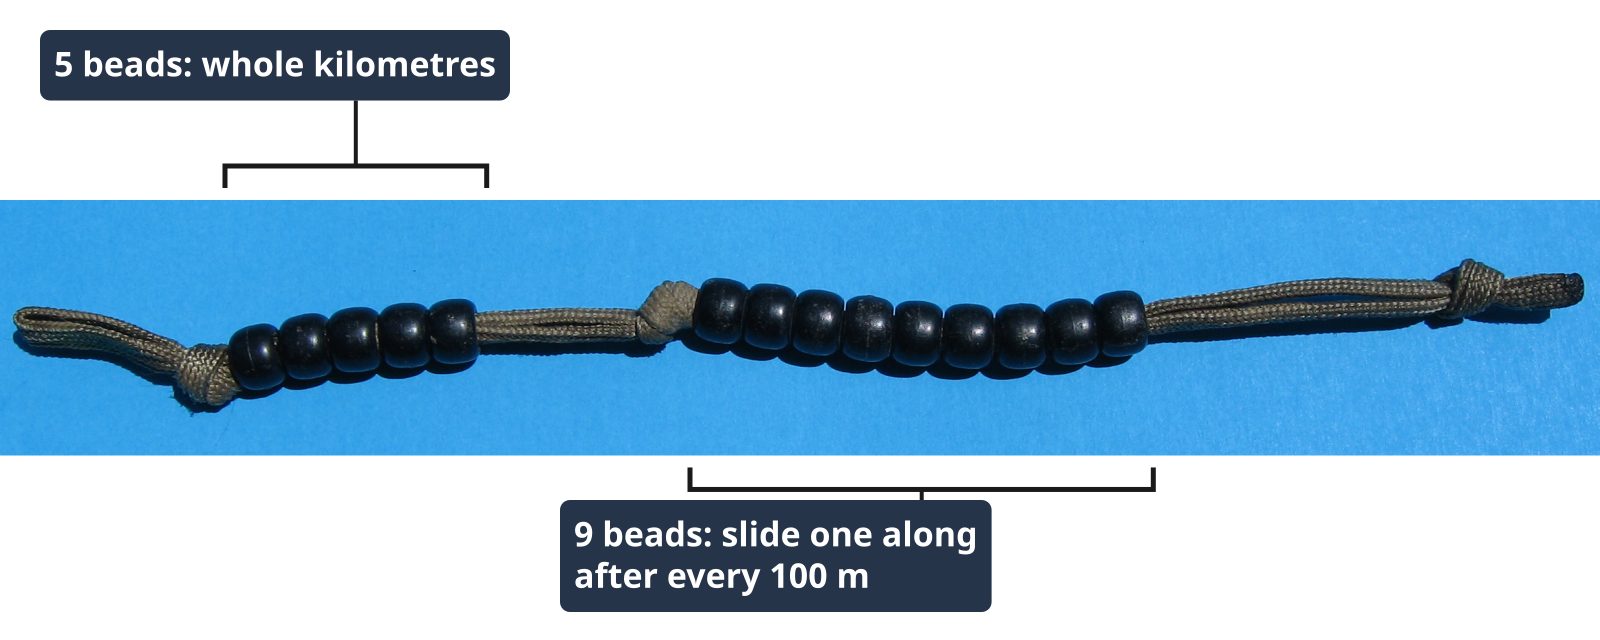
Photo: Leonard J. DeFrancisci, Wikimedia Commons, licence CC BY-SA 3.0 (modified: labels).
An obstacle in the way
Sooner or later you will come across something you can’t cross head-on: a bog, a dense thicket of young trees, a ravine, a fence. There are two ways to deal with it.
If you can see the other side, pick a distinctive point beyond the obstacle, exactly on your bearing. Go round the obstacle whichever way suits you, walk to that point and carry on. Estimate the width of the obstacle and add it to the distance covered.
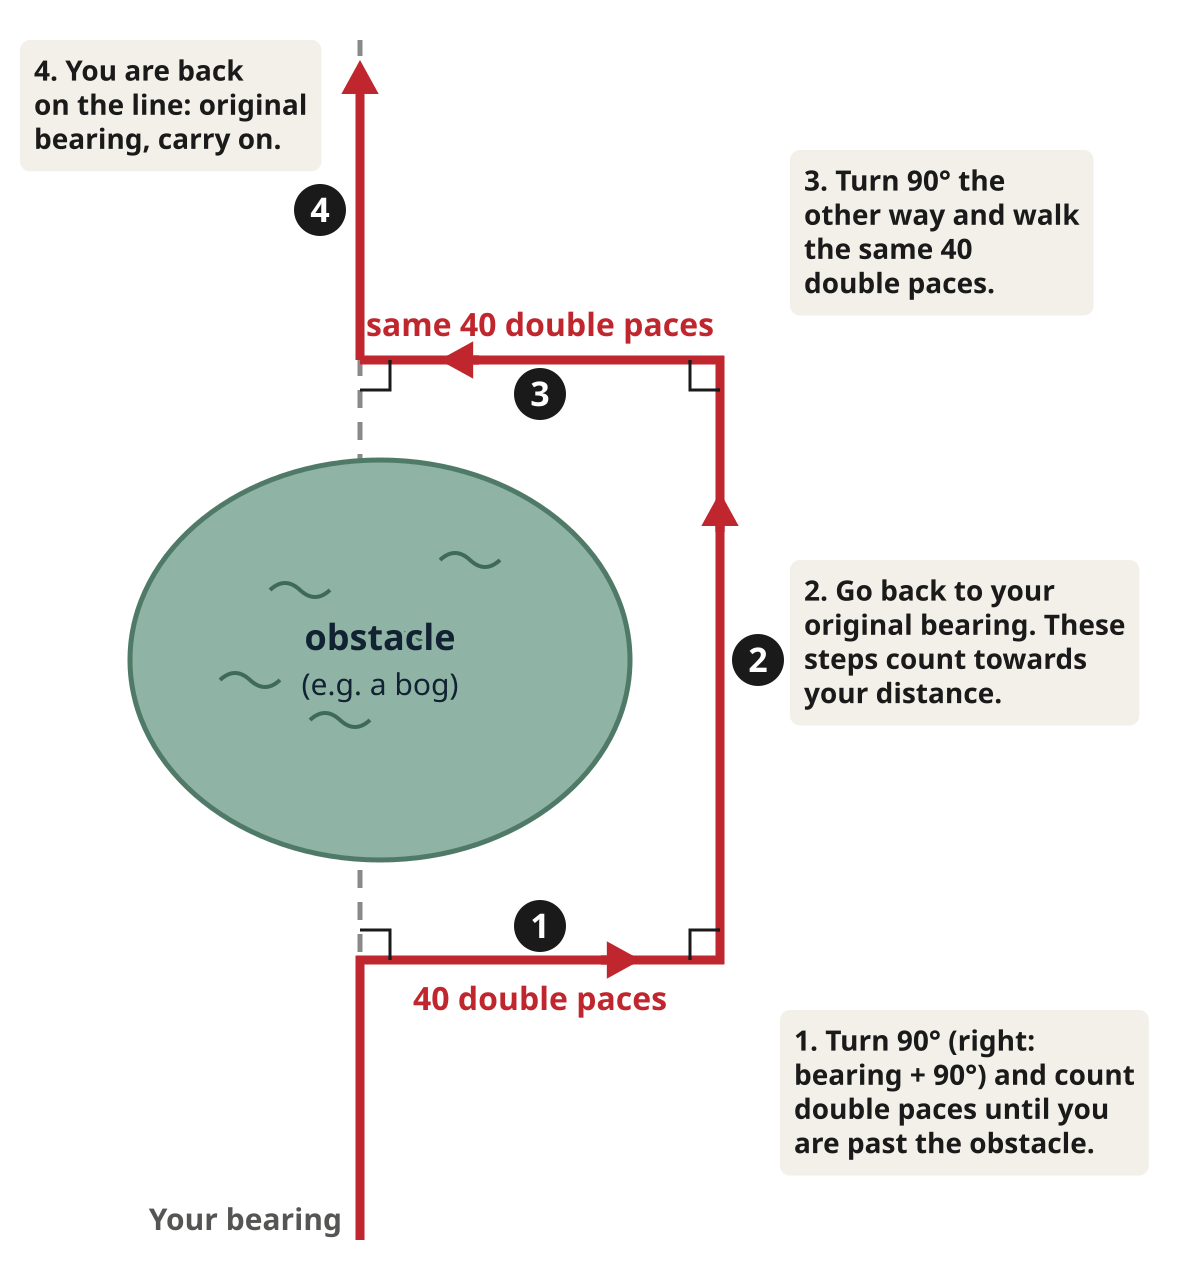
If you can’t see the other side (forest, fog), make a right-angled detour:
- Turn 90° (to the right, that is, add 90° to the bearing, or to the left, that is, subtract 90°) and walk along the obstacle, counting double paces, until you are past it. Let’s say it came to 40 double paces.
- Go back to your original bearing and walk until the obstacle is beside you and behind you. Count these steps towards your distance as normal, because you are walking in the right direction.
- Turn 90° the other way and walk exactly the same 40 double paces.
- You are back on your line. Set your original bearing and carry on.
It’s quite a lot of bother, but without it, after just one bog you are a few dozen metres off your line and don’t even know it.
A look over your shoulder: the back bearing
A back bearing is the direction exactly opposite to yours. If your bearing is less than 180°, add 180°. If it is more, subtract 180°. For 54° you get 234°.
Firstly, it’s a great check. When you reach the next point, turn round and take a bearing on the place you set off from (if you can still see it). Do you get 234°? You are on track. Do you get 244°? That means you were walking on 64°, not 54°, so you were drifting to the right, and you know by how much.
Secondly, the back bearing will lead you back. On a baseplate compass you don’t even need to change anything: walk so that the white, south end of the needle is in the orienting arrow instead of the red one.
Getting “lost” on purpose: the bridge trick
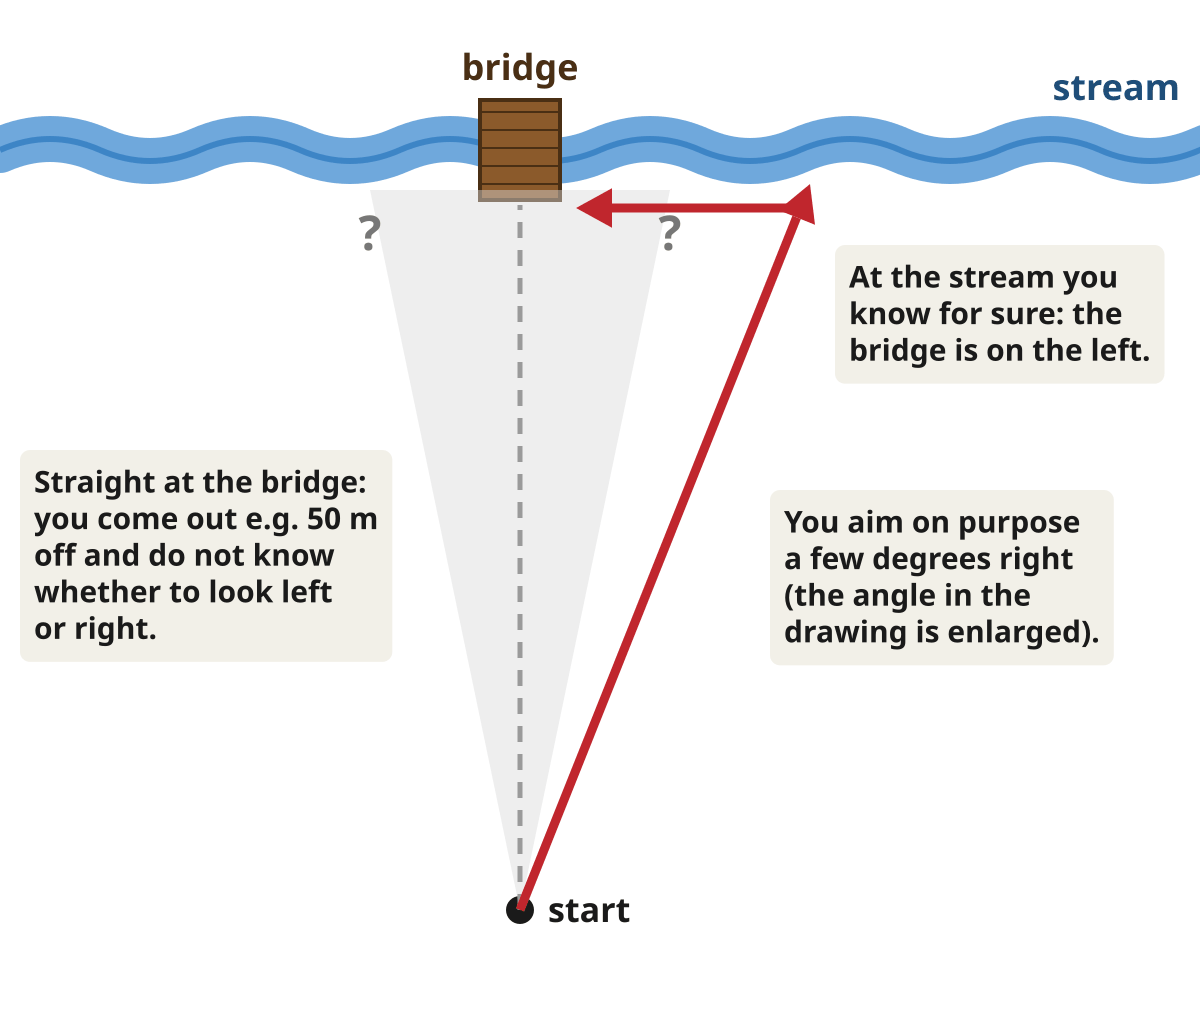
Let’s say you are heading for a bridge over a stream. Even if you walk carefully, you may hit the stream 50 m away from the bridge and not know whether to look for it to the left or to the right. That’s why you aim a few degrees off on purpose, for example to the right. When you reach the stream, you know for certain that the bridge is to your left. The same works with a trail, a road, a ridge or the edge of a forest: you don’t have to hit the point, it’s enough to hit the line.
The most common mistakes
- Metal and electronics near the compass. A phone, keys, a knife, a water bottle, a belt buckle, a car - all of these can deflect the needle. Step away from the car and put your phone in a different pocket.
- A magnet in the phone case. A strong magnet can remagnetise the needle permanently, and the red end will start pointing south. Don’t carry the compass together with a phone in a magnetic case, and before an important trip compare it with the Sun or with a second compass.
- The arrow pointing the wrong way. Put the compass on the map the wrong way round, or line up the white end of the needle with the orienting arrow instead of the red one, and you will walk in exactly the opposite direction. A kilometre the wrong way means two kilometres to make up.
- Declination with the wrong sign. Add it instead of subtracting it, and instead of a 6° error you have 12°, which is more than 200 m per kilometre.
- A tilted compass and rushing. The needle rubs against the housing and stops wherever it likes. Hold the compass level, wait for the needle to settle, and check the reading twice.
- Drifting. You pass every tree on the same side, you edge slightly down the slope because it’s easier, or you trust your gut more than the compass. In my view, when the compass says something different from your gut feeling, the compass is almost always right (unless it’s lying next to an axe ;)).
An exercise for a Saturday afternoon
You won’t learn to walk on a bearing from an article, any more than you will learn to swim from one. But all you need is a meadow or a playing field and an hour of your time.
- Measure your double paces on a running track or a measured stretch, as I described above.
- Check what interferes with your compass. Put it on the ground, wait for the needle to settle, and slowly bring your phone, keys and knife closer to it. See from what distance the needle starts to move. You will remember this better than any warning.
- Walk a triangle. Put something easy to see on the ground, for example a hat. Walk 50 double paces on a bearing of 0°, then 50 double paces on 120°, and finally 50 double paces on 240°. If you did everything right, you are standing next to the hat.
- Measure your error. Count how many double paces you are from the hat. A few metres over a route of about 225 m is a very good result, and a dozen or so is not bad for a first go either.
- Make it harder. Longer sides, then a forest, and finally dusk.
If practising in daylight isn’t enough for you, combine it with a night in the woods - in the dark, a bearing teaches you humility.
Before you leave the trail
- Take a charged phone and a power bank. The emergency number is 112, and in the Polish mountains there is also the mountain rescue number (GOPR and TOPR): 985 or 601 100 300. It’s worth having the free Ratunek app on your phone, which sends your location to the rescuers when you call for help.
- Look at the contour lines, not just the bearing. A straight line on the map in the mountains can lead over a cliff or down a steep gully. A bearing tells you which way to go, but not which way you can actually get through.
- Don’t learn in an emergency. A compass in your bug-out bag is no use to you if the first time you pick it up is in fog.
- If you get lost, stop first. Walking on a bearing works when you know where you are and where you are going. If you don’t know where you are, start with the advice from the part “What to do if you get lost?” in the article on the cardinal directions.
Finally
Walking on a bearing is one of those skills that look harder than they are. An angle, one subtraction, counting steps and a bit of patience. It does help to have a basic grasp of maths, though, so I hope you didn’t sleep through your lessons. In my view an hour in a meadow with a compass will give you more than a whole evening of reading about navigation, so since you’ve made it this far, close this page and go and practise 🙂
Or maybe you have your own ways of keeping your direction in a forest, or a story about how a compass saved your skin (or how you didn’t listen to it)? Tell me in the comments, I read them all. See you on the trail!
Leave a comment